Retail store audits sit at the uncomfortable intersection of speed and accuracy. Auditors need to move through a store quickly, checking dozens or hundreds of product lines across shelves, storerooms, and display units. At the same time, every discrepancy, a price on the shelf that does not match the master record, a stock count that does not reconcile, needs to be captured precisely and reported in a form that someone back at the office can act on.
Most teams handle this with a mix of spreadsheets, phone cameras, and voice notes, which produces an unstructured pile of data that requires manual sorting before it is useful. The auditor captures an inconsistency; it ends up in a chat or a photo roll; someone later tries to map it back to a product code and a store. By the time the exception report is ready, the information is already stale.
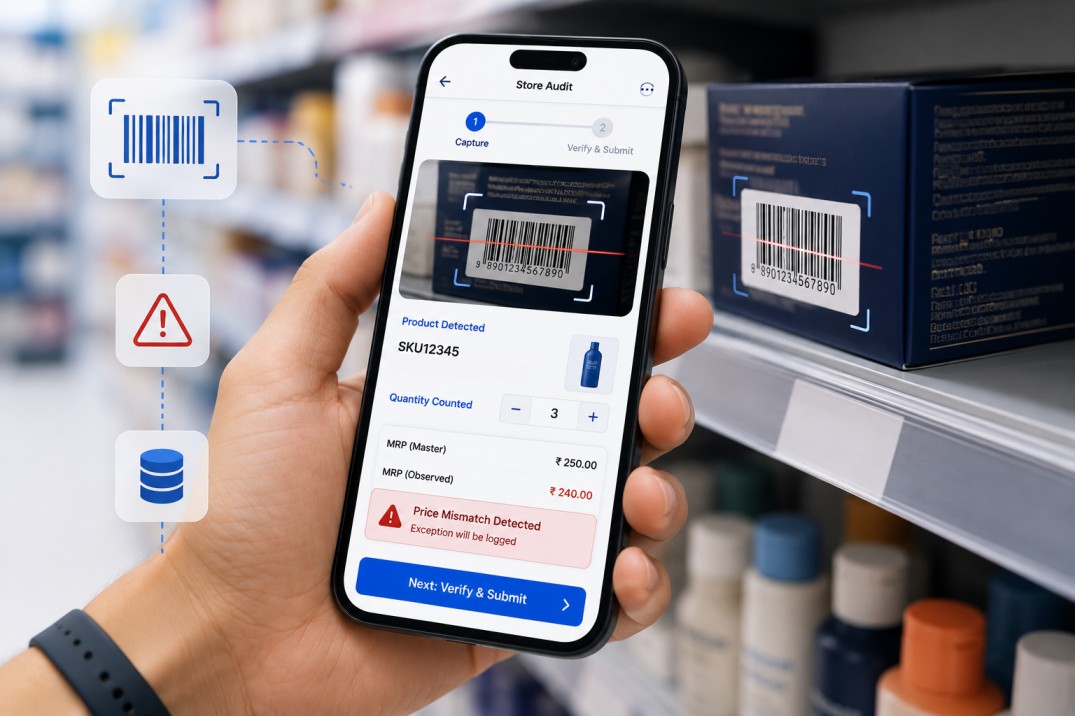
This guide walks you through building a complete in-store audit app in Clappia that supports both barcode scanning and manual product selection, automatically compares captured values against a product master, flags price and quantity mismatches at the moment of capture, and pushes a structured exception record to a separate reporting app the instant the auditor saves. The result is an audit trail that is complete, accurate, and ready for reporting without any post-processing step.
This setup applies to any organisation that conducts regular physical stock or compliance checks across multiple locations: FMCG distributors, retail chains, pharma companies running outlet audits, consumer goods companies verifying shelf pricing, or any field team that needs to compare what is physically in a store against what a central master says should be there.
The audit app is a two-page mobile form. Page 1 handles store identification and product capture. Page 2 handles verification and submission. Supporting it are two reference apps that supply the product and pricing data the audit form validates against, and one downstream app that receives the exception records automatically.
| App | Role |
|---|---|
| Product Master (SKU Master) | Holds product codes, descriptions, EAN codes, and prices. Queried by the audit app during both scan and manual capture modes. |
| Store Stock Reference (optional) | Holds store-level stock data for cross-checking quantity at specific locations. Referenced during manual entry. |
| Store Audit App (main) | The two-page form auditors use on site. Supports scan and manual modes, validates against master data, flags exceptions. |
| Exception Log | A lightweight app that receives a structured summary record automatically every time a price or quantity exception is recorded in the audit app. |
The exception logging is fully automated. Auditors do not take any extra step to log discrepancies. The workflow in the audit app detects whether an exception was recorded and creates the log entry without requiring any action beyond saving the form.
The Product Master is the reference app the audit form queries when a product is scanned or selected. It holds the authoritative values for price, description, and EAN code that the auditor's captured values are compared against. Create a new Clappia app and add the following fields:
| Field | Block Type | What It Holds |
|---|---|---|
| Material Code | Single Line Text | The internal product identifier used by your systems; the primary key for lookups |
| SKU Description | Single Line Text | The product name or description displayed to the auditor for confirmation |
| EAN Code | Single Line Text | The barcode number printed on the product packaging |
| MRP | Number | The master retail price for this product as recorded in your system |
| Revised MRP | Number | An updated price if the master MRP has been officially amended |
The Material Code is the field that connects everything. Scans resolve to it via EAN, and manual selections are made by choosing it directly. Once the Material Code is known, the lookup pulls description and MRP from this master. Keep this app current: if a product's master price changes and the app is not updated, the audit will flag the old MRP as an exception when it is actually correct.
Clappia also supports auto-generating an EAN from a Material Code using a formula. If your product codes follow a consistent prefix pattern, you can add a Formula block to the Product Master that calculates the EAN automatically. The formula uses the Material Code as its input, prepends your organisation's GS1 company prefix, and computes the check digit. This means auditors can look up a product by Material Code and the EAN populates without manual entry, useful when a barcode label is damaged or missing.
Create a new Clappia app for the audit. This app has two pages. Build them in order; the submit button only appears on Page 2, which prevents partial submissions.
Page 1: Store Identification and SKU Capture
Page 1 contains everything up to the point of submission: store confirmation, auditor details, and the product capture section. The product capture section is where the form's core logic lives.
Start by adding the store identification fields at the top of Page 1. These confirm which store the audit is for:
Mode Selection: Scan or Manual Entry
Below the store identification fields, add a Radio Button block labelled Capture Mode with two options: Scan SKU and Manual Entry. This single field controls which product capture section is visible. Use Display Conditions so that:
The two sections are mutually exclusive. The auditor selects the mode once per audit session and the form reconfigures itself accordingly. They can switch modes mid-audit by changing the radio selection, though in practice most audit sessions use one mode throughout.
The Scan SKU section handles barcode-driven capture. The auditor points the phone camera at a product barcode and the form resolves the scan to a product record in the master. Add the following fields inside the Scan SKU section:
Below the auto-filled fields, add two fields the auditor fills in manually after scanning:
Now add the exception detection field. Add a Single Line Text block labelled New MRP (Scan) and set a Display Condition on it so it appears only when Physical MRP does not equal Master MRP. When visible, this field captures the price the auditor is actually seeing on the shelf, distinct from both the master value and the physical measurement. Pair it with a read-only warning label that says something like: Price mismatch detected. Enter the shelf price to log the exception.
Finally, add a read-only Formula block as a summary line. This block displays a text summary of the scanned product, quantity, and MRP for the auditor to confirm before moving to the next item. A simple formula for this would be:
Formula: {Product Name} | Qty: {Physical Quantity} | MRP: {Physical MRP}
This formula uses three fields: Product Name, Physical Quantity, and Physical MRP. It concatenates them into a single readable line. The auditor sees something like Shampoo 200ml | Qty: 12 | MRP: 199 as a confirmation before scanning the next item.
The Manual Entry section handles cases where scanning is not possible: damaged barcodes, loose items, or products that are not in the master's EAN list but can be identified by their material code. It uses a dependency lookup rather than a barcode scan to identify the product.
Add a Get Data from App block labelled Select Material Code. Configure it as a searchable dropdown that queries the Product Master by Material Code. When the auditor selects a material, the following fields auto-fill:
The manual entry section also performs a second lookup that the scan section does not: a store-level stock comparison. Add a second Get Data from App block labelled Master Stock Data. Configure it to query a Store Stock Reference app using two values as its lookup keys: the Store Code (auto-filled from the store identification at the top of the form) and the Material Code selected above. This lookup auto-fills:
Note: the Store Code field used as one of the two lookup keys may be set as visible only to a designated support or admin user in Clappia's Display Conditions. Regular auditors do not see it, but the lookup still uses it in the background for all users. This keeps the form clean for field auditors while still enabling the store-specific stock comparison.
Below the lookups, add the fields the auditor completes:
Add Display Conditions for two inline warnings and one exception capture field:
As in the scan section, add a read-only Formula block as a summary confirmation line. Use the same pattern:
Formula: {SKU Description} | Qty: {Total Quantity} | MRP: {Physical MRP}
The formula uses SKU Description, Total Quantity, and Physical MRP to produce a single summary line. The auditor sees a readable confirmation of what they have just entered before moving on to the next product.
The audit app uses several Display Conditions to keep the form clean and show only what is relevant at each moment. Here is a consolidated view:
| What Is Controlled | Condition | Effect |
|---|---|---|
| Scan SKU section | Capture Mode = Scan SKU | Section visible; Manual Entry section hidden |
| Manual Entry section | Capture Mode = Manual Entry | Section visible; Scan SKU section hidden |
| New MRP (Scan) | Physical MRP (Scan) is not equal to Master MRP | Exception capture field appears with mismatch warning |
| Quantity mismatch warning | Total Quantity is not equal to Master Quantity | Warning label appears below quantity field |
| Price mismatch warning (Manual) | Physical MRP (Manual) is not equal to Master MRP (Store) | Warning label appears below price field |
| New MRP (Manual) | Physical MRP (Manual) is not equal to Master MRP (Store) | Exception capture field appears |
| Final audit radio and planogram link | Store has been loaded via Store Lookup | Radio and optional planogram navigation appear |
Page 2 is intentionally short. Its purpose is to create a deliberate pause between capture and submission, giving the auditor a moment to confirm their work is complete before the record is saved and the exception workflow fires.
Add two elements to Page 2:
Place the Submit button on Page 2 only. In Clappia's multi-page form settings, the Submit button can be restricted to the final page, which means the auditor must navigate through Page 1 before they can save. This prevents accidental early submissions while a product capture is still in progress.
Separating verification from capture is not just a usability choice. It creates a clear moment of accountability: the auditor has reviewed what they entered and confirms it is correct before the record is locked. That declaration is part of the audit trail.
This is where the audit app becomes genuinely powerful. Instead of requiring someone to manually extract exceptions from submitted forms and compile them into a report, the workflow does it automatically at the point of save. Every time an auditor captures a price exception and saves the form, a structured record appears in the Exception Log without any additional action.
Open the app's Workflow settings and create a workflow with an On Save trigger. Add a Condition node before the actions. The condition checks:
If New MRP (Scan) is filled OR New MRP (Manual) is filled
This condition means the workflow only fires when the auditor actually recorded a price exception. Normal submissions with no mismatch pass through without triggering the log entry, keeping the Exception Log clean.
When the condition is true, the workflow executes two actions:
| Exception Log Field | Source (Scan Mode) | Source (Manual Entry Mode) |
|---|---|---|
| Date | Hidden date field from the audit app | Hidden date field from the audit app |
| Time | Hidden time field from the audit app | Hidden time field from the audit app |
| Store Name | Store Name (from Store Identification) | Store Name (from Store Identification) |
| Store Code | Store Code (from Store Identification) | Store Code (from Store Identification) |
| Material Code | Material Code (auto-filled from scan) | Material Code (selected manually) |
| Product Description | Product Name (auto-filled from scan) | SKU Description (auto-filled from lookup) |
| EAN Code | EAN Code (auto-filled from scan) | EAN Code (auto-filled from lookup) |
| Observed MRP | Physical MRP entered by auditor | Physical MRP entered by auditor |
| Total Quantity | Physical Quantity entered by auditor | Total Quantity entered by auditor |
| Remarks | Remarks from Page 2 | Remarks from Page 2 |
The Exception Log app itself requires no workflows. It is a simple receiving app: it holds whatever records the audit workflow creates. Its purpose is to give managers and analysts a clean, flat list of every price or quantity exception across all stores, without having to open individual audit submissions and search for discrepancies.
A second workflow is also useful: an On Review trigger. Configure it with a condition of submission status equals Update. When this condition is met, the workflow creates another entry in the Exception Log (using the same field mappings above) and then reverts the original audit submission's status to its previous value. This covers the scenario where a reviewer updates a submission after the initial save, such as correcting a price entry after speaking with the store manager, and ensures the updated data also gets pushed to the log.
How an Audit Session Flows from Start to Finish
With all the components in place, here is what a complete audit session looks like from the auditor's perspective:
Configure user permissions at the app level. The recommended structure for an audit workflow is:
| Role | Access Level | What They Can Do |
|---|---|---|
| Field Auditor | Submit Only | Complete and submit audits; view own past submissions |
| Area Manager | View Only | Review all audit submissions and exception log entries for their region |
| Support User | View and Edit | Access the Store Code reference field; assist with data corrections |
| Admin | Full Access | Manage the Product Master and Store Stock Reference; configure workflows; access all submissions |
Retail store audits frequently happen in environments with poor or no connectivity: back-of-store storerooms, basement stockrooms, or large warehouse retail formats. The Clappia mobile app, available on Android and iOS, runs in offline mode. Auditors can scan barcodes, select products from the manual lookup, enter quantities and prices, and complete the verification page entirely without a network connection. The submission queues locally and syncs when connectivity returns, at which point the exception logging workflow fires automatically.
For offline lookups to work, the Product Master and Store Stock Reference data must be cached on the device. Auditors should open the Clappia app on Wi-Fi before entering the store so the reference data is available for offline queries during the audit.
Once audits are running, Clappia's Analytics feature builds live dashboards from both the audit submissions and the Exception Log. Useful views for a retail audit operation include:
The Exception Log in particular is designed to be the primary reporting surface for pricing discrepancies. Because each exception record is a flat, structured row with store, product, EAN, observed price, quantity, and remarks, it can be filtered, grouped, and charted directly inside Clappia without any export or transformation step.
A barcode-based retail audit app built in Clappia handles the full capture and exception logging cycle in a single mobile form. Scan mode handles products with readable barcodes by resolving EANs to product records instantly. Manual entry mode handles everything else by letting auditors search by material code and compare against store-level stock data. Both modes detect price mismatches automatically and surface a dedicated exception capture field when a discrepancy is found.
The exception logging workflow removes the biggest friction in traditional audit processes: the manual work of extracting discrepancies from raw form data and turning them into a report. Every price exception is written to a separate log app automatically at save, with a complete set of structured fields that are ready for filtering, aggregation, and management review without any additional handling.
The same pattern applies to any field audit process that involves comparing captured values against a master record and needs to automatically flag and report discrepancies: pharmaceutical shelf audits, FMCG promotional compliance checks, equipment condition assessments, or any scenario where the auditor captures observed data and the system needs to tell them when something is out of line.
To get started, create your Product Master in Clappia and build the audit app following the steps above. The barcode scanner, master comparisons, and exception logging workflow are all standard Clappia features that require no coding to configure.
L374, 1st Floor, 5th Main Rd, Sector 6, HSR Layout, Bengaluru, Karnataka 560102, India
3500 S DuPont Hwy, Dover,
Kent 19901, Delaware, USA


.svg)




3500 S DuPont Hwy, Dover,
Kent 19901, Delaware, USA
L374, 1st Floor, 5th Main Rd, Sector 6, HSR Layout, Bengaluru, Karnataka 560102, India

.avif)