
When a company rolls out a new sales app to a network of field agents, the first few weeks generate a flood of informal requests: agents who cannot log in, agents who are not sure if the app is right for their device, and agents who never received the activation code they need. Without a structured way to capture these interactions, the support team is working from memory and chat messages rather than a consistent record.
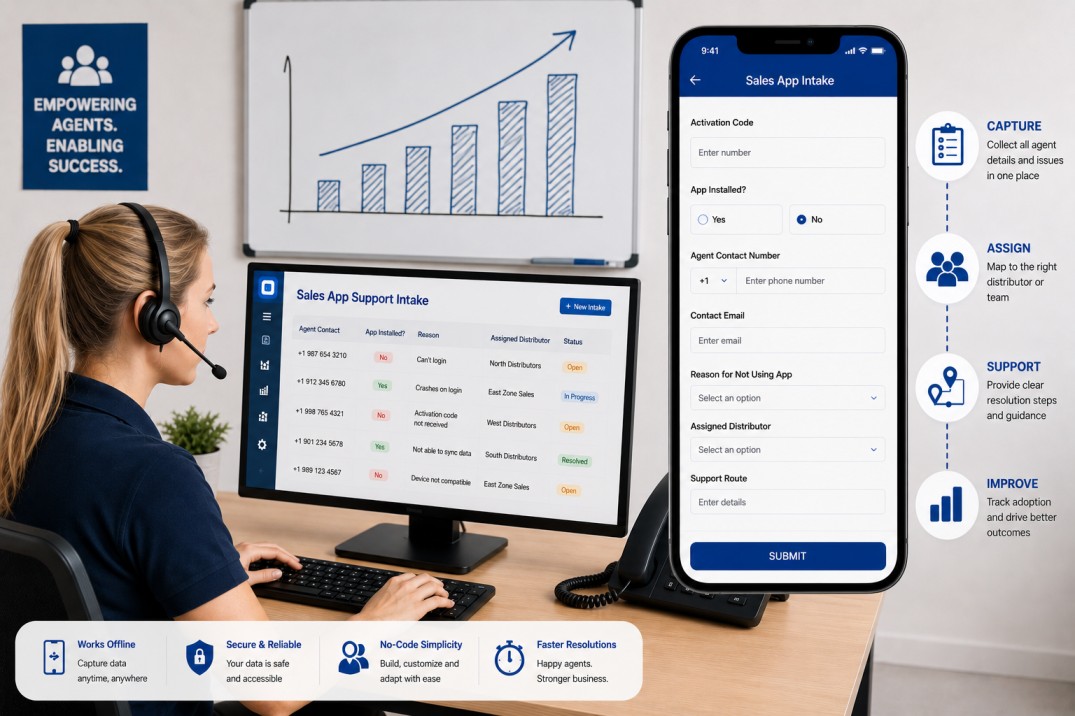
A simple intake form built in Clappia solves this. In Clappia, you build forms by adding blocks, which are individual field types such as a phone number input, a Yes/No toggle, or a dropdown. The form described in this guide captures everything a support coordinator needs to handle one agent interaction: whether the app is installed, who the agent is, why they are not using it if applicable, which distributor is responsible, and what support steps to follow. The whole form can be built in under an hour and runs on any phone without a technical background required.
The steps below reflect a specific working configuration. You can follow them exactly or use them as a guide, adjusting field names, dropdown options, and section layout to match your organisation's terminology and process.
The form is a single page with seven fields organised into sections. Four sections are expanded by default so the most immediate fields are visible the moment the form opens. Three sections are collapsed by default and expand on tap, keeping the form uncluttered for the majority of interactions where those fields are not needed. The form has no automated workflows: it captures and stores data for manual follow-up.
| Field | Block Type | Required | Default State |
|---|---|---|---|
| Activation Code | Number | No | Expanded |
| App Installed? | Yes/No | No | Expanded |
| Agent Contact Number | Phone Number | Yes | Expanded |
| Contact Email | Single Line Text | No | Expanded |
| Reason for Not Using App | Radio Button | No | Collapsed |
| Assigned Distributor | Radio Button | Yes | Collapsed |
| Support Route | Multi-Line Text | Yes | Collapsed |
Step 1: Create the App in Clappia
Log in to Clappia and create a new app. Give it a name that your team will recognise, such as Sales App Intake or Agent Support Form. Once you are in the form builder, you will see an empty canvas where you add blocks. Each block becomes a field in the form.
This form uses a single section, meaning all seven fields sit on one page with no tabs or multi-step navigation. In Clappia, a section is a labelled grouping of fields. You can name this section something like Agent Details or leave it with a generic label. The section name appears as a heading above the fields when the form is filled in on a phone.
Step 2: How to Add and Configure Each Form Field
Field 1: Activation Code
Add a Number block and label it Activation Code. This captures a numeric authorisation code that some agents need to access the sales app. Leave it optional by keeping the Required toggle off. There is no minimum or maximum value constraint needed; any numeric input is valid. This section should be expanded by default so the field is immediately visible when the form opens.
Field 2: App Installed?
Add a Yes/No block and label it App Installed?. In Clappia, a Yes/No block displays as two chips on mobile, one for Yes and one for No, making selection a single tap. Leave this field optional. It records whether the agent has the sales app installed on their device, but it is not required because the status may be genuinely unknown at the time of intake. This section should also be expanded by default.
This field is independent of the others in this configuration. It does not show or hide other sections based on the answer. If you later want the Reason for Not Using App section to appear only when the answer is No, you can add a Display Condition to that section, but this is not required for the form to work.
Field 3: Agent Contact Number
Add a Phone Number block and label it Agent Contact Number. A Phone Number block in Clappia displays a country code selector alongside the number input and validates that the format matches the selected country. Mark this field as required by enabling the Required toggle in the block settings.
In the block settings, set the default country dial code to match your primary operating region. If your network spans multiple countries, you can either leave the country selector unlocked so agents choose their own, or create a separate version of the form per region with the correct default locked in. This field is the primary identifier for the record and is the one your team will use to follow up with the agent, so getting the phone format right matters.
Field 4: Contact Email
Add a Single Line Text block and label it Contact Email. Leave it optional. This is a secondary contact method for agents who can be reached by email. If you want to catch obvious typos, add a Validation rule that checks the value matches a standard email format (containing an @ symbol and a domain). You do not need to restrict it to any specific email provider. This section should be expanded by default.
Field 5: Reason for Not Using App
Add a Radio Button block and label it Reason for Not Using App. Radio Button blocks in Clappia display each option as a chip on mobile, so the agent can select a reason with a single tap. Leave this field optional.
Add the following options to the block. These cover the most common blockers in a mobile sales app rollout. Rename or replace any of them to match the real reasons agents in your network encounter:
Configure this section to be collapsed by default. In Clappia's section settings, there is a toggle to set the default state. When collapsed, the section shows only its heading on screen. The coordinator taps the heading to expand it when the field is relevant. For agents who have the app installed and working, this section is never expanded.
Field 6: Assigned Distributor
Add a second Radio Button block and label it Assigned Distributor. Populate the options with the names of the distributors or regional leads responsible for agents in your network. Mark this field as required. Every submission must be attributed to a distributor so that follow-up responsibility is clear from the record.
Configure this section to be collapsed by default. The coordinator must expand it and make a selection before the form can be submitted. This deliberate extra step prevents the field from being accidentally left blank, which is important since it is a required field in a collapsed section.
Field 7: Support Route
Add a Multi-Line Text block and label it Support Route. Mark it as required. This is where the coordinator documents the escalation path or the specific internal steps to follow for this case. A Multi-Line Text block allows longer entries than a Single Line Text block, which is appropriate since support routes often involve multiple steps or team handoff notes.
Configure this section to be collapsed by default for the same reason as Assigned Distributor: it requires deliberate input from the coordinator and collapsing it reduces the chance of it being skipped. If your support routes follow short standardised codes rather than descriptive text, you could replace this with a Radio Button block listing the possible routes instead.
In this form, three fields are required: Agent Contact Number, Assigned Distributor, and Support Route. In Clappia, a required field prevents the form from being submitted if the field is empty. When a coordinator taps the Submit button with a required field blank, Clappia highlights the missing field and displays an error message. The form does not submit until all required fields are filled.
For Assigned Distributor and Support Route, which are in collapsed sections, the coordinator must actively expand those sections and fill them in. The form does not automatically expand collapsed sections when submission is attempted. This is worth communicating to coordinators during onboarding: if submission fails, they should check whether all collapsed sections have been expanded and completed.
Required fields in collapsed sections are the most common source of confusion for first-time users of this type of form. A brief instruction in the section heading, such as 'Required: expand and complete before submitting', prevents most submission errors.
In Clappia's app settings, there is an option to enable Save as Draft. When this is turned on, a Save Draft button appears alongside the Submit button in the form. Coordinators can save a partially completed form and return to it later without losing their progress.
For an intake form used during field visits, draft saving is useful when a coordinator is interrupted mid-form or when some information (such as the activation code) needs to be confirmed before the record can be completed. Drafts are saved locally on the device and sync to the server when connectivity is available.
In Clappia, user permissions are configured per app in the user management settings. For this intake form, two levels of access cover most team structures:
| Role | Access Level | What They Can Do |
|---|---|---|
| Field Coordinator | Submit Only | Fill in and submit the form; view their own past submissions; save drafts |
| Manager or Admin | Full Access | View all submissions; filter and export records; update app settings and field options |
Coordinators with Submit Only access cannot see submissions made by other team members, which is appropriate for field roles where the focus is on capturing data rather than reviewing the full dataset. Managers with Full Access can filter submissions by distributor, date, or installation status to track rollout progress across the network.
The form is built for mobile use. The Clappia mobile app, available on Android and iOS, presents the form in the same layout as the builder but optimised for a phone screen. Radio Button chips are tappable, collapsed sections expand on tap, and the Submit and Save Draft buttons sit at the bottom of the screen.
Clappia supports offline mode. If a coordinator is in an area without mobile data or Wi-Fi, they can still open the form, fill it in, and save a draft or submit it. The submission queues locally on the device and syncs automatically when connectivity returns. This is particularly useful for networks operating in areas with patchy coverage, where requiring a live connection to submit would create gaps in the data.
The configuration described above is a starting point. Every element of the form can be changed in Clappia's no-code builder:
The form is seven fields, one section, and no workflows. Creating it in Clappia involves adding seven blocks in order, marking three as required, setting three sections to ‘collapsed’, enabling draft saving in the app settings, and configuring user permissions for your team. The entire build takes under an hour.
Once it is live, every agent interaction during your sales app rollout produces a consistent, structured record with a contact number, a distributor attribution, and a documented support path. That consistency is what makes follow-up scalable when you are dealing with dozens or hundreds of agents across a distributed network.
To get started, create a new app in Clappia and follow the steps above. The form can be shared with your field team on the same day it is built.
 Get Started – It’s Free
L374, 1st Floor, 5th Main Rd, Sector 6, HSR Layout, Bengaluru, Karnataka 560102, India
3500 S DuPont Hwy, Dover,
Kent 19901, Delaware, USA


3500 S DuPont Hwy, Dover,
Kent 19901, Delaware, USA
L374, 1st Floor, 5th Main Rd, Sector 6, HSR Layout, Bengaluru, Karnataka 560102, India
.svg)


.jpg)
