

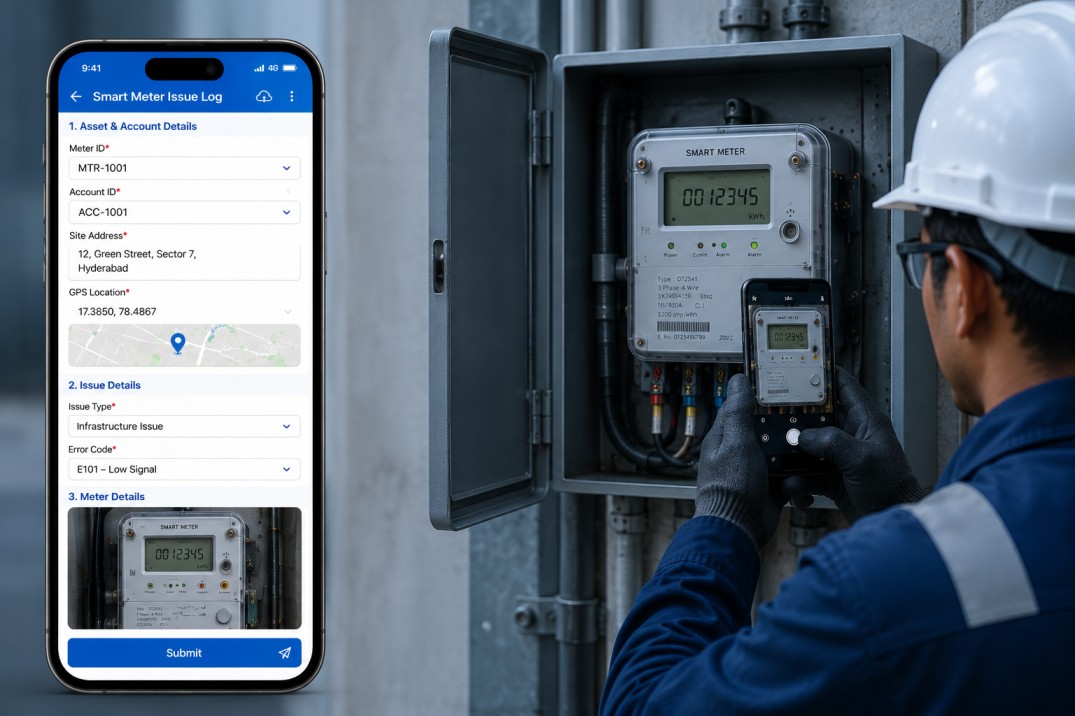
Smart meter troubleshooting eats time in ways that rarely get logged: the back-and-forth messages before a technician even leaves for a site, the extra trip caused by an incomplete report, the supervisor chasing a photo that was sent to the wrong chat, the data reconciliation that someone has to do at the end of the week because the original records did not match up. None of these delays appear in a job duration report because they happen in the gaps between the work, not during it.
This is a challenge faced across utility operations, energy distribution networks, and any organisation that manages connected metering infrastructure at scale. When you multiply these small, invisible delays across dozens of technicians and hundreds of site visits per month, the accumulated time loss is substantial, and almost none of it is necessary.
A well-configured mobile field app does not just digitise a paper form. It eliminates the sources of delay one by one: it auto-fills data the technician should not have to look up, it enforces evidence capture in sequence so nothing gets missed, it routes submissions for review the moment they are saved, and it gives supervisors a complete, verified record without asking anyone to manually compile information from multiple sources. This article explains exactly how to build that app in Clappia and which specific design decisions reduce troubleshooting time at each stage of the job.
Before looking at the solution, it is worth naming the specific delays that a structured mobile app is designed to address. Most of the time lost in smart meter troubleshooting does not happen during the repair itself. It happens in the surrounding tasks:
Looking Up Asset Details Before or During the Visit
Technicians often arrive at a site without knowing the meter ID, the communication status, or the SIM details. This information sits in a separate system, which means either someone looks it up before dispatch and sends it via message, or the technician looks it up manually at the site. In either case, it is a step that adds no diagnostic value. Any time spent searching for data that the app could retrieve in a single lookup is wasted time.
Identifying the Correct Issue Path
Not every site visit involves a meter hardware fault. Sometimes the issue is a power supply failure, a locked access door, or a network dead zone that has nothing to do with the meter itself. When technicians use a generic form or a shared spreadsheet, they often capture the same set of fields regardless of the issue type, filling in irrelevant rows and leaving relevant ones empty. This creates noise in the data and slows the reviewer's ability to make a decision.
Chasing Missing Evidence After the Visit
A technician closes a job and moves on. The supervisor reviews the record and finds the before photo is missing, or the signal reading was not entered, or the SIM replacement is documented but the photo of the new SIM was never uploaded. What follows is a message thread asking for the missing item, the technician trying to recall a visit that happened two days ago, and the record sitting in limbo until someone closes it out. Every one of these follow-up loops takes more time than capturing the evidence correctly in the first place.
Validating Component Replacements After the Fact
When a SIM or NIC is replaced, the replacement component needs to be traceable to an inventory record. If the technician typed the new SIM number from memory and got a digit wrong, or selected the wrong provider from a dropdown-free text field, the record does not match the inventory. Correcting it later requires cross-referencing logs, calling the technician, and manually updating the submission. That is a problem that validation at point of entry would have prevented entirely.
Waiting for an Informal Sign-Off
A supervisor who reviews repairs through a messaging app has to actively check the chat, piece together the evidence from scattered messages, decide whether the job is acceptable, and then communicate that decision back through the same thread. There is no record of when the review happened, who did it, or what they decided. If the submission needs to be re-examined later, the entire process has to be reconstructed from memory and chat history.
The biggest time losses in smart meter troubleshooting are not technical. They are logistical: missing data, fragmented records, and sign-off processes that have no structure. A well-designed mobile app addresses all of them at once.
The following sections walk through how a single Clappia app handles each of the friction points above. The app uses four reference apps as its data backbone. These are standalone Clappia apps whose submitted records become searchable lookups: an Asset and Account Master, a Legacy SIM Reference, a Replacement SIM Inventory, and a Replacement Meter Inventory. Together they hold the validated data the field app queries at key moments during each visit.
The first screen of the app presents two fields: a Zone or Region dropdown, and an Account ID search. The Zone Dropdown block takes a few seconds to fill. The Account ID search is where the real time saving begins.
This field is a Get Data from App block configured to search the Asset and Account Master. The moment the technician selects the account record, four fields populate simultaneously without any further input:
These fields are read-only in the app; the technician sees them as confirmation that the right account has been selected, but they cannot accidentally overwrite them. In a visit where the technician would otherwise have needed to contact the back office for meter details or dig through a shared file, the Account ID lookup replaces that step entirely.
If the meter unit itself needs to be replaced during the visit, a second optional Get Data from App block labelled Replacement Meter ID validates the new meter against the Replacement Meter Inventory before it gets logged. An Image Upload block immediately after it captures a photo of the replacement unit at the point of entry. No separate upload step, no attachment to chase later.
After the account lookup, the technician selects an Issue Type from a Dropdown block. The two options are Infrastructure or Supply Issue and Meter Hardware Issue. This single selection controls which section of the form becomes visible using Display Conditions. The irrelevant section is hidden completely, not greyed out or collapsed with all fields visible. The technician only ever sees the fields that apply to their current situation.
This matters for speed because a technician filling in only relevant fields works faster and makes fewer errors than one navigating a full form and deciding what to skip. It also means the resulting submission contains no empty fields that should have been filled in, and no filled fields that should have been left blank.
Infrastructure or Supply Issue Path
When the issue is not a meter hardware fault, this section captures everything needed in a single, unambiguous flow:
The GPS block is worth a specific mention in the context of troubleshooting speed. When a supervisor needs to confirm that a technician visited the correct site, GPS coordinates in the submission answer that question instantly. Without them, the confirmation requires a follow-up message, a reply, and someone cross-referencing the site address against the location pin that may or may not have been sent to the chat. The GPS block closes that loop at submission, not after.
Meter Hardware Issue Path
For hardware faults, the section is set to collapsed by default. The technician expands it when they are ready and works through three sequential parts: documenting the fault before the fix, recording what was replaced, and capturing the state after the fix.
One of the most common evidence gaps in meter troubleshooting records is the before state. By the time a technician completes a fix and thinks about documentation, the original error display is gone. Recreating it from memory or skipping it entirely creates a record that tells the reviewer what the meter shows now, not what caused the problem.
The before-fix section of the form is designed to be filled in while the fault is still visible, in a sequence that makes that natural:
SIM Identification Without a Call Back to the Office
Identifying the SIM currently in the meter is a step where technicians frequently lose time in the traditional model: the number is printed on the card but not in any system the technician can access, so either they photograph it and wait for someone in the back office to confirm the provider, or they guess. Neither is fast.
The app handles this with an Old SIM Lookup field, which is a Get Data from App block configured to search the Legacy SIM Reference app. When the technician enters the SIM number, the telecom provider auto-fills from the matched record. No call needed. No waiting.
For SIM cards not in the legacy reference, two fallback fields are available: a Provider Name dropdown for manual provider selection, and a manual SIM Number text field. A photo of the SIM card is captured regardless of whether the lookup succeeded, giving the reviewer a visual confirmation of what was in the meter.
| Scenario | How the App Handles It | Time Impact |
|---|---|---|
| SIM found in legacy reference | Technician enters SIM number; provider auto-fills from matched record | Zero time spent on provider identification |
| SIM not in legacy reference | Technician selects provider from dropdown and enters number manually; photo uploaded as fallback evidence | Slower than auto-fill, but still structured and verified |
| SIM number unknown | Technician photographs the SIM card and enters visible digits; manual provider selection | No call-back required; evidence captured in-form |
Two Yes/No blocks control the replacement section. SIM Replaced? and NIC Replaced? are each set to No by default. When SIM Replaced? is answered Yes, three fields appear via Display Condition: a lookup to validate the new SIM against the Replacement SIM Inventory, a photo upload for the new SIM card, and a provider selection dropdown. When NIC Replaced? is Yes, a single dropdown appears for the NIC variant, such as the colour or hardware revision that distinguishes different NIC types in your network.
The inventory validation here is doing real work beyond record-keeping. When a technician looks up the new SIM number and it is not found in the Replacement SIM Inventory, the lookup returns no result. That is an immediate signal to the technician that either the SIM number was entered incorrectly or the SIM is not a tracked, authorised replacement unit. Catching this at the point of entry takes seconds. Catching it during a post-visit audit takes much longer.
The after-fix section mirrors the before section and adds two checks specific to the end of a repair visit:
Because the before and after data live in the same submission, a reviewer can compare fault codes, signal readings, and photos side by side without opening multiple records or cross-referencing files. That is a direct reduction in review time.
In most field operations, the post-visit review is where time quietly accumulates. A supervisor needs to be reminded to check the record, needs to locate the photos, needs to form a view, and needs to communicate the outcome back to the team. Each of those steps has a waiting period attached to it.
The Clappia approval workflow removes the first three steps entirely. Configure a workflow triggered On Save with an Approval node. The settings to configure are:
The reviewer clicks the link in their notification, sees the complete submission with all photos and field values on a single screen, and selects IMAGE VERIFIED or IMAGE NOT VERIFIED. Their choice is recorded against the submission with a timestamp. The submission status updates automatically. No message thread. No manual status update. No reconstruction required if the record is reviewed again later.
A separate On Edit workflow with a passive start node is also configured, which means minor corrections to a submission, such as fixing a typo or updating a remark, do not trigger a new approval request and do not reset the review status.
Clappia's Submission Status feature tracks where every record sits in the process. The three statuses used in this workflow tell a supervisor everything they need to know about a submission's current state:
| Status | What It Tells the Supervisor | Action Required |
|---|---|---|
| SUBMITTED | The technician has saved the form. The approval notification has been sent. The record is complete and awaiting review. | Open and review; act within 7 days |
| IMAGE VERIFIED | The submitted photos have been reviewed and confirmed as clear, complete, and accurate. | None; record is closed |
| IMAGE NOT VERIFIED | The submitted photos are unclear, missing, or inconsistent with the reported data. A follow-up is needed. | Contact technician; schedule re-visit or request additional photos |
Filtering the submissions view by SUBMITTED status gives supervisors a live queue of everything waiting for review, prioritised by submission date. Filtering by IMAGE NOT VERIFIED surfaces every job that needs a follow-up. Neither of these requires opening a spreadsheet, running a query, or asking anyone to compile a report.
Smart meter sites are not always in areas with reliable mobile connectivity. Basements, remote installations, and shielded enclosures all present connectivity challenges. The Clappia mobile app, available on Android and iOS, supports offline mode: the technician fills in the complete form, uploads photos, and records GPS coordinates without any network connection. The submission queues locally and syncs as soon as the device reconnects, with no manual intervention.
The one condition for offline lookups to work correctly is that the reference app data must be cached on the device before the visit. Technicians should open the Clappia app on Wi-Fi before heading to site. The app syncs the lookup data to the device, and from that point the Account ID, Old SIM, and Replacement SIM lookups function without network access.
User permissions are configured at the app level. The recommended structure for this workflow is:
| Role | Access Level | What This Enables |
|---|---|---|
| Field Technician | Submit Only | Fill in and submit the form; view own past submissions; no access to reference app data or other technicians' records |
| Supervisor or Reviewer | View and Approve | See all submissions; receive and action approval requests; filter by zone and status |
| Admin | Full Access | Manage reference app data; configure the field app; update user permissions; access analytics |
The table below maps each friction point identified at the start of this article to the specific app feature that addresses it and describes the mechanism by which time is saved:
| Source of Delay | Feature That Addresses It | How Time Is Saved |
|---|---|---|
| Looking up asset details before or during visit | Account ID lookup with auto-fill | Four fields populated in one search; no manual lookup or call to back office |
| Navigating an irrelevant form section | Issue Type branching with Display Conditions | Only relevant fields shown; technician never needs to decide what to skip |
| Identifying SIM provider from memory or by asking | Old SIM Lookup with provider auto-fill | Provider name populated from legacy reference in the same step as SIM entry |
| Discovering a replacement SIM is not in inventory | New SIM lookup validated against inventory | Mismatch caught at entry; no post-visit audit required |
| Missing before-fix evidence | Structured before section in sequence | Evidence captured while fault is still visible; prompts before moving to replacement fields |
| Chasing missing photos or readings after the visit | Required fields and sequential form layout | All evidence fields are present and in context; supervisors see exactly what was entered |
| Waiting for informal supervisor sign-off | On Save approval workflow | Notification sent automatically; reviewer acts on full record in one click |
| Reconstructing review history | Submission status with reviewer record | Status and reviewer decision stored against submission; no reconstruction needed |
Once the app is in use, the submission data surfaces patterns that are invisible when records are scattered across spreadsheets and chat threads. Clappia's Analytics feature builds dashboards directly from live submission data. For a meter troubleshooting workflow, the most operationally useful views are:
These dashboards update in real time and are accessible directly inside Clappia to anyone with the appropriate access level. They convert the submission data collected during each visit into operational intelligence that can shorten future troubleshooting cycles across the entire team.
The entire setup, from the four reference apps to the field form to the approval workflow, is built inside Clappia with no coding. The sequence is:
From this point, every field visit generates a complete, structured, GPS-stamped, photo-verified record without any manual aggregation step between the field and the back office. The troubleshooting time reduction is not a gradual effect; it appears from the first submission.
The goal of a smart meter troubleshooting app is not to add a digital layer on top of the same slow process. It is to remove the steps between the technician's visit and a closed, verified record: the lookup call, the missing evidence, the informal approval, the data reconciliation. Each of those steps has a time cost, and a structured Clappia app eliminates most of them at the point where they would have occurred.
The setup described here applies to any organisation that manages connected assets in the field and needs a reliable, auditable record of each visit. The four reference apps, one branching field form, and one approval workflow are all that is required to move from fragmented, time-consuming documentation to a process that closes out each job the moment the technician saves the form.
You can start building in Clappia today, without any development work, and have the first version of the app in front of your team within the same session.
L374, 1st Floor, 5th Main Rd, Sector 6, HSR Layout, Bengaluru, Karnataka 560102, India
3500 S DuPont Hwy, Dover,
Kent 19901, Delaware, USA


.svg)




3500 S DuPont Hwy, Dover,
Kent 19901, Delaware, USA
L374, 1st Floor, 5th Main Rd, Sector 6, HSR Layout, Bengaluru, Karnataka 560102, India

.jpg)



.jpg)
%20inventory%20management%20.jpg)