%20(1).avif)
Most businesses track stock in some form, but the moment quantities, suppliers, product variants, and billing come together, traditional tools begin to fall short. Spreadsheets work only until multiple people need to update them. Pre-built inventory software often forces rigid workflows, making it hard to adapt the system to your own processes. As soon as your stock movement changes or your billing needs additional fields, the system stops fitting.
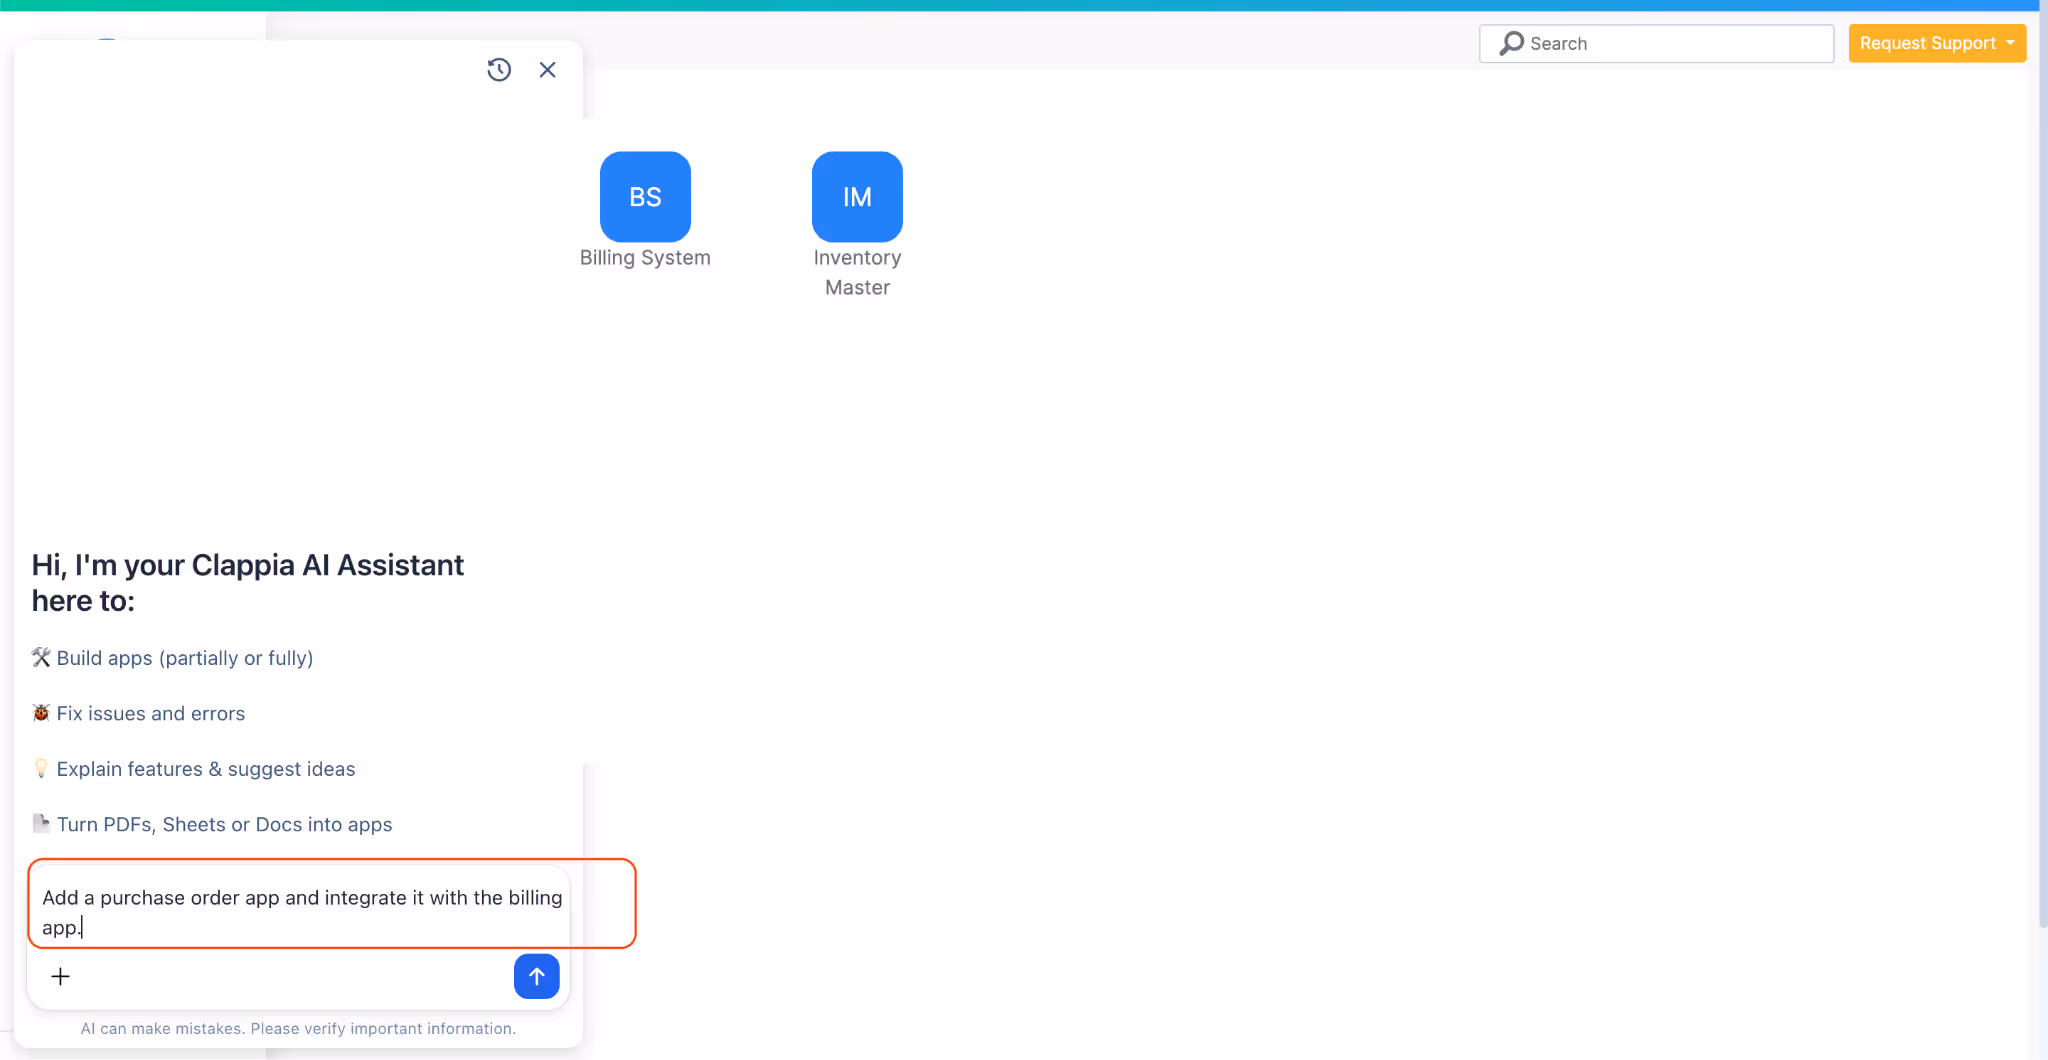
Clappia solves this by letting you build an inventory and billing system that matches your exact workflow, instead of adjusting your operations around software limitations. You can generate the starting version through Clappia’s AI chat. Simply give your instructions like “Create an inventory management system integrated with a billing system” and the AI creates the entire app for you. You can then refine it with Clappia’s no-code tools or with the AI itself. Everything stays flexible, and the structure evolves with your operations, whether you handle products, parts, consumables, or mixed stock with multiple billing rules.
You can create your inventory–billing setup in whichever method suits your workflow.
Describe what you need to the AI assistant and it will help you get started quickly. You can continue evolving your app with its help and suggestions. This method is the fastest when you want a working draft instantly.
If you prefer full control, you can build every part step by step like product details, stock adjustments, billing entries, calculations, validations, and linked data. This is useful when you already know the exact structure you want.
Some teams use Clappia’s MCP to automate app generation or create a standardised inventory template for multiple branches. You can send prompts directly from tools like Claude and let MCP create or modify apps inside your Clappia workplace automatically.
If your existing product lists, stock registers, or rate cards already live in spreadsheets, you can import them. Clappia converts the data structure into an app, and you continue building from there.
If you maintain order or stock request forms in Google Forms, you can import them and extend them with calculations, validations, linked data, and workflows to support billing and stock updates.
These entry points let you begin in whichever way is most convenient, and refine the system at your own pace.
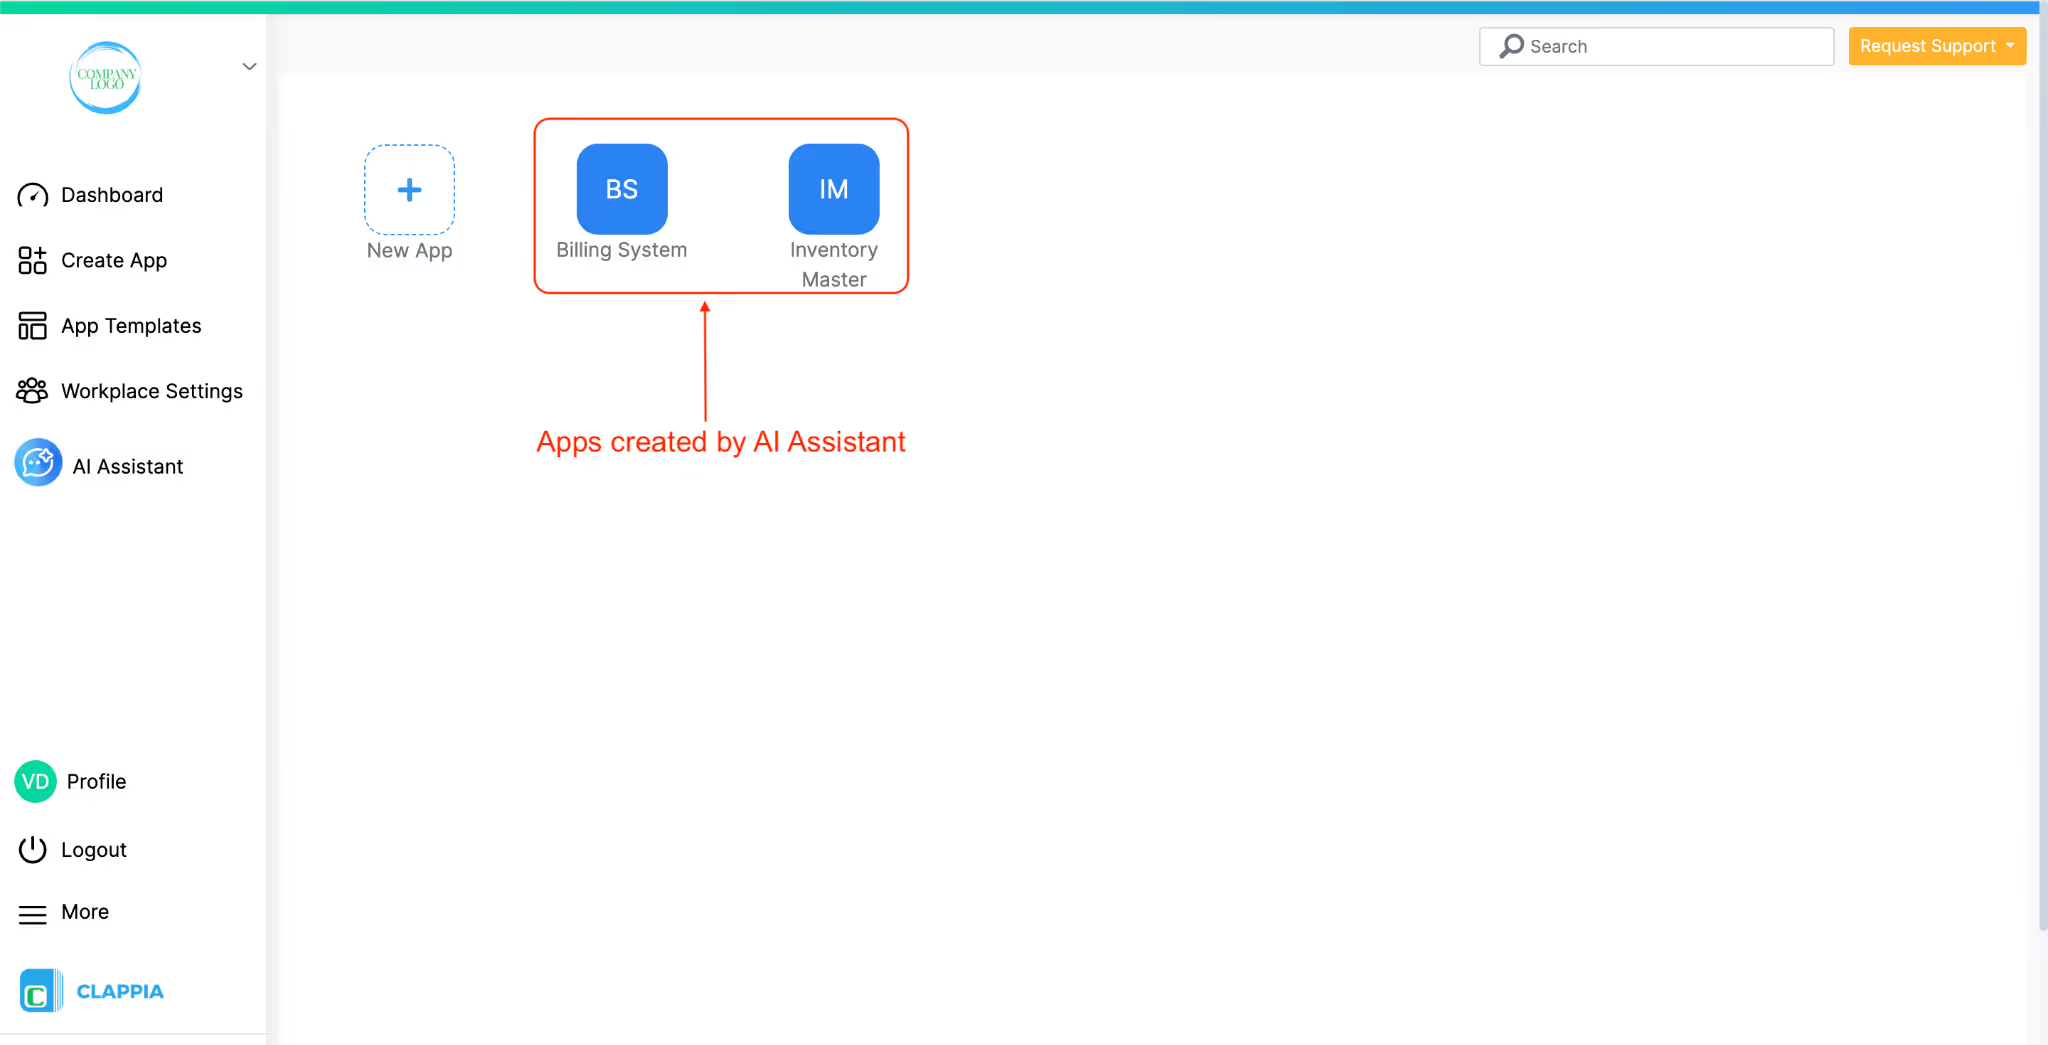
Once you decide to manage inventory and billing inside Clappia, the cleanest setup is to use two connected apps:
These two apps work together to keep your data consistent. The Inventory Master becomes your single source of truth for products, while the Billing System focuses only on sales activity and stock movement. This separation avoids errors, prevents duplication, and gives you a setup that can scale without needing to rebuild the structure every time you introduce new products, warehouses, or pricing rules.
Below is the structure that the AI chat generated, along with all the additions you can make to support your operations.
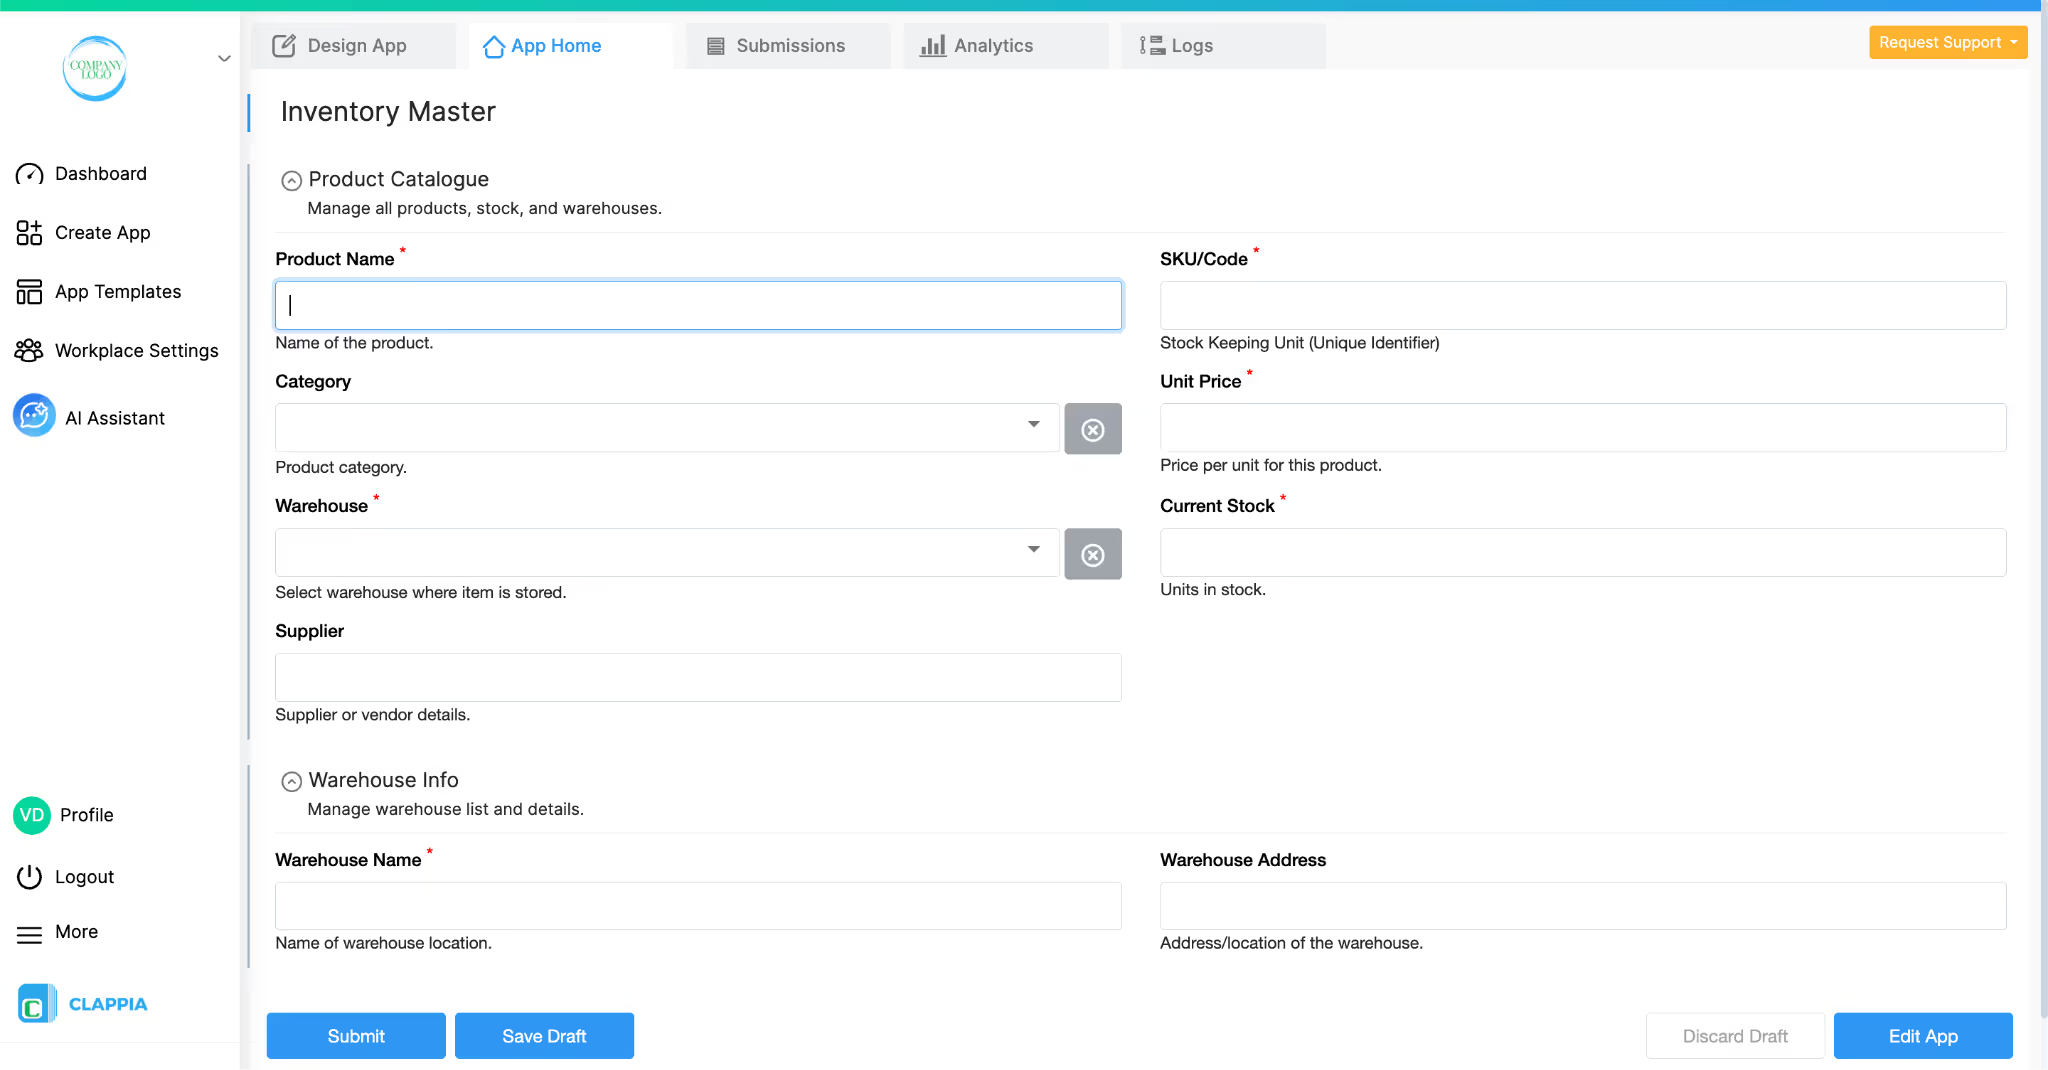
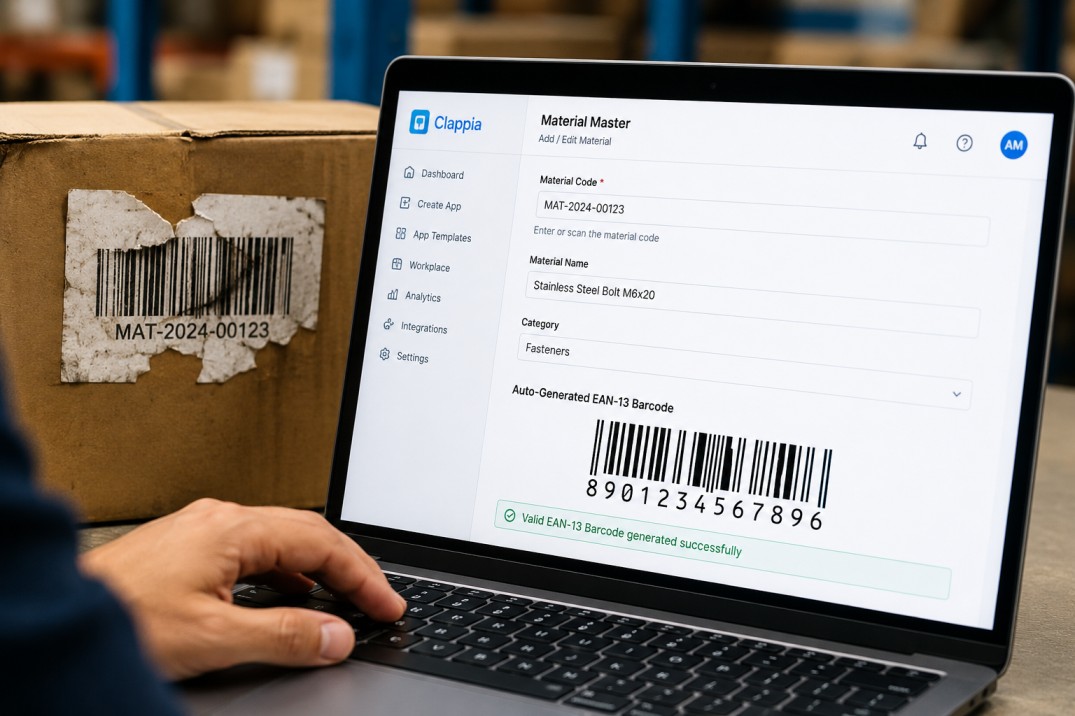
The Inventory Master is your central database for all products. It stores the product’s identity, where it sits, its pricing, and its current stock level.
Keeping this in a separate app ensures:
Because every app can pull data from every other app, this master app becomes the backbone of the entire system. You can use the Get data from other apps feature to interlink apps. If you already have existing data, maybe in a spreadsheet, you can bulk upload the entire data in one go into this app. This saves you time from manually doing this one by one.
Section: Product Catalogue
This structure covers the essentials, but you can expand it depending on how detailed your stock process is.
These additions help the Inventory Master double as a reference database for downstream processes.
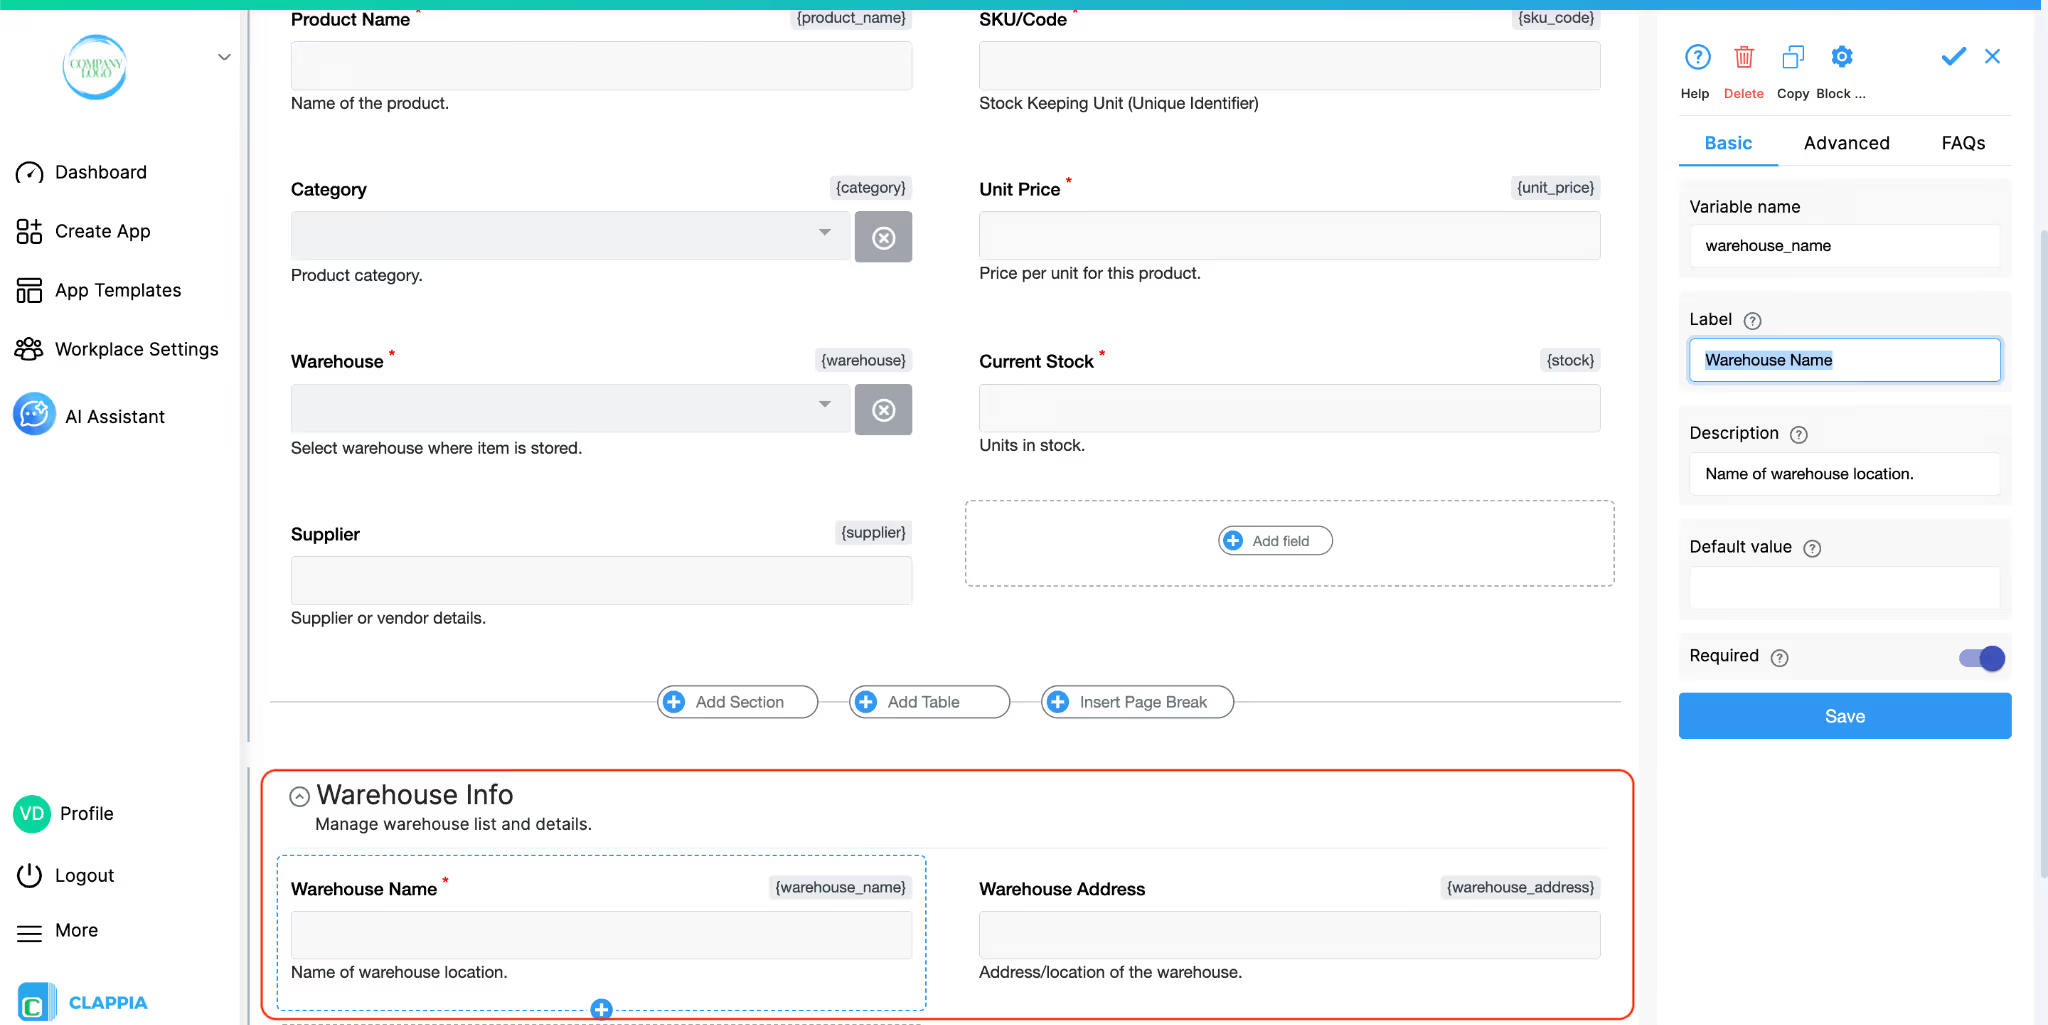
Some teams maintain a separate section for warehouse details:
Page: Warehouse Info
This supports setups where stock is distributed across locations or stores.
The Billing System focuses on creating invoices and recording sales activity. It pulls product information from the Inventory Master app, calculates totals, and triggers stock updates automatically. This app is intentionally kept independent so the UI stays clean for sales teams, field users, or billing clerks.
It also helps avoid mistakes:
Users won’t enter prices manually since the system fetches the correct values.
Users can only select products that belong to the chosen warehouse.
Users cannot bill quantities that exceed available stock.
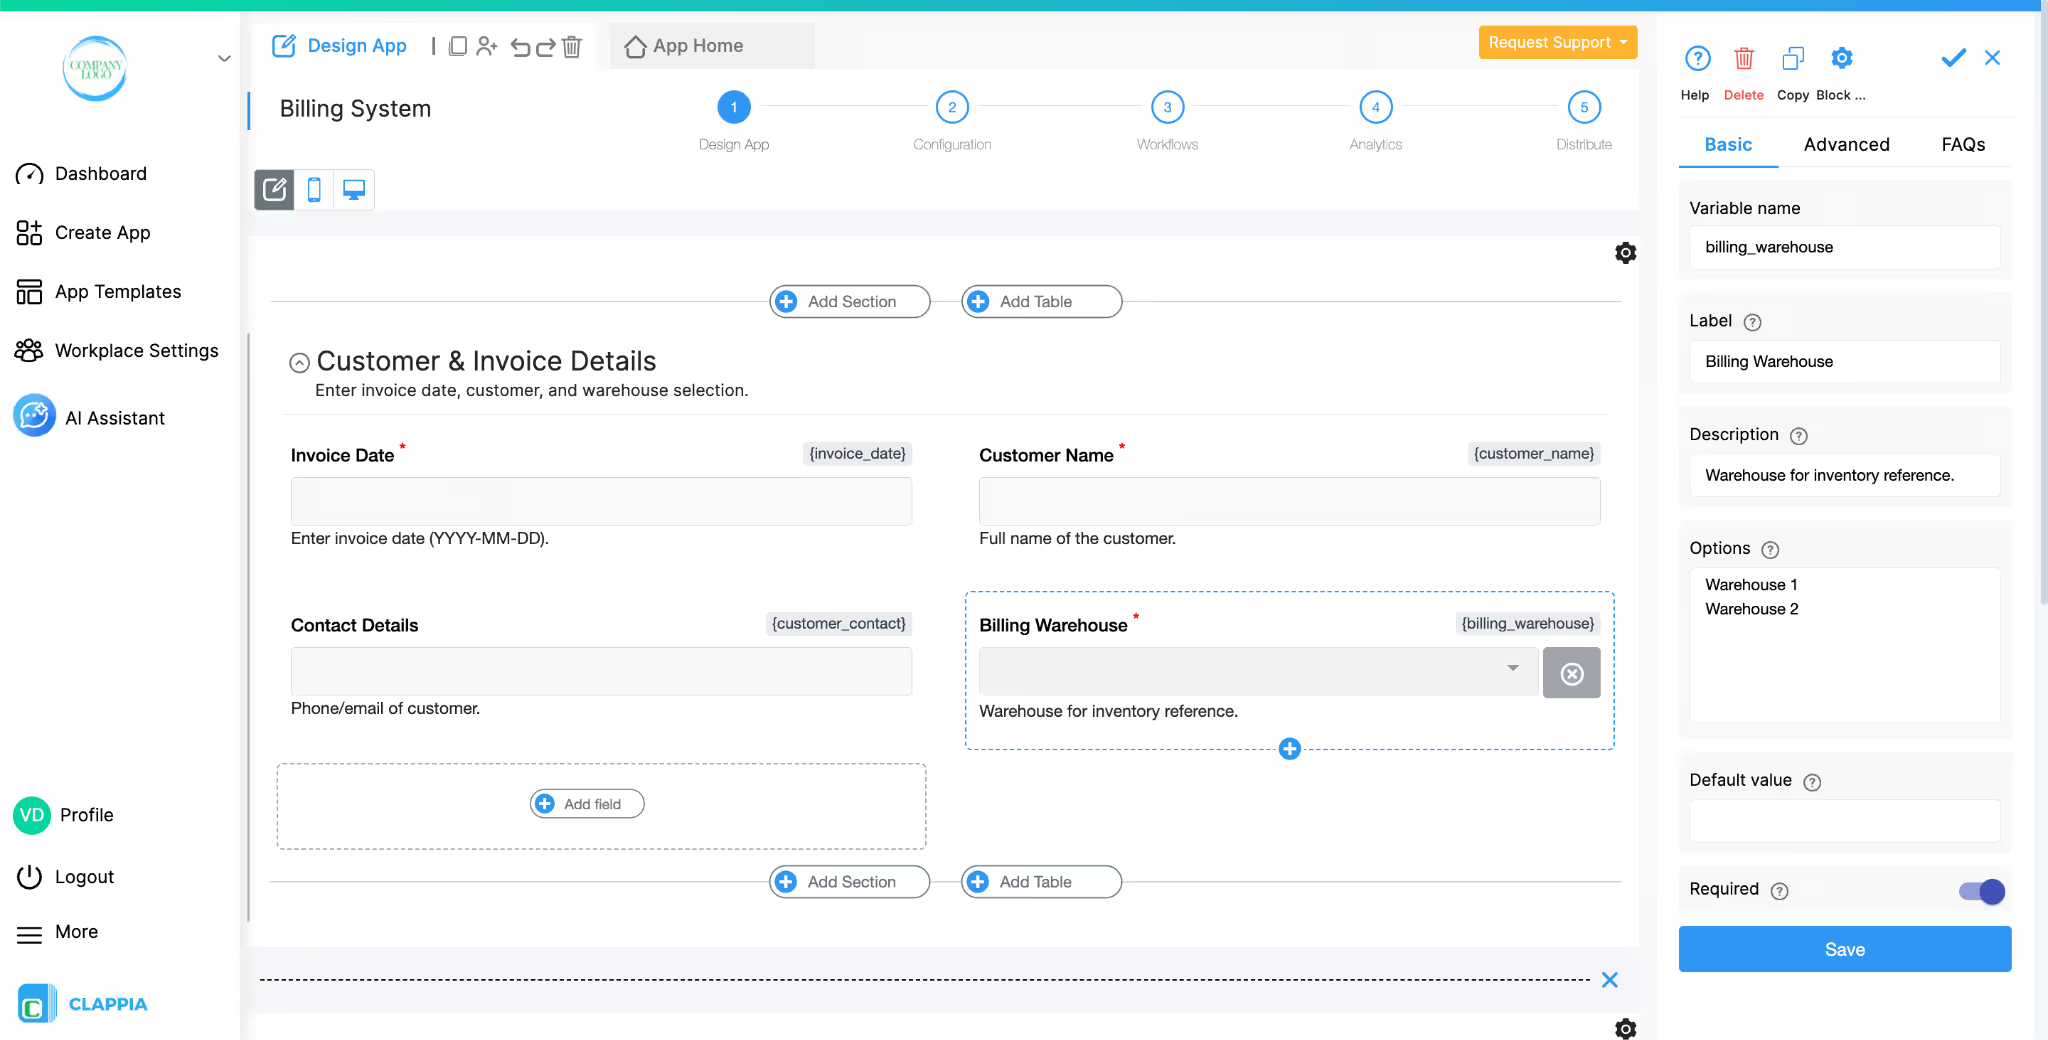
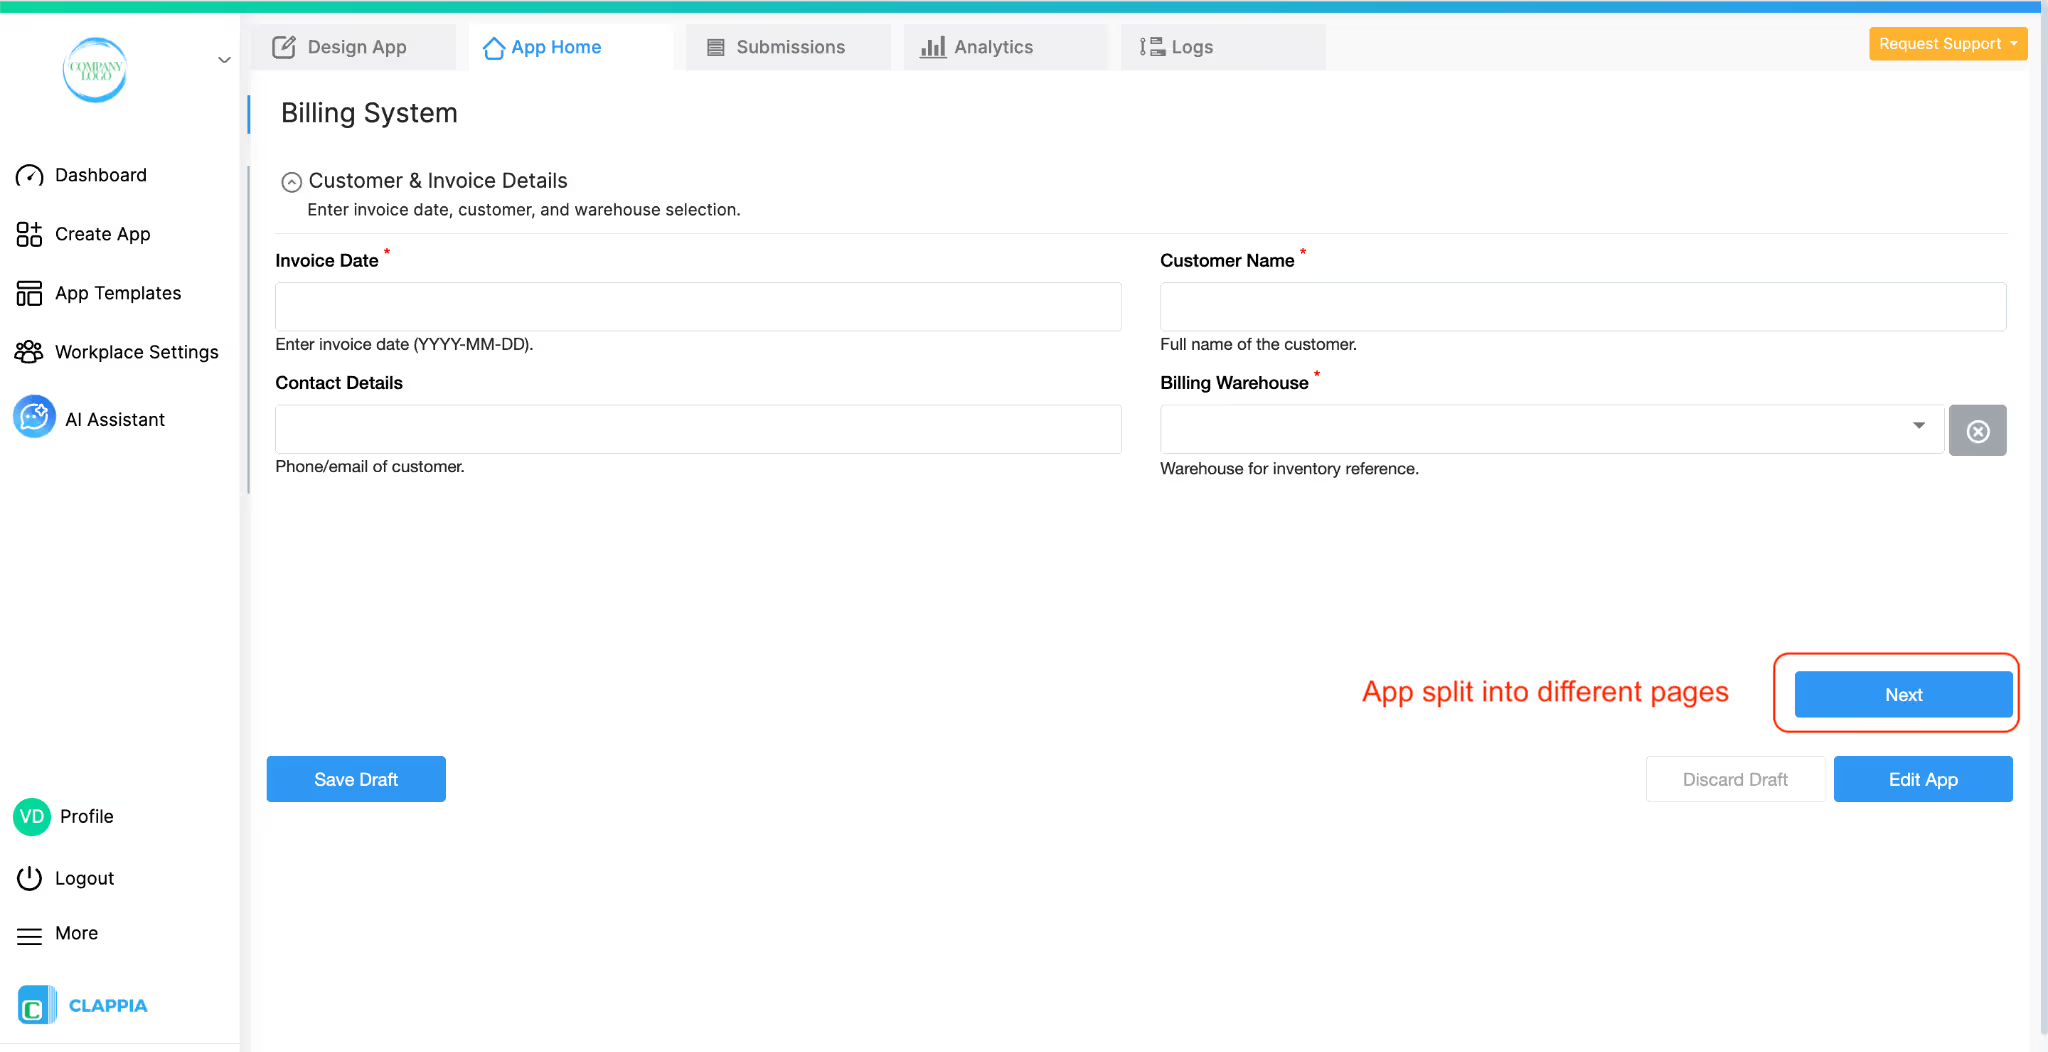
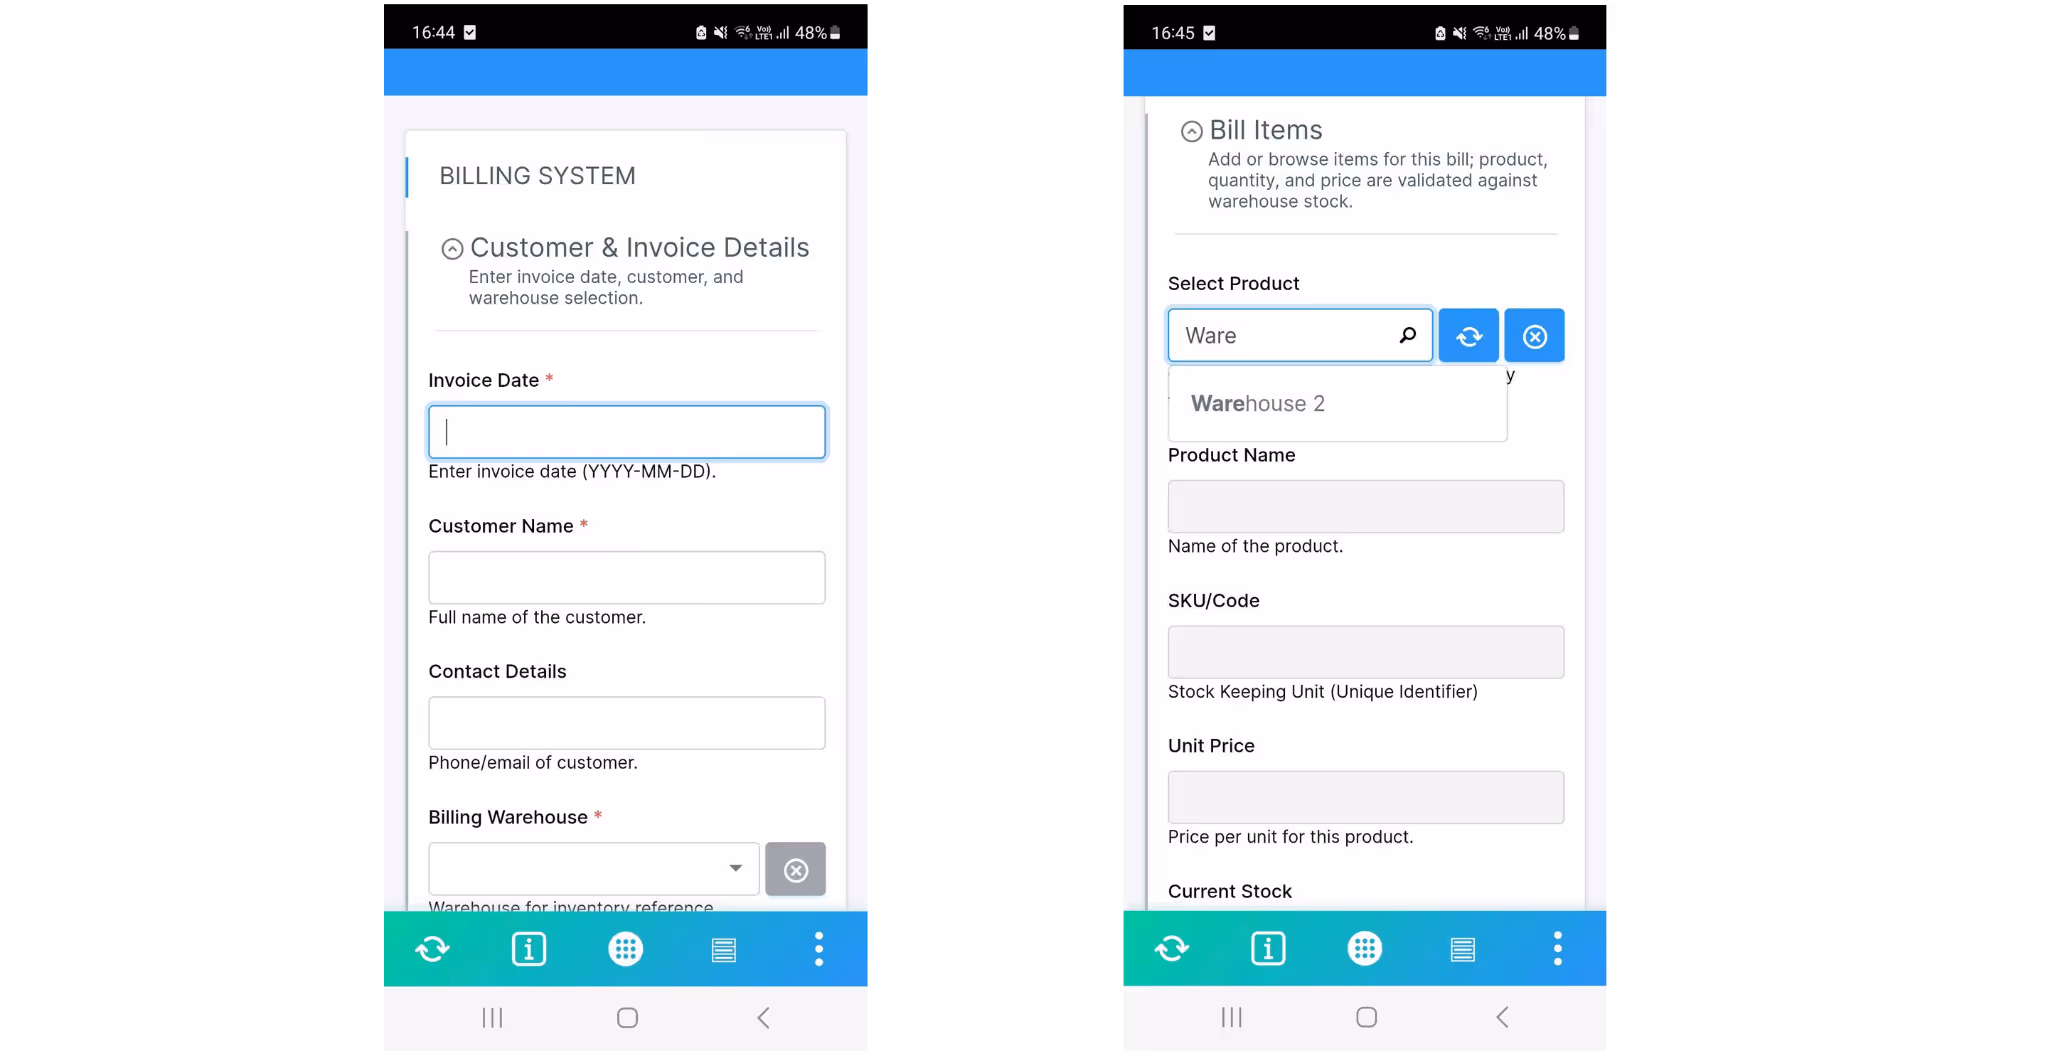
To keep the form easy to use, the Billing System is split into separate pages – one for customer and invoice details, one for line items, and one for the final summary. This breaks a long form into smaller steps, keeps each page focused, and makes it simpler for users to move through the billing flow.
Page 1: Customer & Invoice Details
This page collects basic customer and invoice metadata.
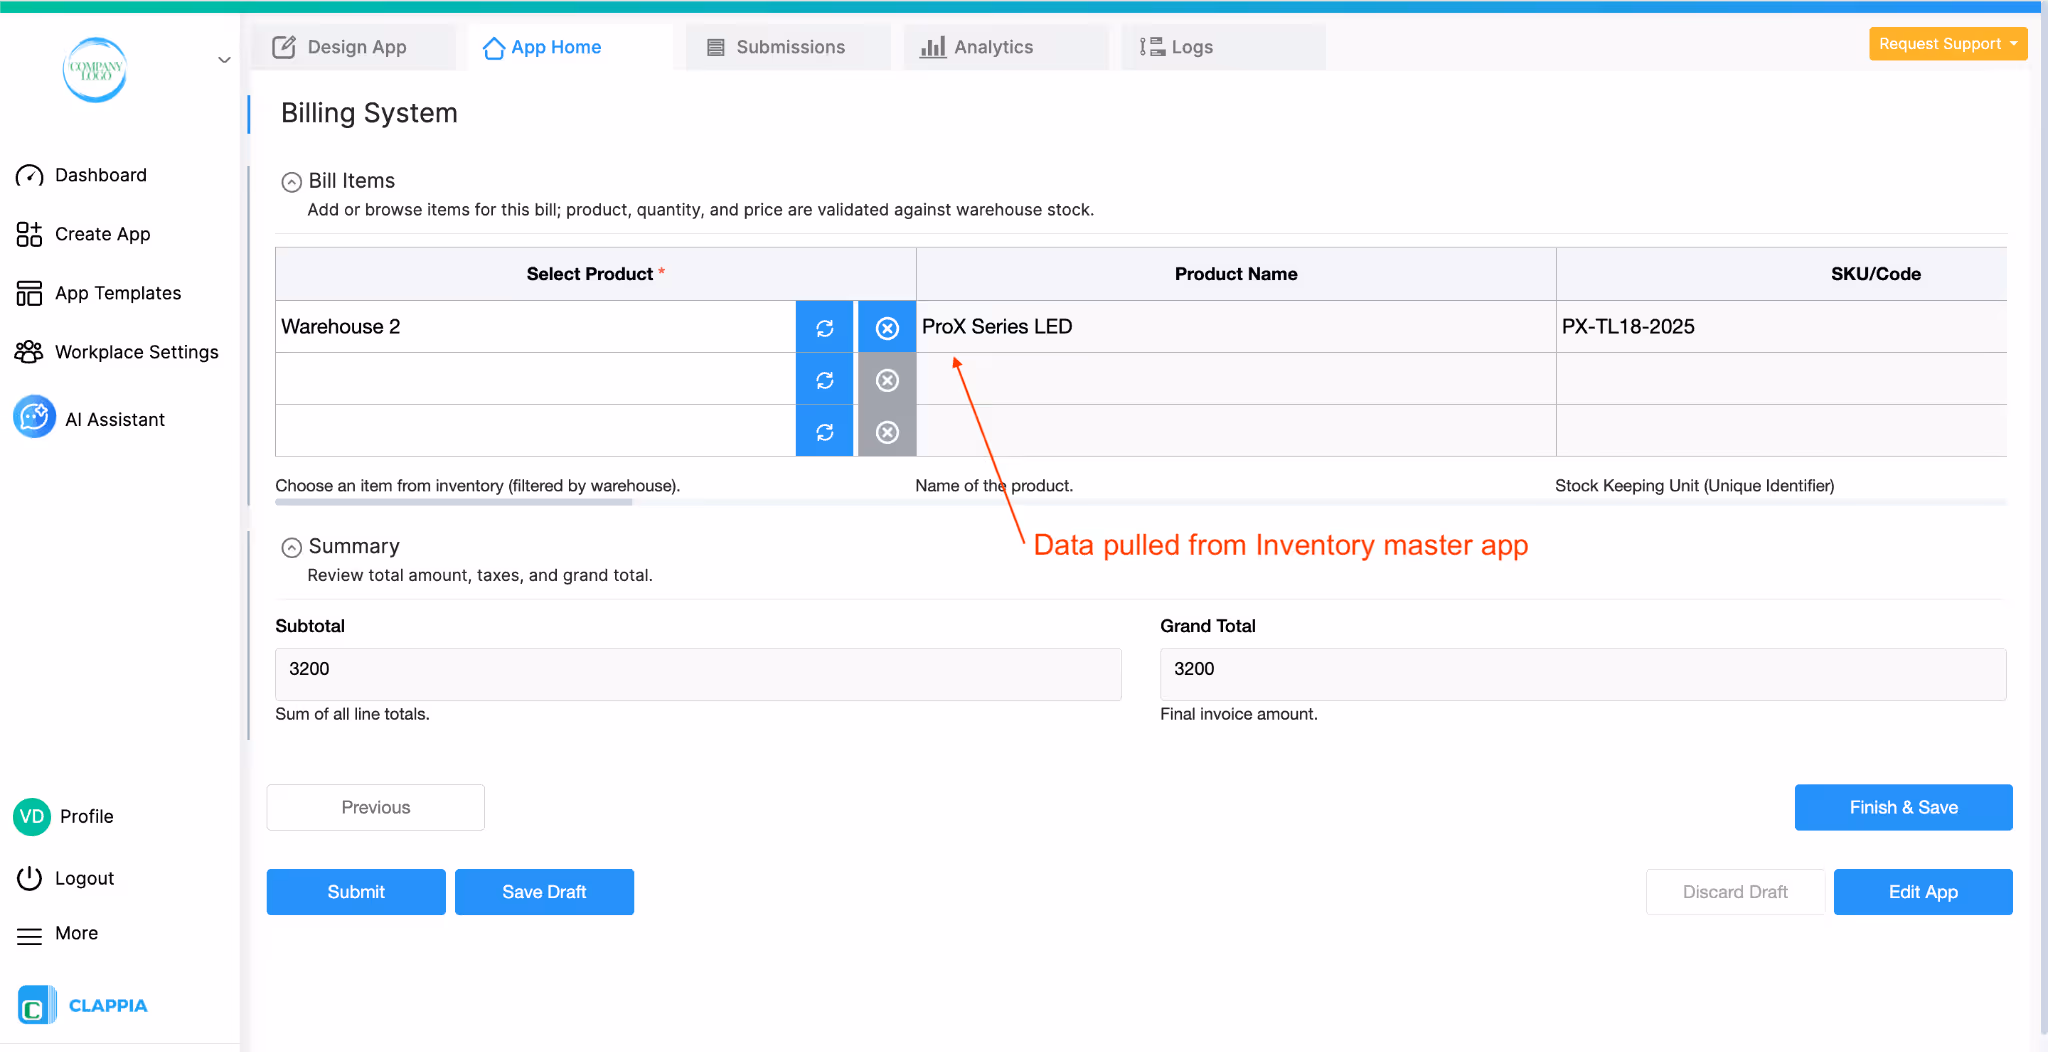
Page 2: Bill Items (Table Section)
This is where the line items are added.
The “Select Product” field uses the Get Data from Other Apps block to pull product details directly from the Inventory Master. This ensures users always pick from the verified product list instead of typing names manually and users only see the products that belong to the selected warehouse. This keeps the billing process clean and prevents cross-warehouse errors.
The pricing and totals in this table run through the Calculation fields, which update whenever a product or quantity changes. This keeps the unit price, in-stock value, and line total aligned with the data coming from the Inventory Master.
You can expand this table with:
The core idea remains that everything here is linked and validated against the Inventory Master.
Summary Section
After the table:
This section provides the final calculation before submitting the bill.
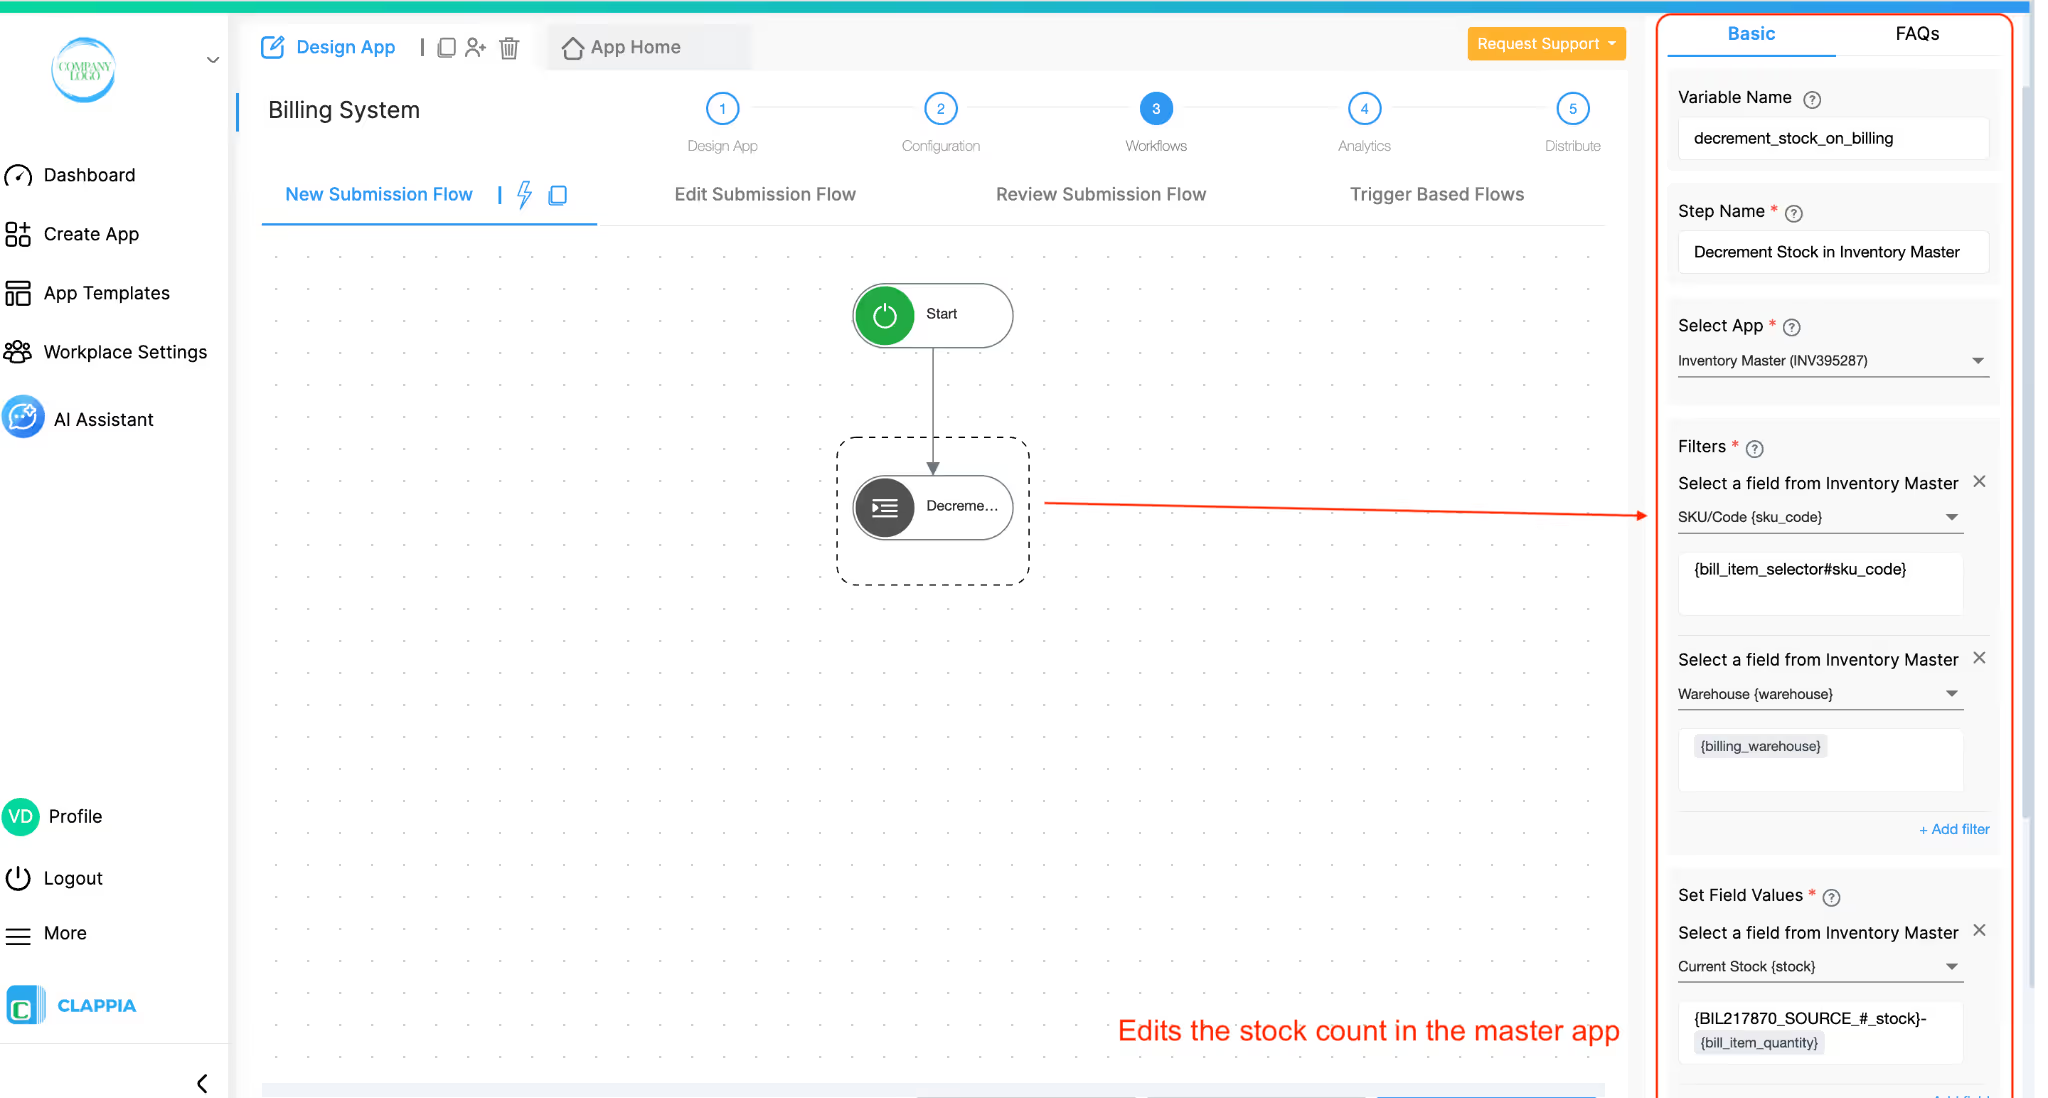
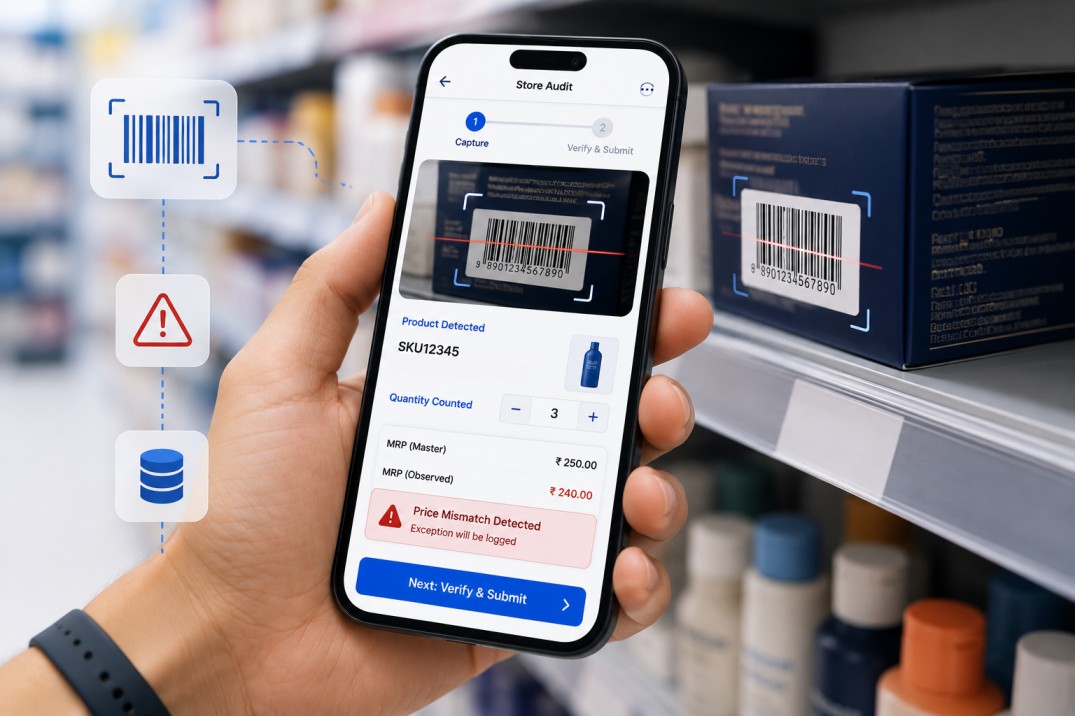
Once a bill is submitted, workflows keep the Inventory Master updated so stock levels remain accurate across warehouses. The workflow setup focuses on adjusting stock based on the quantities billed.
When a bill is created in the Billing System, a workflow updates the corresponding product entry in the Inventory Master:
This workflow keeps product availability aligned with every billing entry without requiring manual stock adjustments.

You can add workflow-based notifications:
These can run in parallel without changing the app structure.
Both apps support analytics pages for quick overviews.
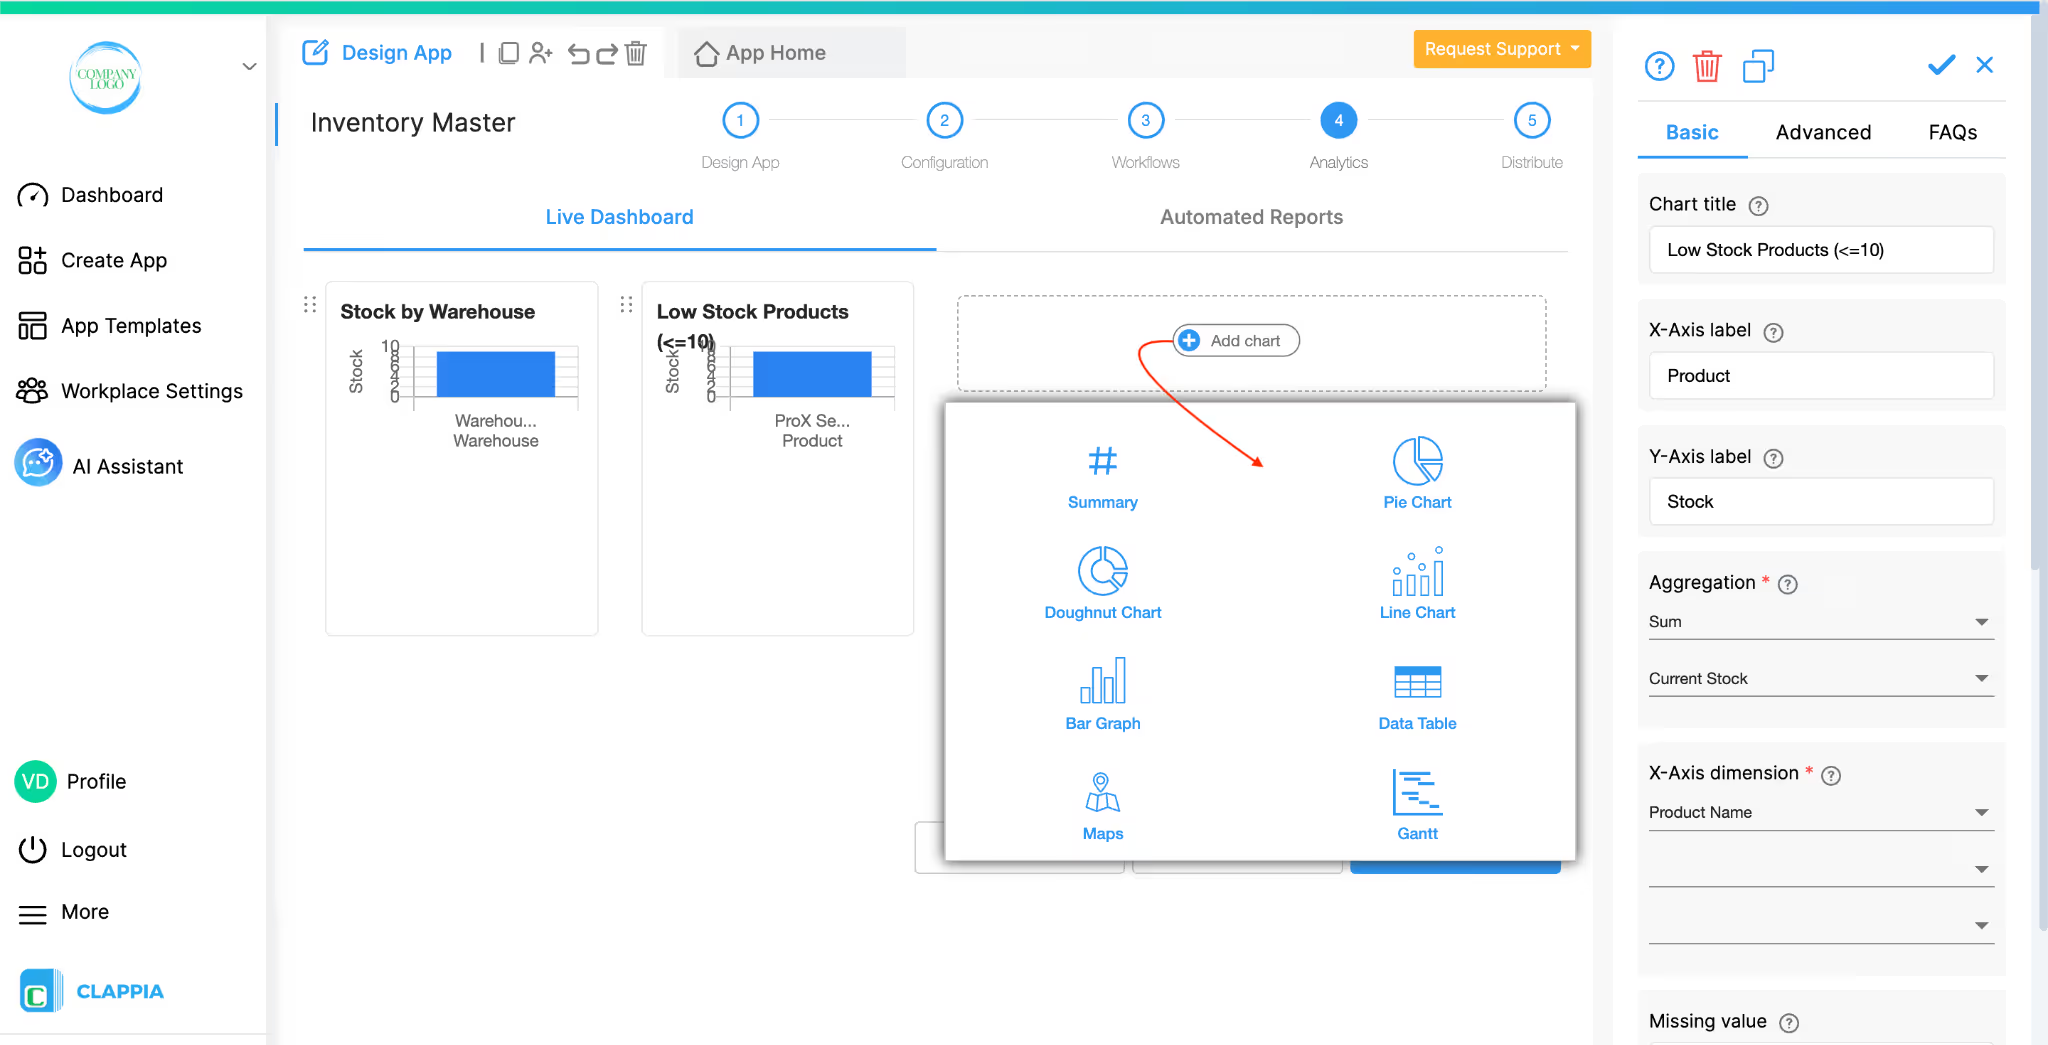
These help warehouse and procurement teams stay ahead of shortages.
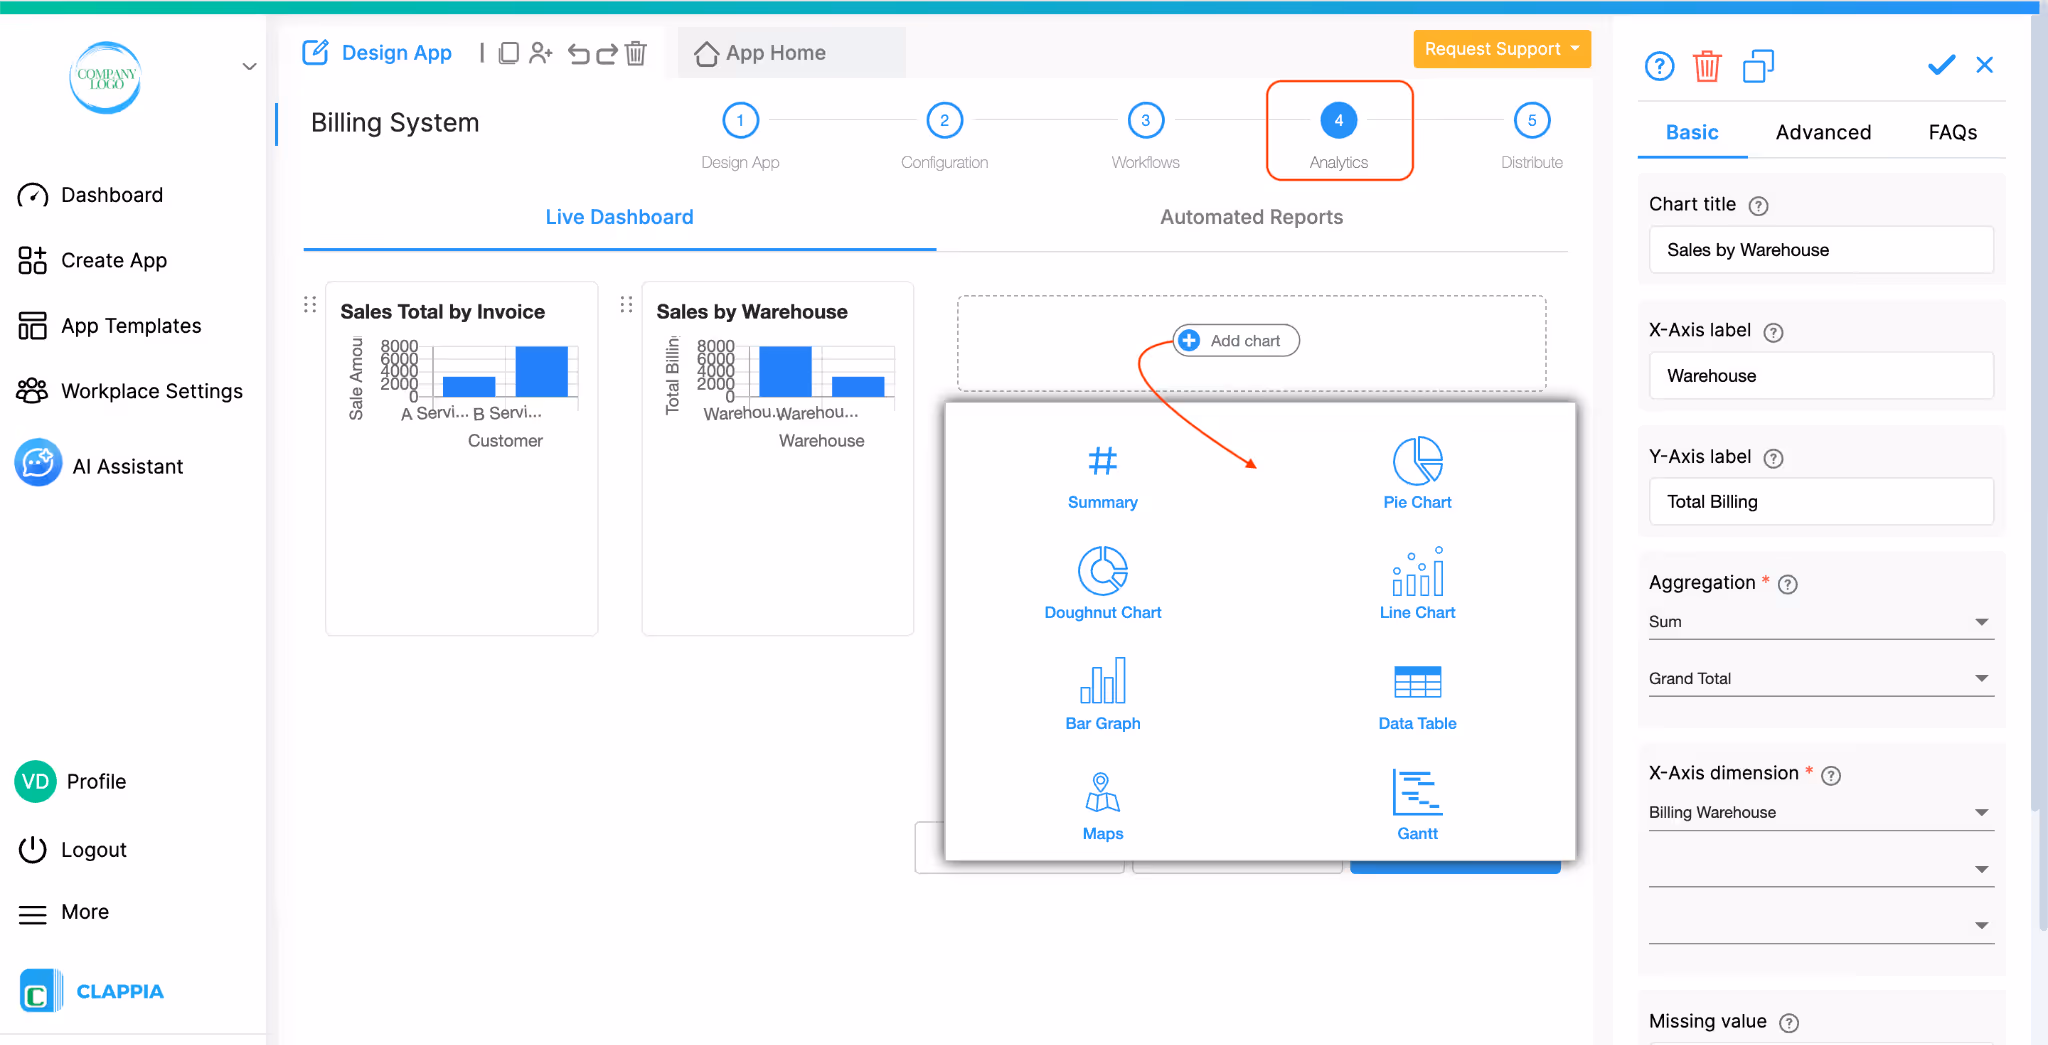
You can also create scheduled reports to send these analytics regularly.
Once the core flow works, you can build more around it:
Everything grows on top of the same foundation without disturbing existing users.
A separate Inventory Master and Billing System gives you a clean modular setup:
This becomes a base for broader systems like procurement, sales, order management, and warehouse operations.
For users, the system remains simple, they can use the app either from the web or mobile app. There is no extra setup for the mobile app.
Users see a clean front-end, while all the linked data and workflows run in the background. Everyone, from warehouse staff to billing teams, sees only what they need based on permissions.
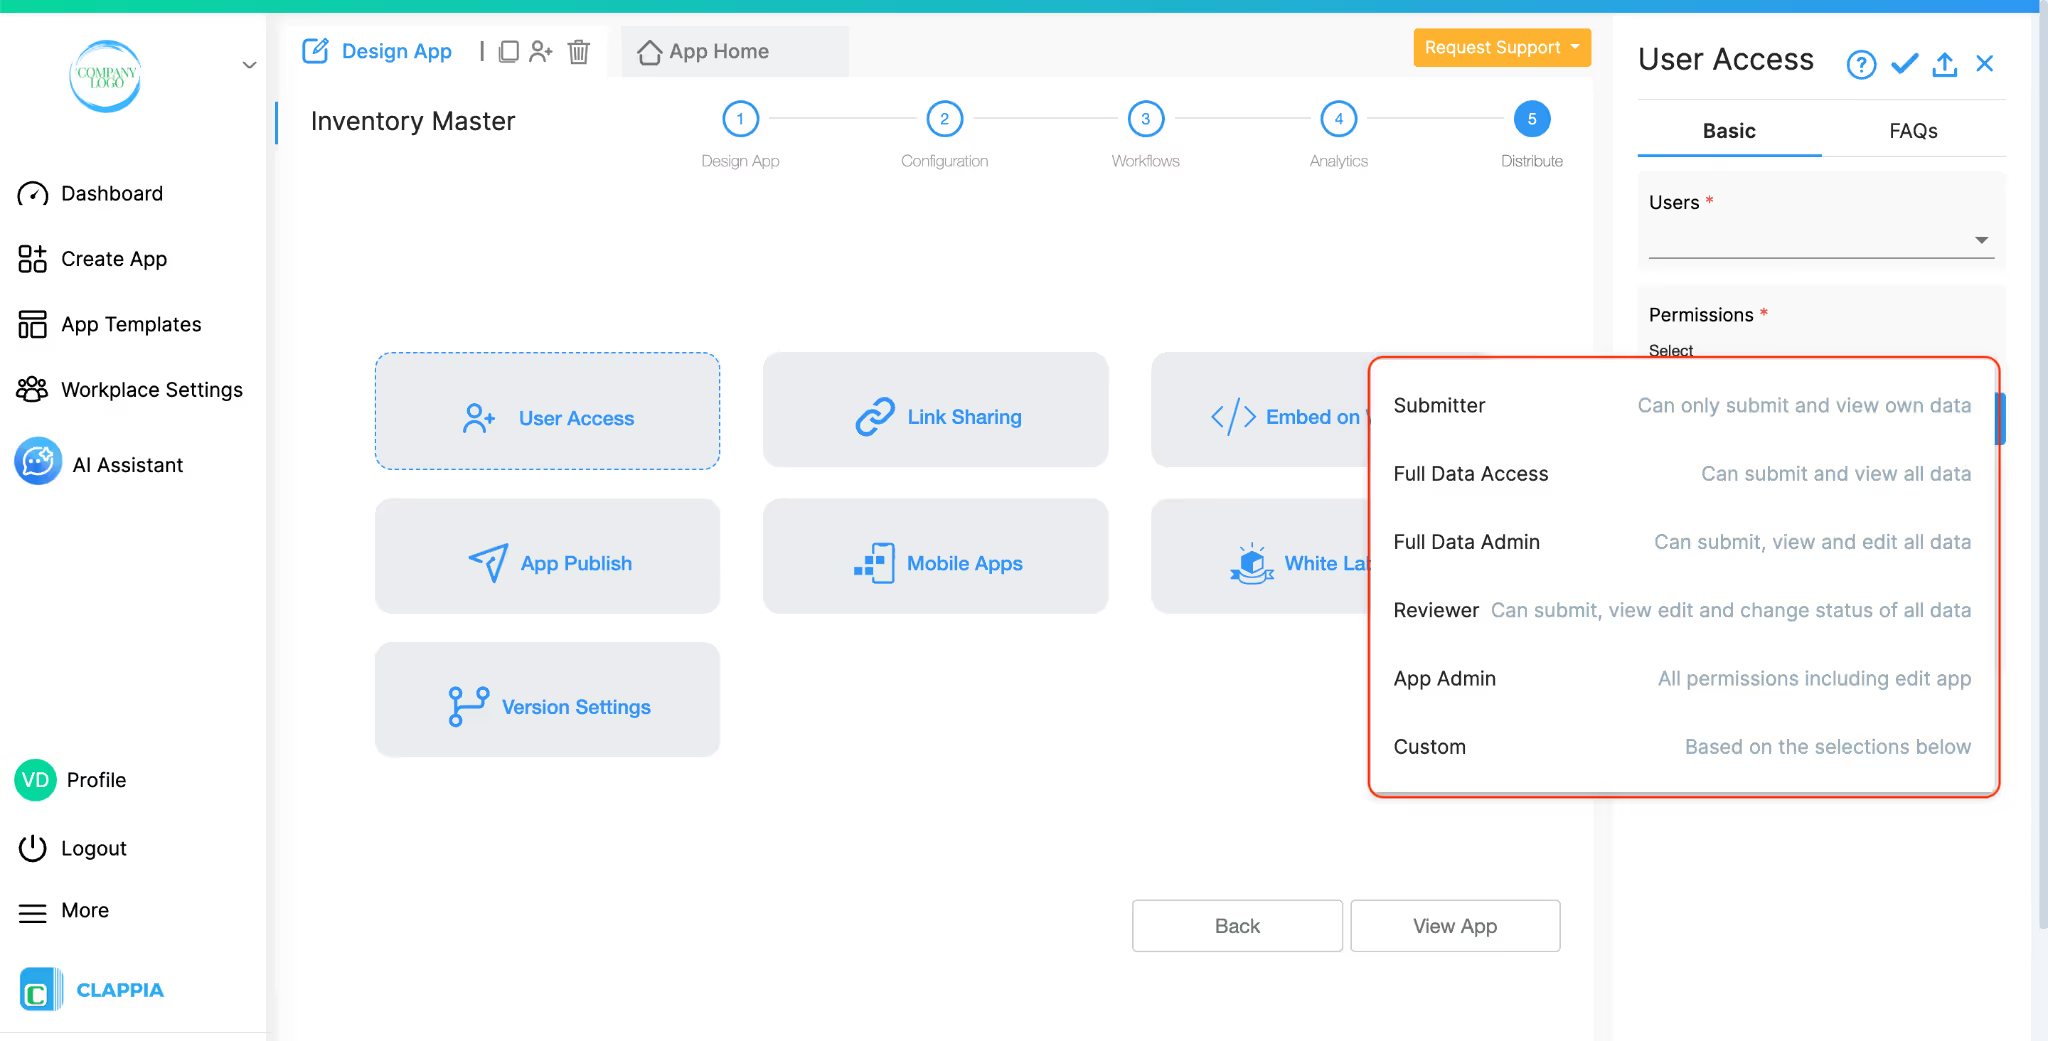
Once your inventory and billing setup is ready, you can decide who uses which part of it. Clappia lets you control access at the app level so each person only sees what they need.
If you work with external staff, suppliers, or temporary teams, you can share app links so they can submit information without a Clappia login which is useful for delivery partners, franchise partners, or contractors who need to submit stock or billing details occasionally.
You can also keep teams separate. If you don’t want sales teams to see purchase-side data, or warehouse teams to see billing data, you can assign access accordingly. Each app stands on its own, and only the users you choose can view or update it.
Here are some straightforward reasons companies prefer using Clappia for inventory systems where billing is part of the workflow.
Once the inventory and billing structure is in place, you can continue expanding it without starting over. Some teams add approval steps for billing, others connect stock records with purchase orders or delivery tracking. You can build dashboards for product movement, automate low-stock alerts, or link billing entries to customer master data.
As your process grows, the system grows with it. You can add fields, workflows, and linked logic at any point, and users see the changes instantly after refreshing the app. This makes Clappia a long-term base for inventory, billing, procurement, and even order management—without needing to shift platforms each time your requirements evolve.
 Get Started – It’s Free
L374, 1st Floor, 5th Main Rd, Sector 6, HSR Layout, Bengaluru, Karnataka 560102, India
3500 S DuPont Hwy, Dover,
Kent 19901, Delaware, USA


3500 S DuPont Hwy, Dover,
Kent 19901, Delaware, USA
L374, 1st Floor, 5th Main Rd, Sector 6, HSR Layout, Bengaluru, Karnataka 560102, India
.svg)


.jpg)