
Field data collection teams face a persistent data quality problem that rarely gets fixed at the source. A sales representative registers a new contact and types a phone number with spaces in the wrong place, no country code, or ten digits instead of ten. Someone else enters an internal account ID from memory and gets one character wrong. By the time the record reaches the CRM or operations team, correcting it requires tracking down the original source, which is often a paper form or a WhatsApp message.
The cost of this is not just the time spent fixing individual records. It is the downstream failures: automated notifications that never reach anyone because the phone number is malformed, lookup queries that return no result because the ID does not match, and follow-up tasks that fall through because the data was incomplete at the point of capture.
In Clappia, a no-code platform for building field operation apps, you can address most of these problems directly in the form itself, before the data is ever submitted. This guide walks through how to set up a field registration form with enforced phone number formatting, required ID fields, guidance text on name fields, and automated follow-ups that use the captured data. It is written for someone who is new to Clappia and wants to understand not just what to configure but why each step matters.
If you are new to Clappia, here is the context you need before the steps below make sense. In Clappia, you build apps using blocks. A block is a single form element: a text input, a phone number field, a GPS location capture, and so on. You add blocks to your app in the Clappia builder, configure their settings, and the result is a form your team can fill in on a phone or a computer.
Each time someone fills in and submits the form, Clappia stores that as a submission. You can view all submissions in a list, filter them, and export them. Workflows are automation rules you attach to an app: for example, send an email whenever a new submission is saved, or create a calendar event. Everything in this guide is configured through Clappia's no-code builder; no coding is required.
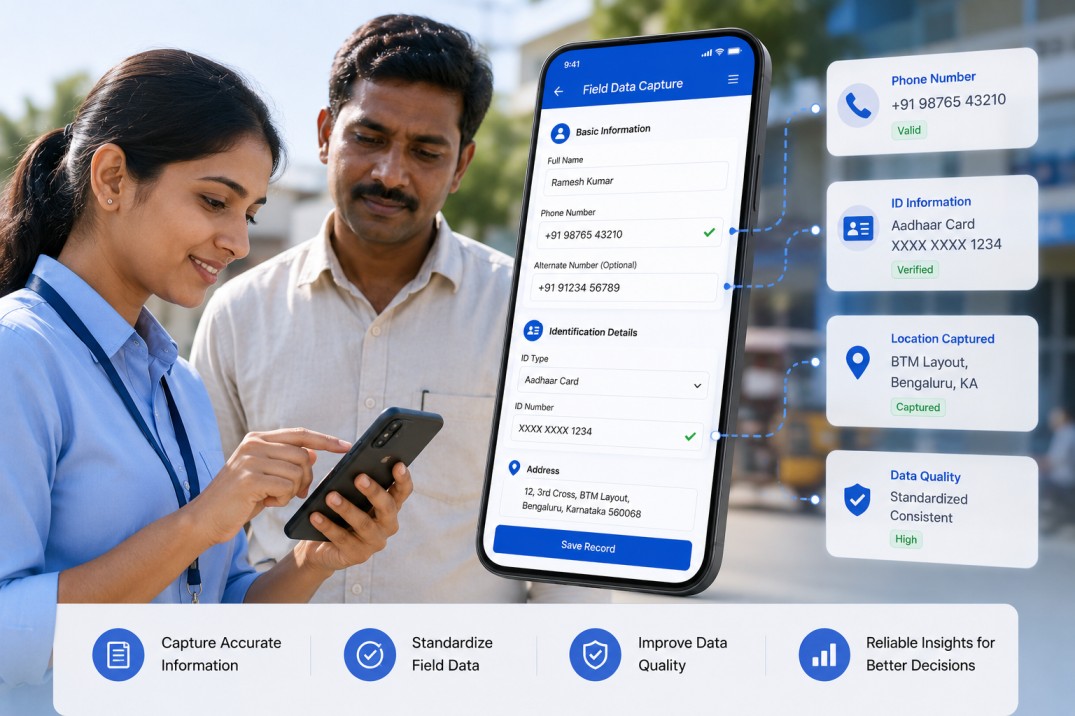
The form in this guide is a field registration form for capturing contact and location details during a visit. It could be used by a sales team registering new retail partners, a distribution network onboarding agents, a service team logging site contacts, or any scenario where a field representative needs to record a name, a phone number, an internal identifier, a location, and a GPS pin. The specific use case is generalised throughout, so the configuration applies across industries.
The form has five fields in a single section:
| Field | Block Type | Key Behaviour |
|---|---|---|
| Organisation Name | Single Line Text | Required; guidance text instructs the user to enter the full registered name |
| Phone Number | Phone Number | Required; country dial code locked to a default to enforce consistent formatting |
| Internal Reference ID | Single Line Text | Required; guidance text clarifies which ID system to use |
| Town or Area | Single Line Text | Required; guidance text instructs the user to enter the operating location |
| GPS Location | GPS Location | Required; defaults to device location; manual override allowed |
The rest of this guide covers each field in detail, then explains the two automated actions that run whenever a submission is saved.
Step 1: Organisation Name Field
Create a new app in Clappia and add your first block. Open the block picker and select Single Line Text. This block creates a standard text input where the user types a short value. Label it Organisation Name.
In the block settings, you will find a field called Guidance Text or Placeholder. This is the hint text that appears inside the input box before the user types anything. Set it to something like:
Enter the full legal or registered name of the organisation
This small addition does meaningful work. Without it, one person types Apex Ltd, another types apex limited, and a third types APEX. All three refer to the same organisation but will not match in any report or filter. Guidance text sets a clear expectation at the moment of entry, before the variation happens.
Also mark this field as required. In the block settings, look for the Required toggle and enable it. In Clappia, a required field prevents the form from being submitted if that field is empty. The user will see an error message and cannot proceed until they fill it in.
Step 2: Phone Number Field with Locked Dial Code
This is where most field data quality problems around contact capture can be solved in one setting. Add a Phone Number block and label it Phone Number. The Phone Number block in Clappia is different from a regular text input: it displays a country flag and dial code prefix alongside the number entry, and it validates that the number matches the format for the selected country.
In the block settings, find the default country code option and set it to the country your field team operates in. Then enable the option to lock or freeze the country code so users cannot change it. The reason for locking it is important: if users can switch country codes freely, you will end up with phone numbers that look the same length but have different dial codes, making them impossible to use in automated communications without manual correction.
For example, if your team operates in India, set the default to India (+91) and lock it. Every phone number submitted will follow the same format. If your team operates across multiple countries, consider creating separate regional versions of the form, each with the appropriate country code locked by default. This is a cleaner approach than leaving the code unlocked and hoping field representatives select the right one.
Mark this field as required as well.
Locking the country dial code is one of the highest-impact single settings in a field contact form. It costs nothing to configure and eliminates an entire category of phone number formatting errors before they ever enter your system.
Step 3: Internal Reference ID Field
Add another Single Line Text block and label it Internal Reference ID. This field captures the unique identifier your organisation uses to track contacts, partners, or accounts internally. It might be called a channel ID, a vendor code, a partner number, or a territory reference depending on your context. Use whatever name your team recognises.
Set the guidance text to clarify exactly which ID system to use:
Enter the internal ID assigned by the sales or territory team
The guidance text here is especially important because IDs often look similar across systems. If your organisation uses more than one identifier (a territory code and a system ID, for example), the guidance text should be specific enough that the field representative knows which one to enter without having to ask.
Mark this field as required. A submission without an internal reference ID creates an orphaned record: you have contact details and a GPS pin, but no way to link the record to your internal systems without manual intervention. Making the field required prevents that category of incomplete record entirely.
Step 4: Town or Area Field
Add a Single Line Text block labelled Town or Area. This field captures the operating location of the contact in plain text, separate from the GPS pin. GPS coordinates are precise but not human-readable in a list view or an email notification. A town name makes the record immediately scannable.
Set the guidance text to:
Enter the town, area, or district where this contact operates
Without guidance, this field accumulates inconsistent values: one person writes Mumbai, another writes Mumbai Central, a third writes MH-Mumbai. Consistent guidance does not fully solve this, but it reduces the variation by making the expectation explicit. If you need very high consistency on location values, consider using a Dropdown block instead, pre-populated with the towns or territories your team covers. A dropdown restricts input to defined values and eliminates free-text variation entirely.
Step 5: GPS Location Field
Add a GPS Location block labelled GPS Location. This block captures the latitude and longitude of the device at the time the form is filled in. In the block settings, configure the following:
Mark the GPS field as required. A registration record without a location pin cannot be geocoded or mapped later, and if your workflow creates a calendar event with a location, the event will have no address unless the GPS data is present.
Step 6: Speed Up Repeated Entries with Retained Values
In Clappia's app settings, you will find an option called Retain Values. When enabled, the values a user enters in one submission are pre-filled in the next time they open the form. This is useful for field teams who are registering multiple contacts in the same town in a single day: the Town or Area field and any other consistent values carry over automatically, so the representative only needs to change the fields that differ between records.
Enable this in the app settings alongside Save as Draft, which lets users save a partially completed form and return to it later, and Print, which allows a PDF copy of the submission to be generated if a paper record is needed.
Step 7: Automate Follow-Ups with Workflows
Once the form is built, you can configure Clappia to automatically trigger actions whenever a submission is saved or updated. In Clappia, these are called workflows. A workflow is a set of automated actions that run in response to a trigger. For this form, you will set up two actions that run in parallel every time a record is saved: an email notification and a Google Calendar event.
To access workflows, open your app in Clappia, go to the Workflow settings, and create a new workflow. Set the trigger to On Save so it fires whenever a submission is created or updated. Then add two actions to run simultaneously.
Action 1: How to Configure the Automated Email Notification
Add an Email action. This sends an automated email to whoever needs to be informed when a new record is registered. Configure the following:
In Clappia email bodies, you reference field values using curly brace notation. For example, writing {Organisation Name} in the email body will be replaced with the actual value from the submission when the email is sent. The same applies to {Phone Number}, {Internal Reference ID}, and {Town or Area}. This means every email is automatically personalised to the specific record that triggered it.
Action 2: How to Set Up the Google Calendar Follow-Up Event
Add a Google Calendar integration action. This creates a follow-up event in a calendar automatically, so the responsible team member has a scheduled reminder to complete the onboarding or follow-up tasks. Configure the following:
As with the email, field values from the submission are referenced using curly brace notation in the event description. The {Phone Number} and {Internal Reference ID} values will appear in the calendar event automatically when it is created.
The phone number and internal ID you enforced at the point of capture are the same values that flow into the email and the calendar event. If either was wrong in the form, the automated follow-up would be wrong too. Clean capture at the form level protects every automated action downstream.
In Clappia, you control who can access each app through user permissions set at the app level. For a field registration form like this one, the recommended structure is:
| Role | Access Level | What They Can Do |
|---|---|---|
| Field Representative | Submit Only | Fill in and submit the form; view their own past submissions |
| Team Manager | View Only | See all submissions; filter by town, date, or status |
| Admin | Full Access | Edit app settings, configure workflows, manage user access |
The Clappia mobile app, available on Android and iOS, supports offline mode. Field representatives can open the form, fill it in, and save a draft without any network connection. The GPS Location block captures coordinates using the device's built-in GPS, which also works offline. Submissions sync to the server automatically when the device reconnects, at which point the workflow fires and the email and calendar event are created.
For the form to require user authentication, enable the authentication setting in the app settings. This ensures every submission is tied to a named Clappia user, making the submission record traceable to a specific team member.
The setup described above handles the most common data quality problems at the point of capture. If your team operates in more complex conditions, a few additional configurations are worth knowing about.
Clean field data does not require complex technology. It requires the right constraints applied at the right moment: a locked phone number format that prevents dial code errors, a required ID field that prevents orphaned records, guidance text that sets expectations before the user types, and a GPS block that captures location automatically rather than relying on manual entry.
In Clappia, each of these is a straightforward configuration in the form builder. Once the form is set up correctly, the workflow takes the clean data and puts it to work immediately: an email notification lands in the right inbox with the right details, and a calendar event appears on the right team member's schedule with the contact's phone number and ID already in the description.
The result is a registration flow where bad data is prevented at entry, and good data is acted on automatically. You can get started by creating a new app in Clappia and following the steps above. The entire setup, form fields, required settings, guidance text, and workflow automation, can be completed without writing any code.
L374, 1st Floor, 5th Main Rd, Sector 6, HSR Layout, Bengaluru, Karnataka 560102, India
3500 S DuPont Hwy, Dover,
Kent 19901, Delaware, USA


3500 S DuPont Hwy, Dover,
Kent 19901, Delaware, USA
L374, 1st Floor, 5th Main Rd, Sector 6, HSR Layout, Bengaluru, Karnataka 560102, India
.svg)


.jpg)


.jpg)

