
Still need help?

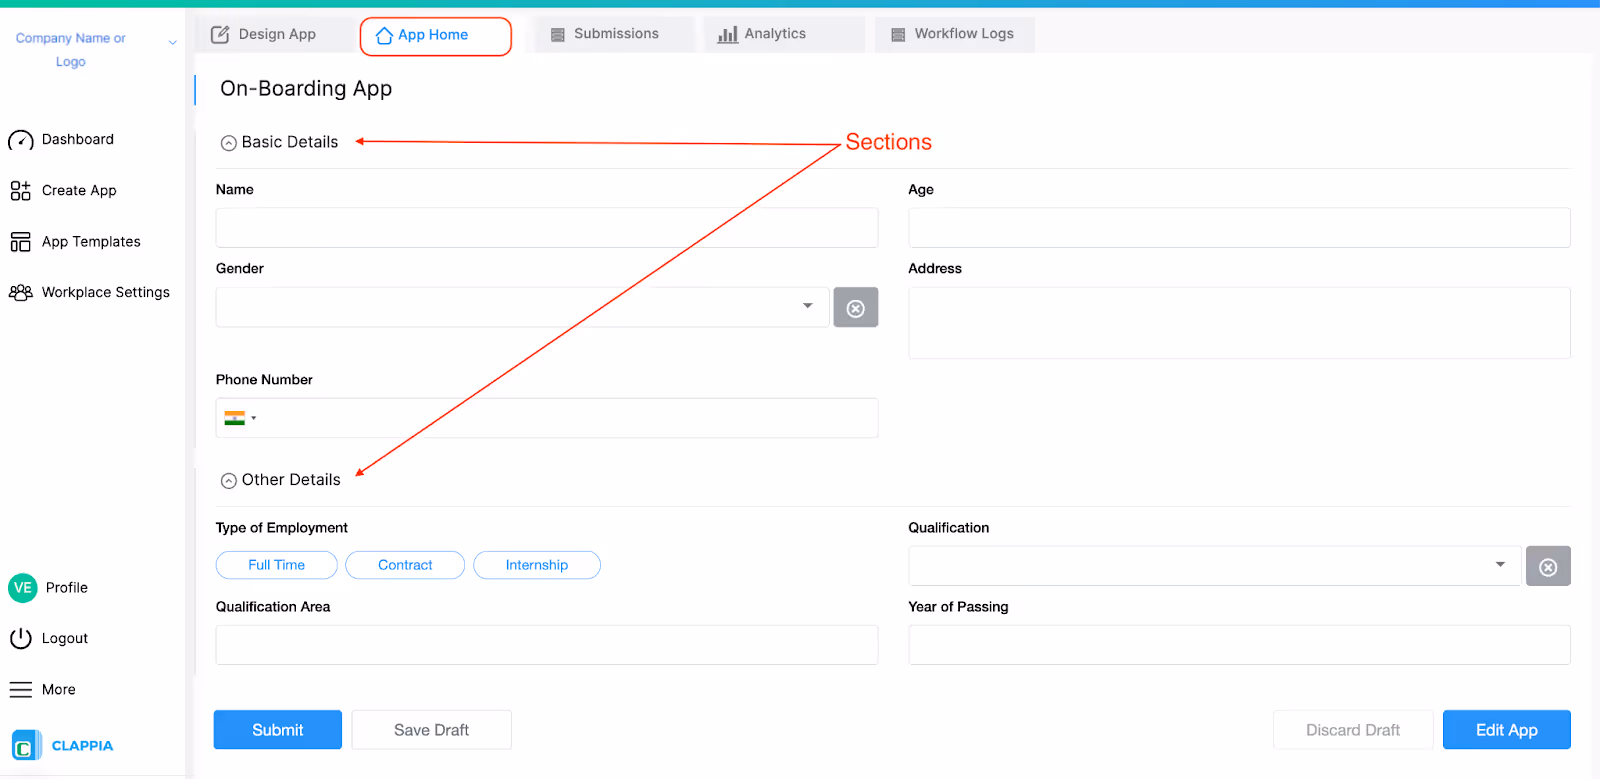
A section is a wrapper of multiple fields added to an app. They serve two purposes -
Once you click on New App in your Dashboard, you will be directed to the Design App to start building your app. Name the app, and click on Add Section to start.


In this section, you will be able to add all relevant fields related to the section name. Click on Add Field, select the appropriate field from the list of customisable clocks available. You can also click on the ‘+’ icon that appears on every field to add fields in between.


Similar to the drag-and-drop action of the blocks, you can also rearrange the sections. Click on the section and drag it to the desired placement area.

You can see that sections have been rearranged.

This is one of the most useful features that help app creators create very complex apps. You can use this to introduce branching of sections in your apps. Basically you can make sections appear in the app based on certain conditions (eg: selecting certain options, input certain details into fields).
Here we are taking an example of an employee management app for full-time employees, contractors and interns. Let’s say if the type of employee is full-time, a section should appear which takes the employee's joining date (and other details) and if the type of employee is a contractor, then the section which takes the joining date and the planned exit date of the contractor should appear.
This app has 6 sections: Basic, Other, Full Time, Contract, Internship, Bank Details.

In App Home, where the app is live, it looks like this:
Here only the Basic Details and Other Details sections are visible.
The employee on-boarding app will be used to enter the details of employees based on the type of employment.
If the ‘type of employment’ field is selected as ‘full time’ then then section ‘Full Time Details’ will be opened showing the corresponding fields.

This is achieved by inserting a simple formula in the Design App.
In the ‘Design App’, if the ‘Full Time Details’ section is selected, a right panel will appear. Under the Advanced option, go to Display this section if field.
Type '@' and select the Type of Employment variable and write =”Full Time” .
This means that when the type of employment is selected as ‘Full Time’ in the app, then the ‘Full Time Details’ section will be displayed.


If you are using Single Selectors, Multiple Selectors or Dropdowns to make sections appear upon selection, then make sure that the value in the display condition matches exactly, else it will not work.
You can also use multiple conditional display logic within sections.
In ‘App Home’, only two sections are visible. Once ‘Type of Employment’ is selected as ‘Full Time’, the ‘Full Time Details’ section appears.
Then in that section when the ‘Received Documents?’ field is selected as ‘Yes’, the ‘Bank Details’ section appears in the app.


The logic remains the same in the ‘Design App’.

Now let’s say the conditional display logic is also applied to the ‘Contract’ section, followed by which if the field ‘Received Documents?’ in this section is selected as ‘Yes’, the ‘Bank Details’ section should appear.
This would mean that the ‘Bank Details’ section should appear by selecting ‘Yes’ from the ‘Received Documents?’ field from either the ‘Full Time Details’ section or ‘Contract Details’ section (Both sections contain this field).
For Full Time:

For Contract (same formula applied to show the ‘Contract’ section):

Here you will have to modify the display condition formula for the ‘Bank Details’ section in the Design App so that it takes both display conditions.
Select the ‘Bank Details’ section. Under the Advanced options, go to Display this section if field.
Now write the following formula: OR({received_d}="Yes",{received_d_1}="Yes")
This means when the ‘Received Documents’ field is selected as ‘Yes’, the bank details section will be displayed, be it for full time or contract based.


Following are reference guides to relevant functions in Excel.
This configuration field appears only if the ‘Display this section if’ has been given a condition.


If enabled, this will enable any previously filled section to retain its values if edits are made to it and it is kept hidden even after submission. This is useful when it comes to approvals.
For example, if there are three sections in app:
Now if the department head only needs to see the 2nd & 3rd section, the 1st section is hidden for them, and if the option ‘Retain Values if hidden’ is enabled, then all details filled in the first section will still be present in the submission.
All the values will be available for admins to see.
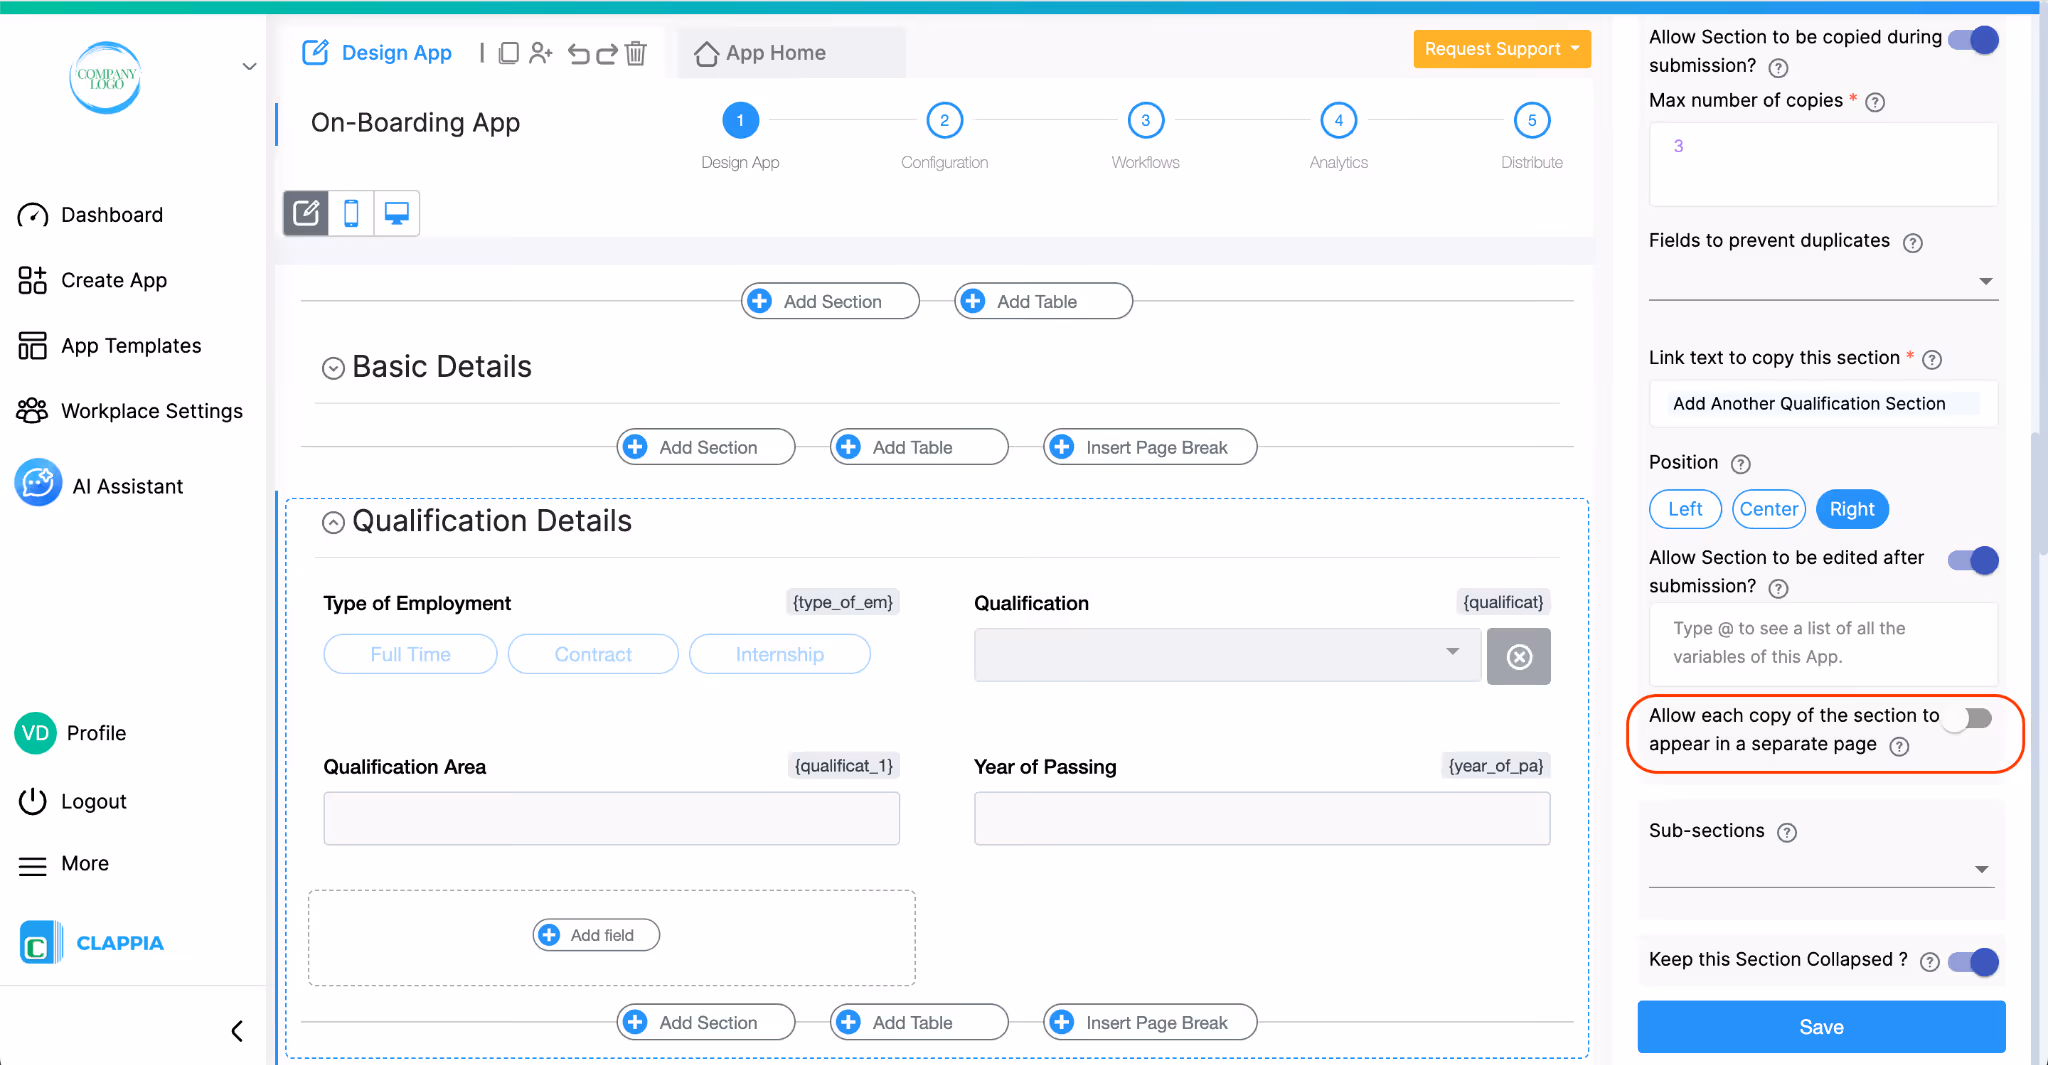
You can create multiple copies of a section to collect different data with the same fields. For example, collecting family member details, education details, product price, etc.
Click on the section of which you want to create multiple copies. Edit from the Right Panel which appears on the right side.
Enable this option to allow creating copies of the section selected.

Enter a number of how many copies of the section that you may need.

Enter your desired text for the end user to understand that clicking on this will create another copy of that section.
There are 2 ways to do that:
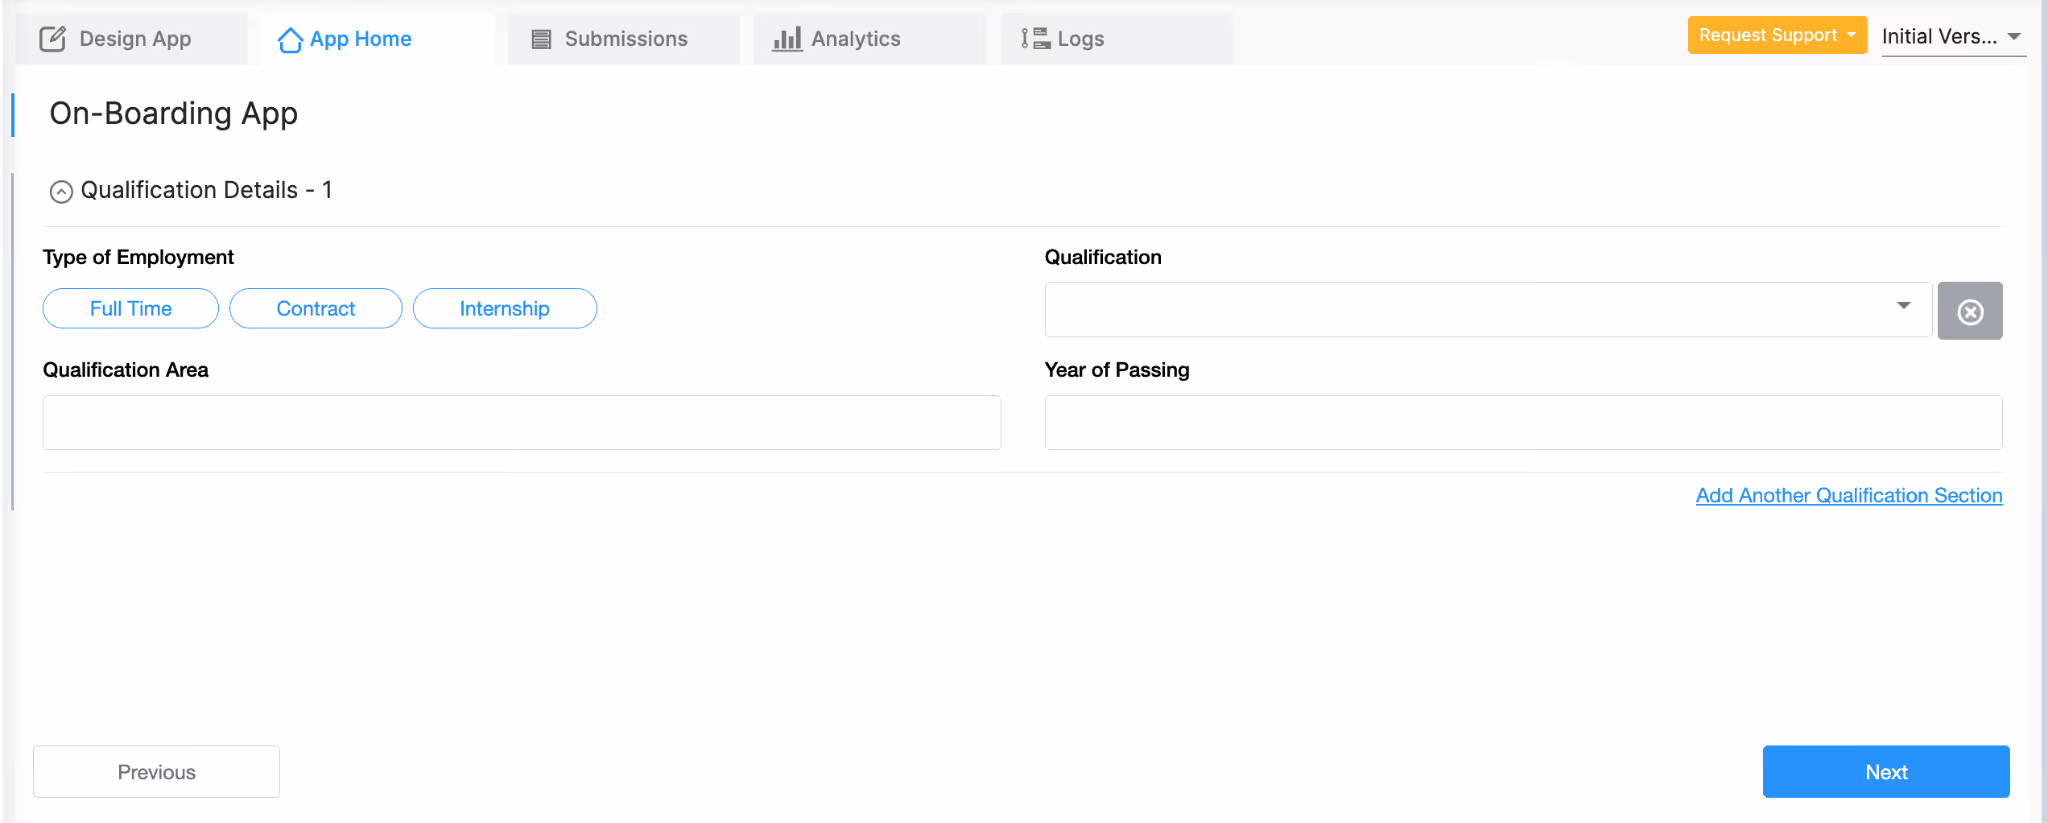
In this example, 'Add Another Qualification Section’ is the text. You can add your own self-explanatory text. This appears on the bottom right side of the section in App Home.


You can add your own custom link here. Below is an example of a custom link and its preview.
<h2 style='color: #007BFF;cursor: pointer;text-align:left;'>+ Add Another Qualification Section</h2>

In the above link, 'Add Another Qualification Section’ can be changed to your own self-explanatory text. This appears on the bottom right side of the section.
This option allows you to control where the "Add Another Section" link appears in App Home.

You can choose to align the link to the Left, Center, or Right based on your preference.
For specific fields i.e. Single Selector, Code Scanner, and Get Data from Other Apps, you can enable the "Fields to prevent duplicates" option to exclude these fields from being copied along with the rest of the section. This option appears only if any of these fields are in the section to be copied. When enabled, users filling out the copied sections in App Home will not be able to select a value that has already been selected in another section copy.

When this option is enabled, each copied section will open on a separate page in App Home instead of appearing one below the other.
If a user adds another copy of the section, the new copy will not appear in the same screen. Instead, it will open as the next page, and users can move between copies using the Next and Previous buttons.
This is useful when the section contains many fields and you want to avoid a long, scrollable form.
How it behaves in different cases:
This ensures the form is broken into clear steps, especially when repeated sections are involved.
This option is especially useful for performance when dealing with large datasets. If a copyable section contains many fields and users add multiple copies, loading all of them on a single page can slow down the app and impact responsiveness. By displaying one copy per page, the app only renders the fields for the current step, which helps maintain smoother performance and reduces lag during data entry.
It also improves reliability during submission and editing, as smaller sections of data are handled at a time instead of processing all copies together on a single screen.
Once a submission is created, there may be situations where you need to update or correct values inside a copyable section. This can be automated using the Edit Submission workflow node.
The Edit Submission node allows you to pick an existing submission and update its fields through workflow logic. With copyable sections, the same process applies, but you need to carefully configure filters and conditions so that the workflow knows exactly which repeated section to update.
How to Set It Up
Typically, you should have a unique identifier inside the copyable section itself (e.g., an Item ID field, Serial Number, or some other key).
In the logic box, use an IF condition to check if the identifier matches. For example:
IF({id} = {job_id},{quantity}+100,{quantity})
This ensures you are not overwriting the field in every copied section but only the one that corresponds to the condition you define.
Key Points to Remember
You can update multiple fields in the same copyable section row by repeating this process for each field under Set Field Values.
By enabling this option, the section will appear collapsed (unopened) by default when the app loads in App Home.


Users can click on the section name to expand it and fill in the details.
This is especially useful in apps with multiple sections where you want to avoid overwhelming users or make navigation easier.
This option appears only if there are 2 or more sections in an app.
You can make some sections of the app as subsections of any other section in the app. For example, the screenshots below show a Checklist App with 3 main Checklists C1, C2, and C3 and each of them has sub-checklists like 1.1, 1.2. 2.1 etc. So the users filling data in the App will initially see only the 3 top-level sections. Then when they click on one of these sections, their sub-sections will appear.


To create such a setup with sub-sections, follow these steps.

L374, 1st Floor, 5th Main Rd, Sector 6, HSR Layout, Bengaluru, Karnataka 560102, India
3500 S DuPont Hwy, Dover,
Kent 19901, Delaware, USA


3500 S DuPont Hwy, Dover,
Kent 19901, Delaware, USA
L374, 1st Floor, 5th Main Rd, Sector 6, HSR Layout, Bengaluru, Karnataka 560102, India
.svg)
