
Still need help?

The Live Tracking block allows you to capture the exact route taken by a user in real time, from the starting point to the end point, along with the total distance traveled. This path is displayed visually on a map, and the captured distance can be used for additional calculations; such as time taken, cost estimation, or efficiency tracking; directly within your app.
It’s designed for use cases like monitoring field employees, tracking goods in transit, or recording movement for audits and compliance. The tracking process runs in the background while the user is on the move and records precise GPS coordinates for every step of the journey.
Note: GPS Location permission should be allowed for the Clappia app in your smartphone settings and the location must be enabled for this feature to work.
*The Live Tracking option only works on the Clappia mobile app on Android devices.
If you are have any questions about Live Tracking such as accuracy, offline behaviour, downloads, permissions, and limitations, refer to the Live Tracking FAQs.

Click on the Live Tracking block. A Right Panel for editing appears on the right side.


Label is positioned above the block and it is the Heading which conveys to the end user that this is a Live Tracking block.
According to the user requirements, the App Designer can rename the Label suitably pertaining to tracking the movements of field employees or goods.
Description is positioned below the Input block which further explains to the end user about the path of travel and the distance to be covered or any other parameter according to the use case.
Description is an optional field.
Mention the number of hours that the live tracking block can be kept ongoing while on the move before the user ends the live tracking.
This is useful in cases where the user fails to stop the live tracking. Once stopped, it will automatically update the submission with the last taken location.
Enable this option to tell the end user that it is mandatory to use the Live Tracking block in order to make a submission.

The Advanced Label option allows you to change the label of a field dynamically based on a condition you define. Instead of always showing the same fixed label under the ‘Basic’ tab, the field can display different labels depending on requirements of the form. Use spreadsheet-like functions such as IF, AND, OR, etc. and make use of other field variables to set your conditions. Type @ and select the field.
This is useful when the meaning of a field changes based on context, business logic, or user choices.
For example:
If you have a dropdown called Select with options “Employee Tracking” and “Vehicle Tracking”.
Label should update to reflect the type of tracking.
So:
– If Employee Tracking, show “Track Employee Movement”
– If Vehicle Tracking, show “Track Vehicle Movement”
Formula:
IF({select} = "Employee Tracking", "Track Employee Movement", "Track Vehicle Movement")
This allows the same field to adapt its displayed purpose without needing multiple separate fields.
The Advanced Description option works exactly like Advanced Label, but it changes the description text instead. This is useful when guidance or instructions for a field need to change depending on earlier answers.
For example, using the same scenario from Advanced Label:
If you have a dropdown called Select with options like “Employee Tracking” and “Vehicle Tracking”, you may want the description of your Live Tracking field to guide the user differently depending on what they selected.
So:
– If the user selects Employee Tracking, the description could say: “Live track employee movement when tracking is active.”
– If the user selects Vehicle Tracking, the description could say: “Live track vehicle movement and capture route.”
Formula:
IF({select} = "Employee Tracking", "Live track employee movement when tracking is active.", "Live track vehicle movement and capture route.")
This helps users understand what is required from them without showing unnecessarily long or irrelevant instructions.
Additional Examples (Apply to Both Advanced Label and Advanced Description)
1. Showing nothing until a selection is made
For example, if you have a dropdown field called Visit Category with options “Routine” and “Urgent”, you may want the label or description of a field to remain blank until the user first selects a category.
Once a selection is made:
Formula (can be used in either Advanced Label or Advanced Description):
{visit_category}The label/description stays empty until the dropdown has a selected value.
After the user picks an option, the selected text (Routine or Urgent) becomes the label or description.
2. Changing label/description based on language selection
For example, if your form includes a dropdown field called Select Language with options English, Spanish, and French, you can show the label or description in the selected language.
So:
Formula (can be used in either Advanced Label or Advanced Description):
IF({select_language} = "English", "Enter details", IF({select_language} = "Spanish", "Ingrese detalles", "Entrez les détails"))The formula returns the text for the selected language.
Only one label/description is shown at a time, depending on what the user picks in the Select Language dropdown.
1. Variables do not change
When a field is created, its variable name is derived from the label you set in the Basic tab. That variable name is what you must use in formulas, workflows, and other logic. The visible label or description shown by Advanced Label / Advanced Description does not change the variable name.
2. Submissions tab: table view vs right panel
In the Submissions area, the table view always displays the labels from the Basic tab. When you open an individual submission, the right panel shows the labels and descriptions as they appear in the form (i.e., the Advanced Label and Advanced Description applied for that submission). This keeps the submission list consistent while letting reviewers see the context-aware labels and descriptions when viewing a record.
3. Bulk Edit shows Basic tab labels and descriptions
When you need to Bulk Edit submissions, the spreadsheet you download shows the labels and descriptions from the Basic tab only. Advanced Label and Advanced Description are not applied in Bulk Edit, so keep that in mind when preparing bulk updates.
4. Some fields cannot be used inside Advanced Label/Description formulas
Certain block types do not expose a variable that can be referenced in Advanced Label or Advanced Description. If a block does not expose a variable, you cannot use it inside the formula.
Geo Address
GPS Location
PaymentGateway
Audio
Live Tracking
Signature
Code Scanner
NFC Reader
Get Data from RestApi
Get Data from Other Apps
Get Data from Google Sheets
Get Data from Database
AI Block
Text, HTML & Embedding
Attached Files
Image Viewer
Video Viewer
PFD Viewer
Code block
Progress Bar
Action Button

Enable this option to show/hide the Live Tracking block in relation with another block.
Note: Make sure the GPS Location permission is granted for the Clappia app in your smartphone settings and the location is enabled for the Live Tracking feature to work.

When a Live Tracking block is added and saved, five Calculation & logic blocks are automatically added to the app:


These blocks are pre-configured with the live tracking variables, as seen in the above image, that fetch data from the Live Tracking block, ensuring that the tracking data is readily available for use.

These blocks function exactly as the ‘Calculation & logic’ block, click here to know how to configure and use this block.
Note - Previously, users had to manually add a Calculations & Logic block to track these values by referencing Live Tracking variables. Now, these fields are pre-added to avoid confusion about using variables for tracking.
Deleting a Block → If you do not require a particular field, you can delete it by selecting the block and clicking the Delete icon at the top in the right panel.

Modifying a Formula → Admins can change the formula in these blocks as needed. For example, to calculate ‘Total Hours Covered’, they can modify a block’s formula as follows:
{live_track#startTime}/60 to capture the time in hours.

Hiding a Block → If you do not want these fields to be visible in the app interface for your users, you can hide them by selecting the block, navigate to the ‘Advanced tab’, and enable the ‘Hidden’ option.

When users start live tracking, these fields are automatically populated with real-time data, eliminating manual setup.
If you have deleted and/or need to have additional Calculation blocks using the live tracking variables, simply add a ‘Calculations & logic block to your app and in the right panel under the formula option, type in @livetracking, and you will find all the available variables of the live tracking block.


Note:
Distance is captured in km.
Time is captured in minutes.
Location captures GPS Coordinates.
Make sure the user has the updated app. They can refresh the app by clicking on the bottom left icon.
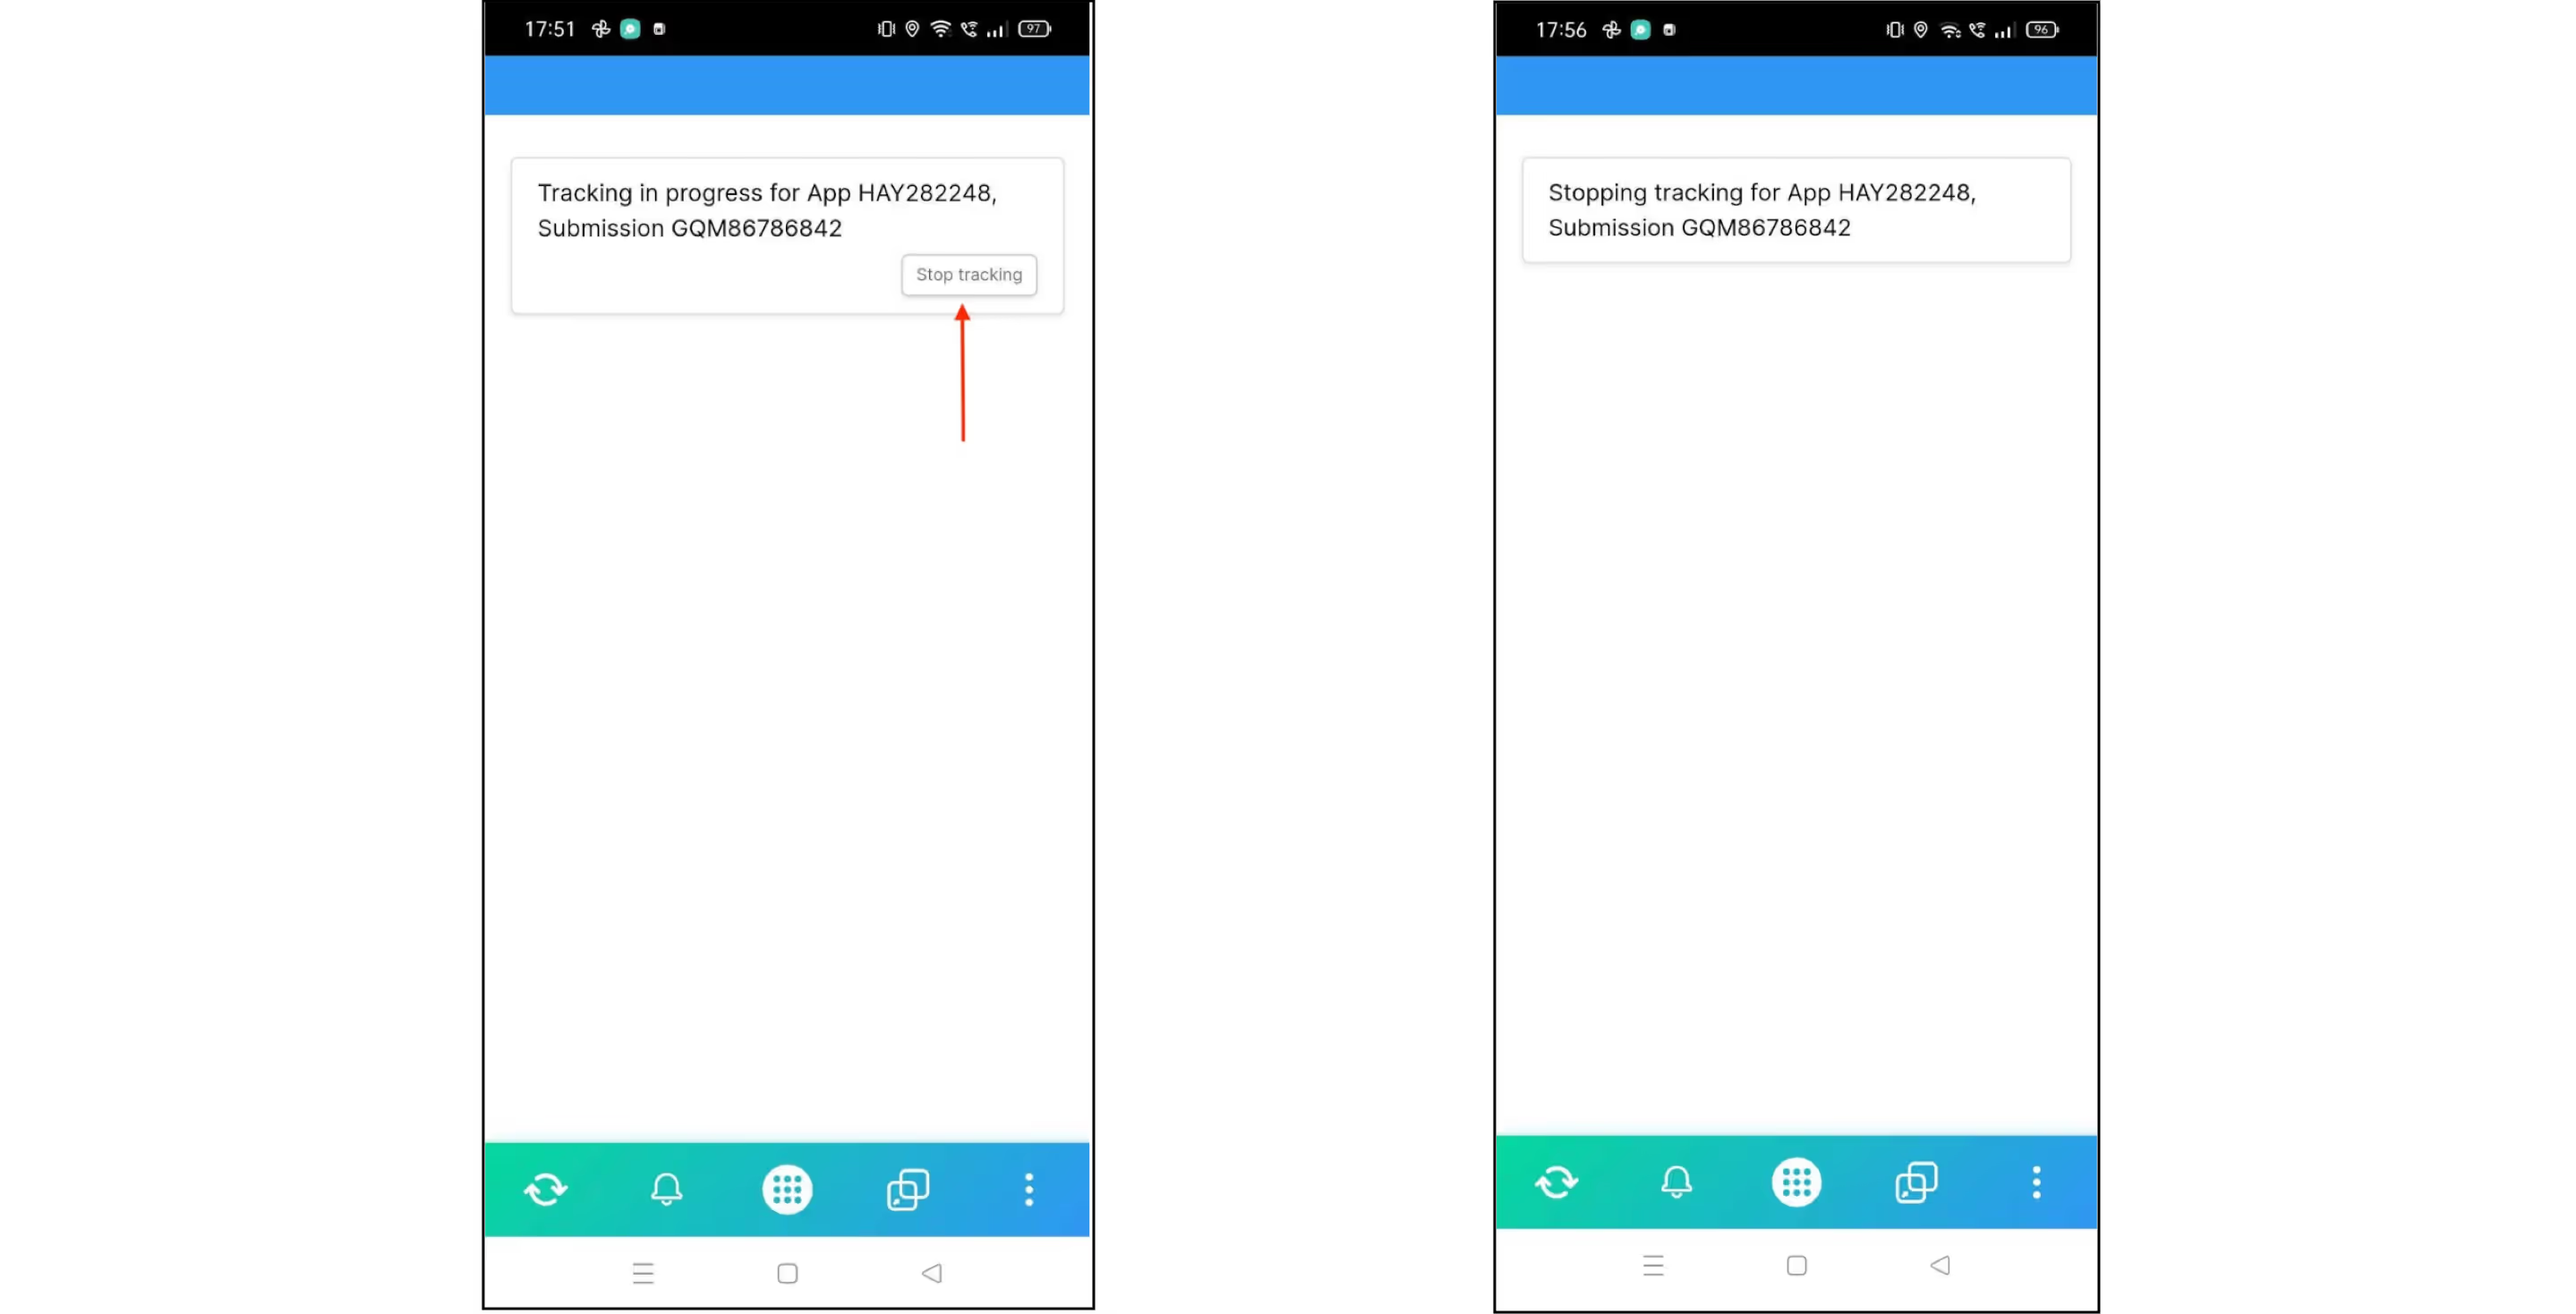
Upon opening the Live Tracking app, fill all details in your app, click on the Start Tracking button and then click on Submit.


Click on OK.

Once submitted, the user can make another submission or view their submissions.

There are multiple ways to stop live tracking. The first is by clicking on view submissions right after submission.
The second is by clicking on the submissions view icon at the bottom when the app is opened.


Once the user clicks on Stop Tracking, they should click on Submit.
The other way to stop live tracking is from the home screen of the app. The user can click on the icon at the bottom right corner of the app. Then click on Live Tracking.


In case users are in remote locations, live tracking will still work as long as they keep the location in their mobile on.
The app will work even when there is no internet connection. Data can still be submitted along with live tracking. Data automatically syncs once it is connected to the internet.
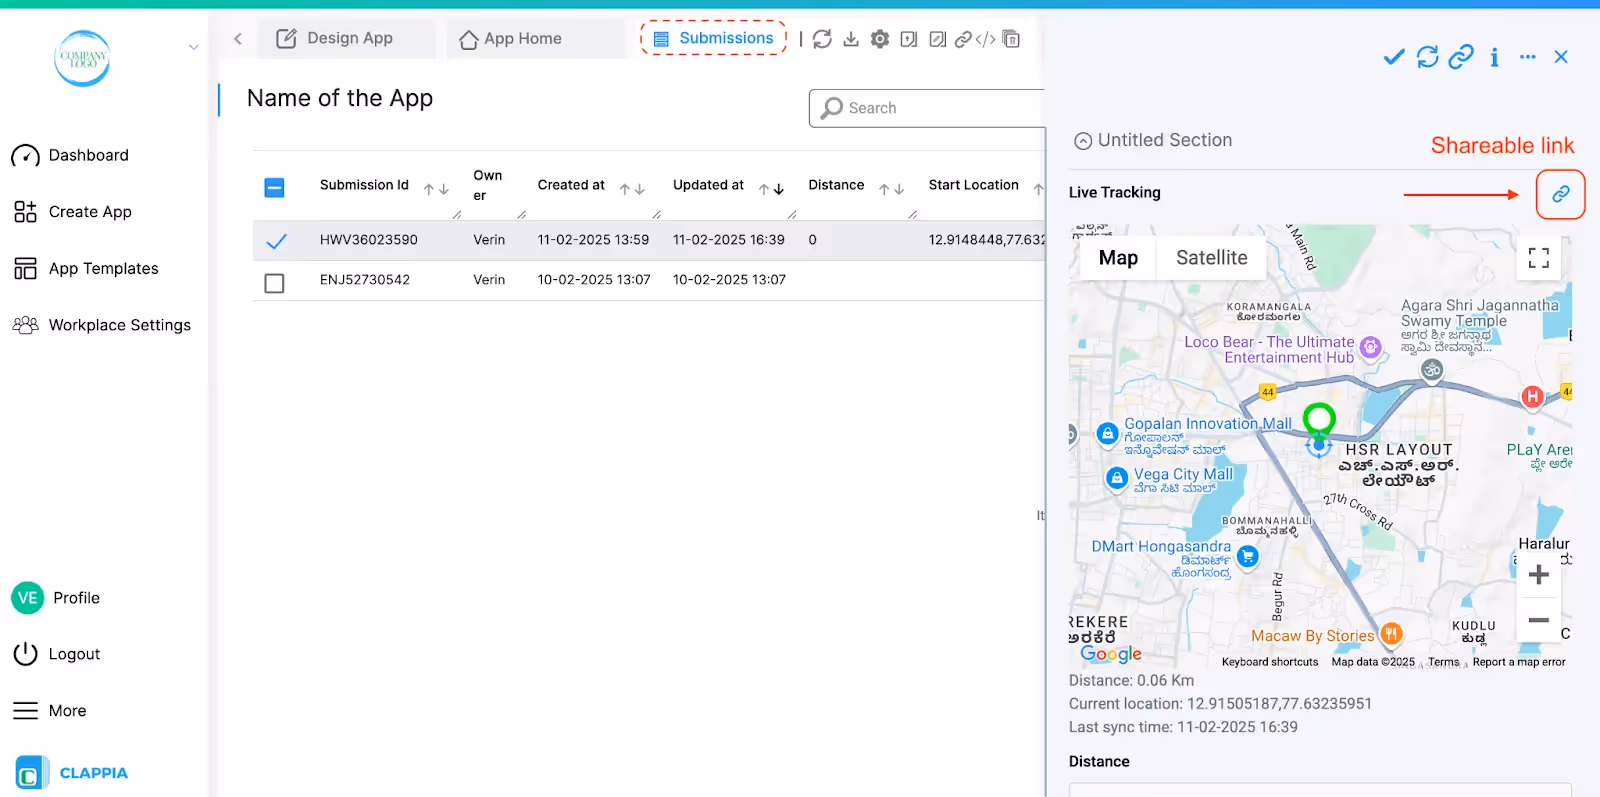
To view live locations of users, in the web app, once the app is open, go to the Submissions tab.
Click on a submission to get a right panel that shows the details submitted by the user.
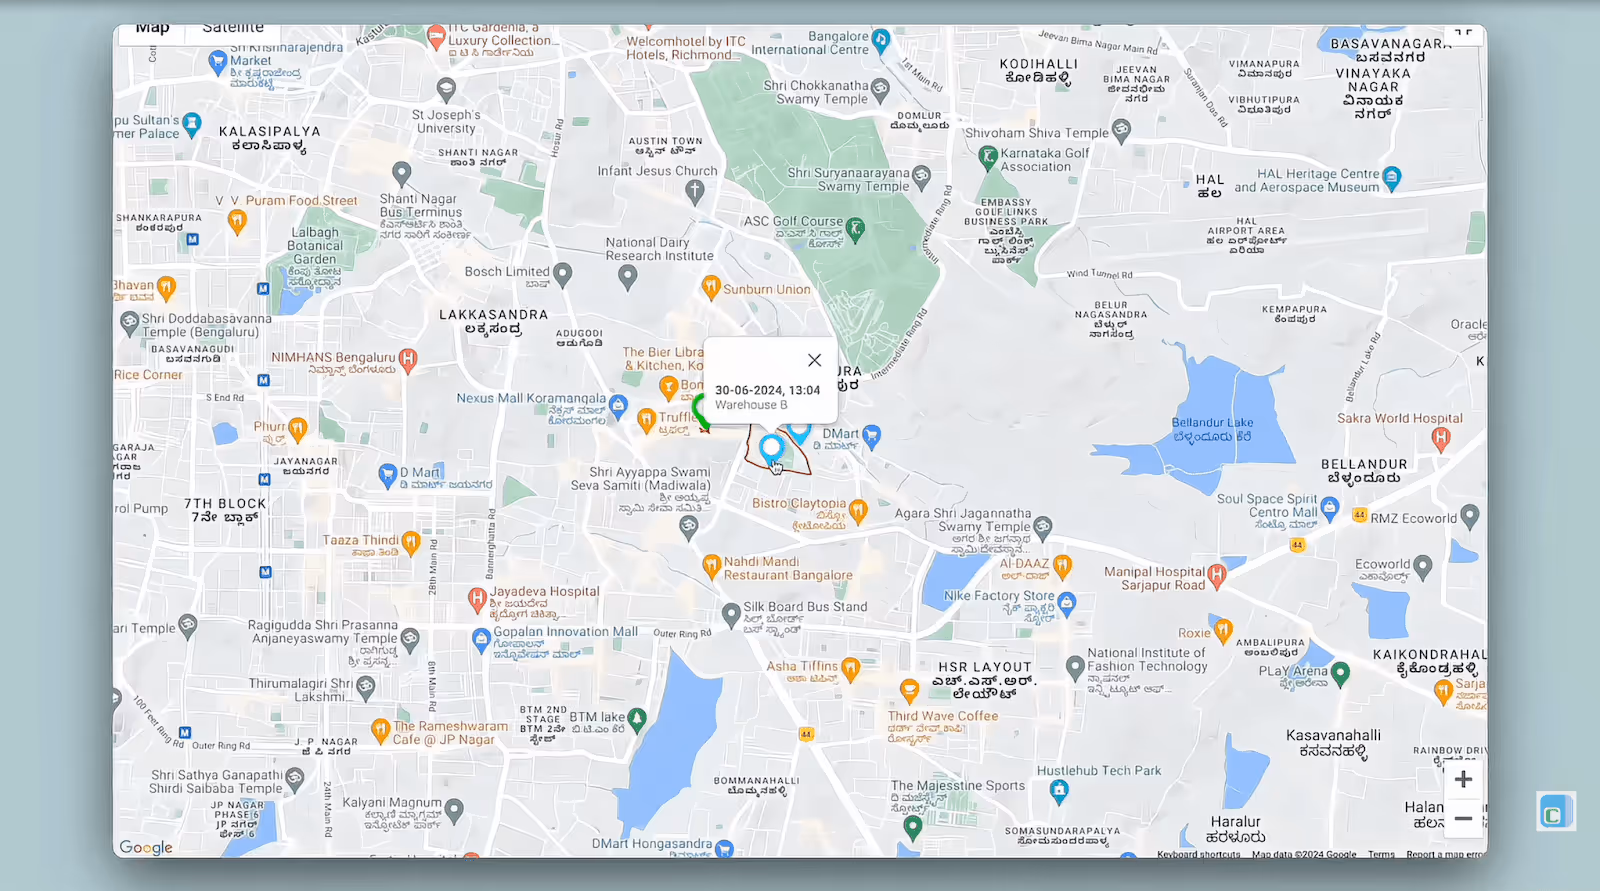
The path of movement is tracked and is displayed on the map.

The Green coloured location icon represents the start position and the Red coloured location icon represents the end position of the user.


You may also get a yellow coloured icon, this indicates that either the GPS signal of the user’s mobile is weak or their mobile’s battery is below 65% or both.

The route travelled by the user will be shown in red. In case you see grey lines, this indicates that the GPS signal of the user’s mobile is weak.

Distance traveled, current location and last sync time is also tracked and is displayed at the bottom left of the map.

The calculation fields have also automatically calculated the values based on the live tracking data as seen in the picture above.
In addition to tracking live locations via the Submissions tab, app admins or users with appropriate permissions can share a live tracking link to monitor a user’s movement in real time.
In the Submissions tab > Select a submission. On the right panel, a shareable link will be available at the top. Click on it to automatically copy the tracking link to clipboard. Share this link with workplace members who need to monitor the live location. This shareable link will still be available even if the live location has ended.
When opened, this link will show the submitter’s real-time movement along with the details as shown below.
When location tracking is ongoing:

When location tracking has ended:

This ensures that authorised users can track field employees, logistics, or other live movements directly from the web app without requiring manual updates.
There are two different places to download tracking data, and they serve different needs:
A) Download all submissions (includes live-tracking + calculation blocks)
In the Submissions tab, at the top, click the Download icon.

This file downloaded contains every submission and all fields (unless filtered), including the auto-generated Calculation & Logic fields that come with the Live Tracking block (Distance, Start Location, End Location, Start Time, End Time).
In this download, the live-tracking portion appears as coordinates within the submission’s data.

Use this when: you need a full dataset across many records (e.g., for reporting, audits, or analysis that includes non-tracking fields).
B) Download tracking data for one submission (icon above the map)
Open a specific submission → in the right panel, scroll to the Live Tracking map → click the Download icon above the map.

This gives you the tracking information for that one submission (the journey tied to the map you’re viewing), separate from the full submissions download.

Use this when: you only need the route data for a single record (e.g., to review or share the exact path) without pulling every column from every submission.
(using Edit Submission Workflows)
If a route includes stops or updates mid-journey, you can show them on the map as blue pins. The map already uses green for the start and red for the end; blue pins appear when the submission is edited during tracking.

How to set it up:

Why this is useful: for multi-stop scenarios (e.g., visiting multiple warehouses or sites), admins can see every stop made, not just the overall route, along with the contextual details they chose to record.
For Android versions 10 & above, users have to set 'Allow all the time' permission for location in Clappia app for the Live Tracking feature to work.


Power-saving mode warning
If a user’s phone is in power saving mode, a warning appears before starting tracking. Live Tracking will work, but tracking can be limited.
Fix: turn power saving off while tracking to ensure proper recording.

Battery optimization blocks tracking
If the Clappia app has battery optimization enabled (some devices set this by default), the user will see a warning and Live Tracking won’t work.
Fix (quick): tap the link in the warning to open app settings and set Battery > Unrestricted.
Fix (manual path): Your device’s Settings > Apps > Clappia > Battery > Unrestricted
*options may vary depending on your device.

Developer options enabled
If Developer options are turned on for the device, the user cannot use Live Tracking.
Fix: turn Developer options off and start tracking again.

If you have questions about Live Tracking accuracy, offline behaviour, data downloads, permissions, or supported limitations, refer to the Live Tracking FAQs here.
L374, 1st Floor, 5th Main Rd, Sector 6, HSR Layout, Bengaluru, Karnataka 560102, India
3500 S DuPont Hwy, Dover,
Kent 19901, Delaware, USA


3500 S DuPont Hwy, Dover,
Kent 19901, Delaware, USA
L374, 1st Floor, 5th Main Rd, Sector 6, HSR Layout, Bengaluru, Karnataka 560102, India
.svg)
