
.avif)
Most businesses deal with customers, vendors, and a growing list of expenses tied to both. When this information sits in different tools or gets handled separately by different teams, it becomes harder to keep everything aligned. You may have customer details in one file, vendor lists somewhere else, and expenses scattered across spreadsheets. Any time you try to pull a clean report or understand where money is going, you end up stitching everything together manually.
Instead of managing all of this in separate places, you can bring it together inside a single Clappia workspace. You can create neatly organised master apps for customers and vendors, and then connect them to an expense tracking app. When everything is linked, your teams always work with accurate information, and you avoid duplicate entries or mismatched names. With AI helping you build the initial structure and no-code features letting you refine it whenever needed, you get a setup that stays simple for users and powerful for admins.
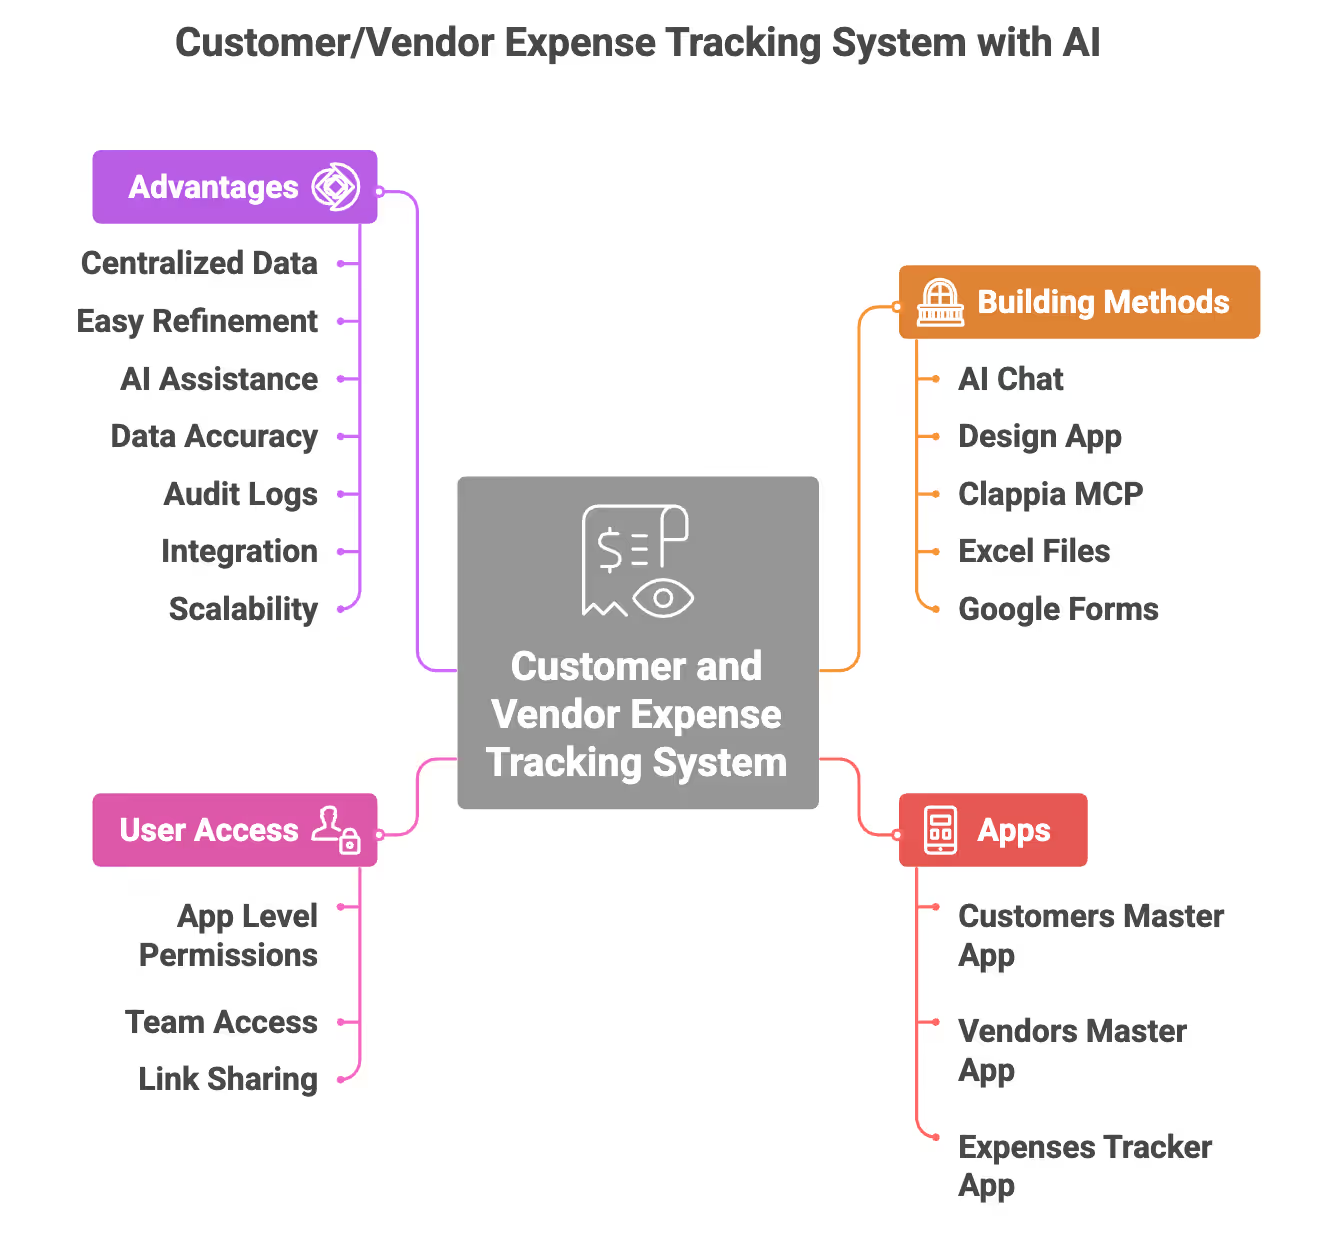
You can create this system in whichever way is most comfortable for you:
Describe what you want, for example, “an app to track my customers and vendors and record expenses linked to each of them”, and the AI chat will generate a starting structure. You can then adjust it in the Design App.
Building Manually in the Design App
If you prefer building step by step, you can add pages, sections, and fields yourself. This is useful when you already know exactly how you want the data to be organised.
If you want to generate apps using prompts or automate the creation of standardised apps across locations or teams, MCP makes it easy to do that from a single place.
If you already maintain customer or vendor lists in spreadsheets, you can import them directly and Clappia will create the app for you.
Import a form you already use and convert it into a Clappia app. You can then enhance it with linked data, validations, and automation.
Below is an example of how you can structure this setup and how the pieces fit together inside your workspace.
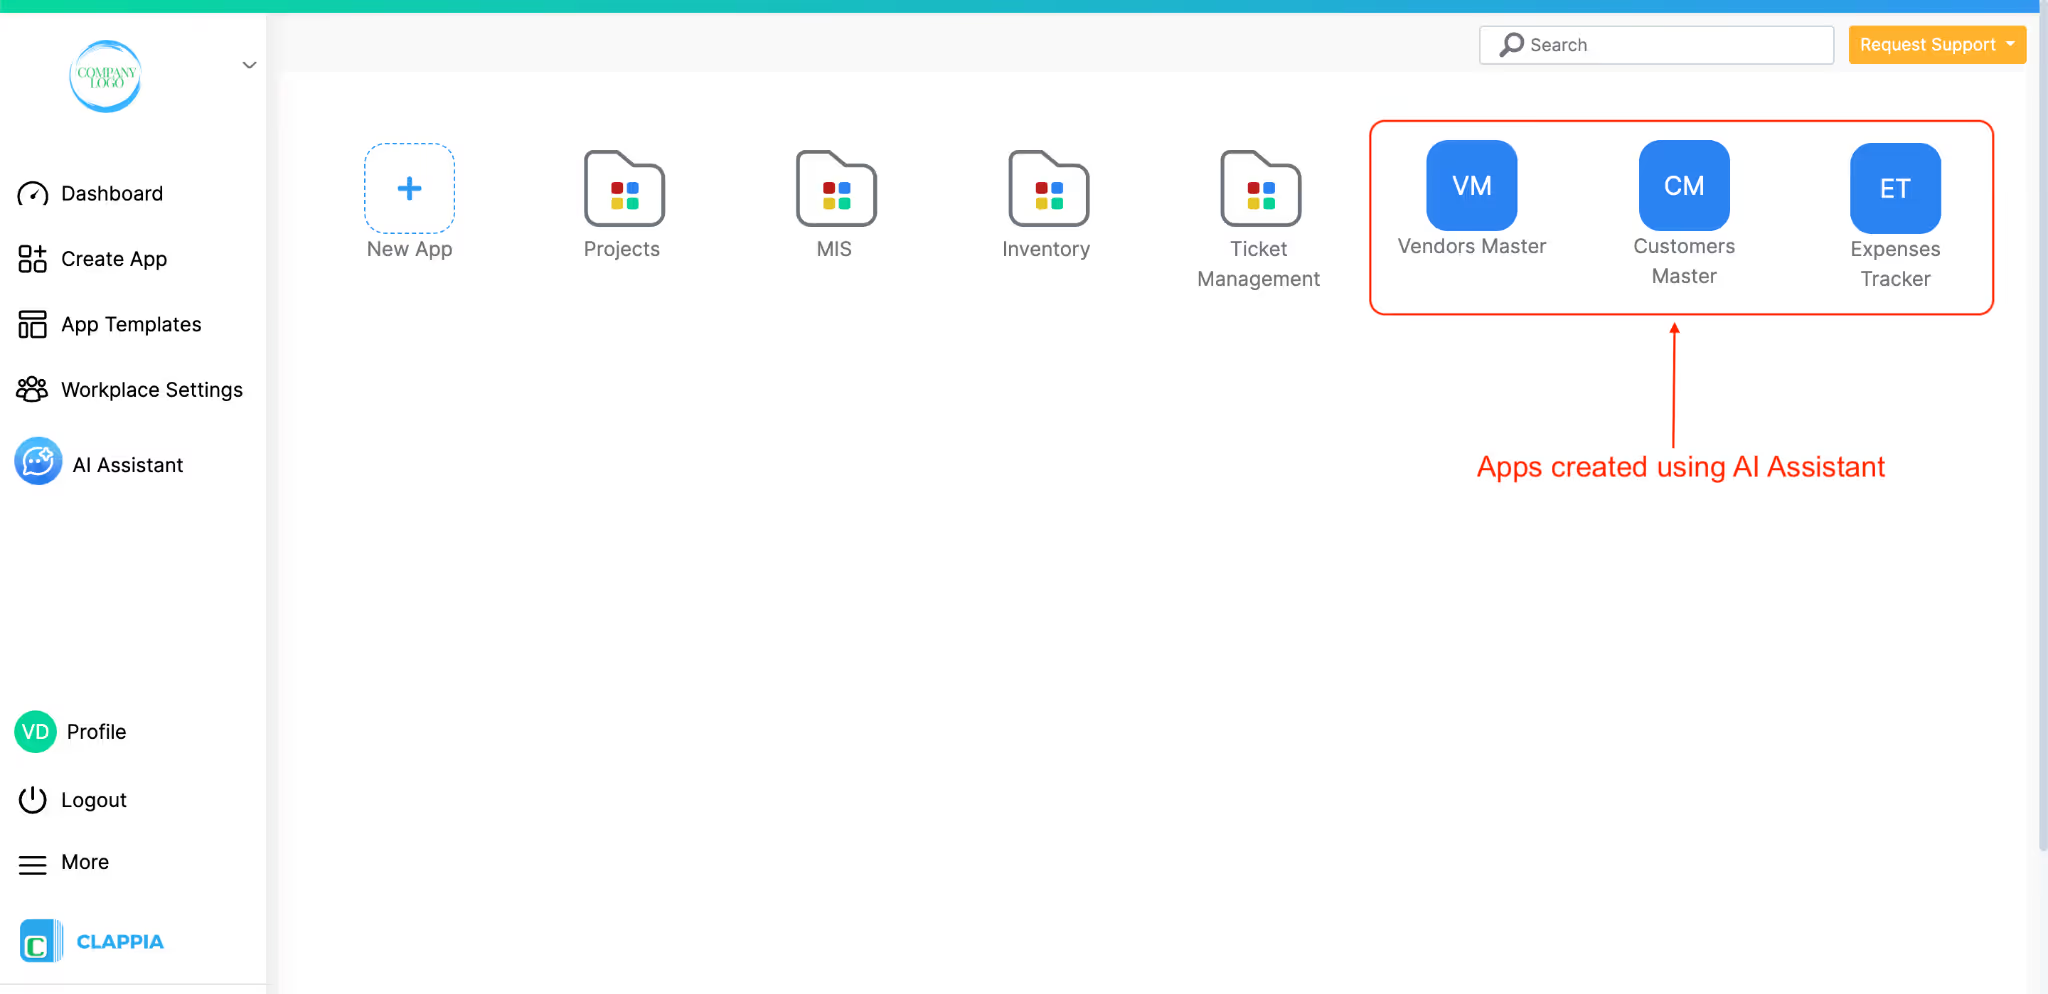
To track customers, vendors and the expenses linked to them, you can build three simple apps in your Clappia workspace. Two of them store your master data, which will be customer information and vendor details, and the third one is the main app where your team records every expense. When these apps work together, your information stays clean, consistent and easy to use across all your processes.
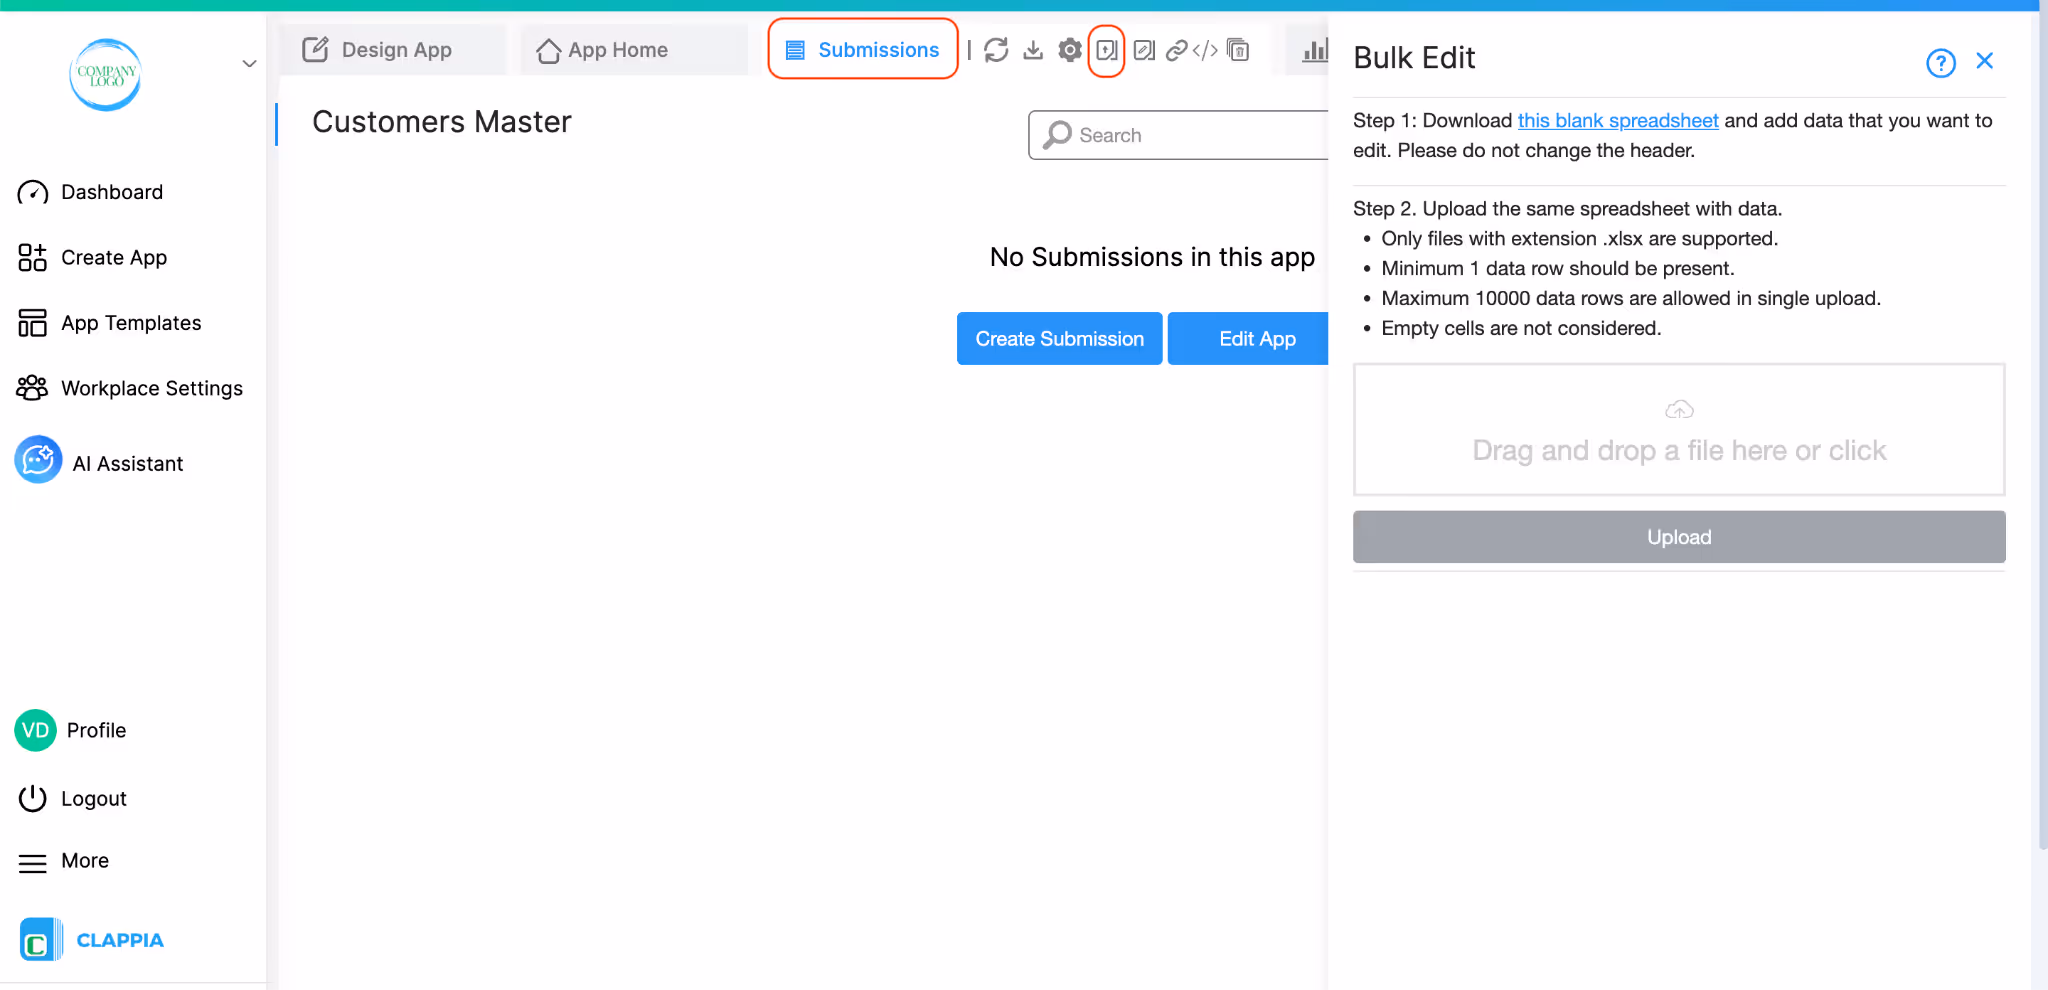
If you already have customer or vendor details in spreadsheets, you can bulk upload that data into the master apps so you don’t have to enter anything manually. If you’re starting fresh, you can add entries one by one. Once the data is inside Clappia, any other app you build can use it instantly. That is why teams often treat these as their MIS or reference apps.
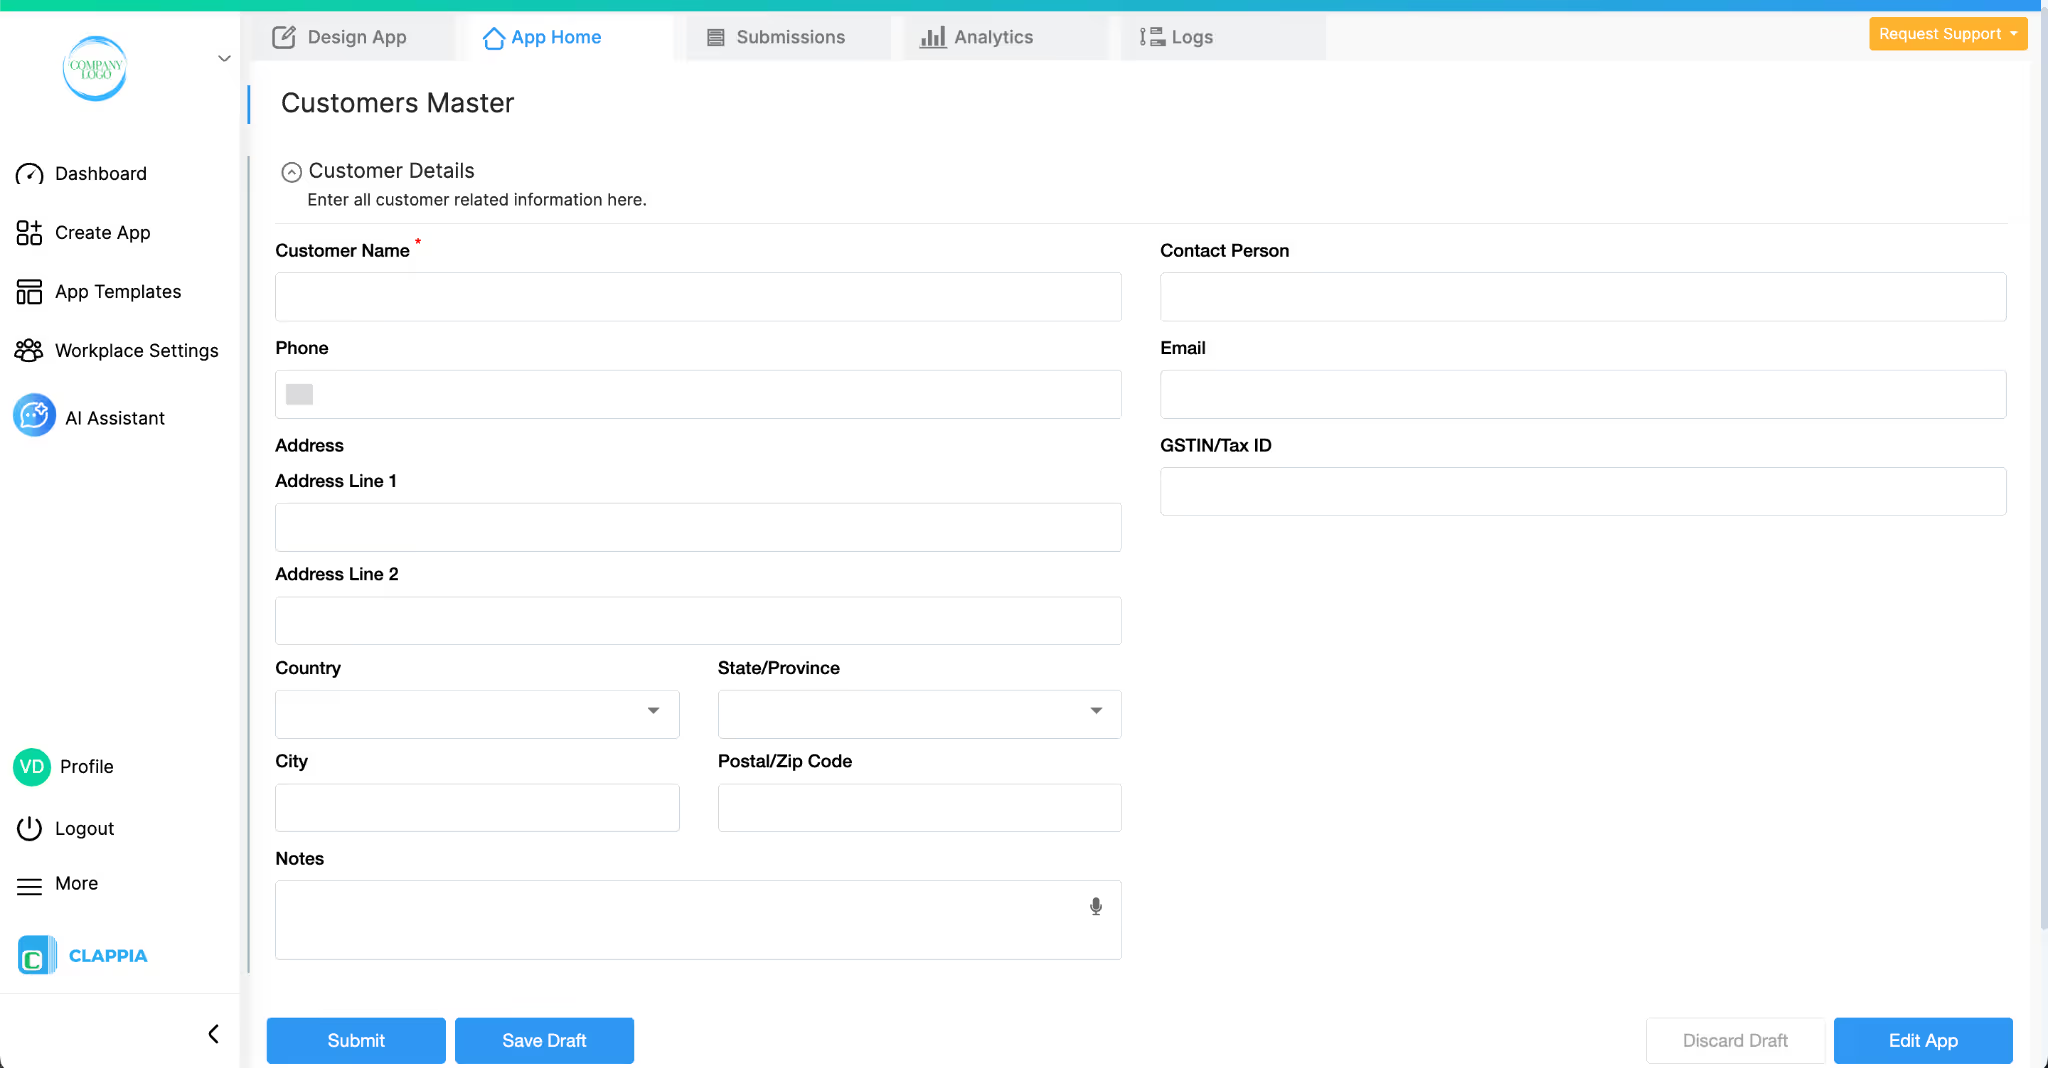
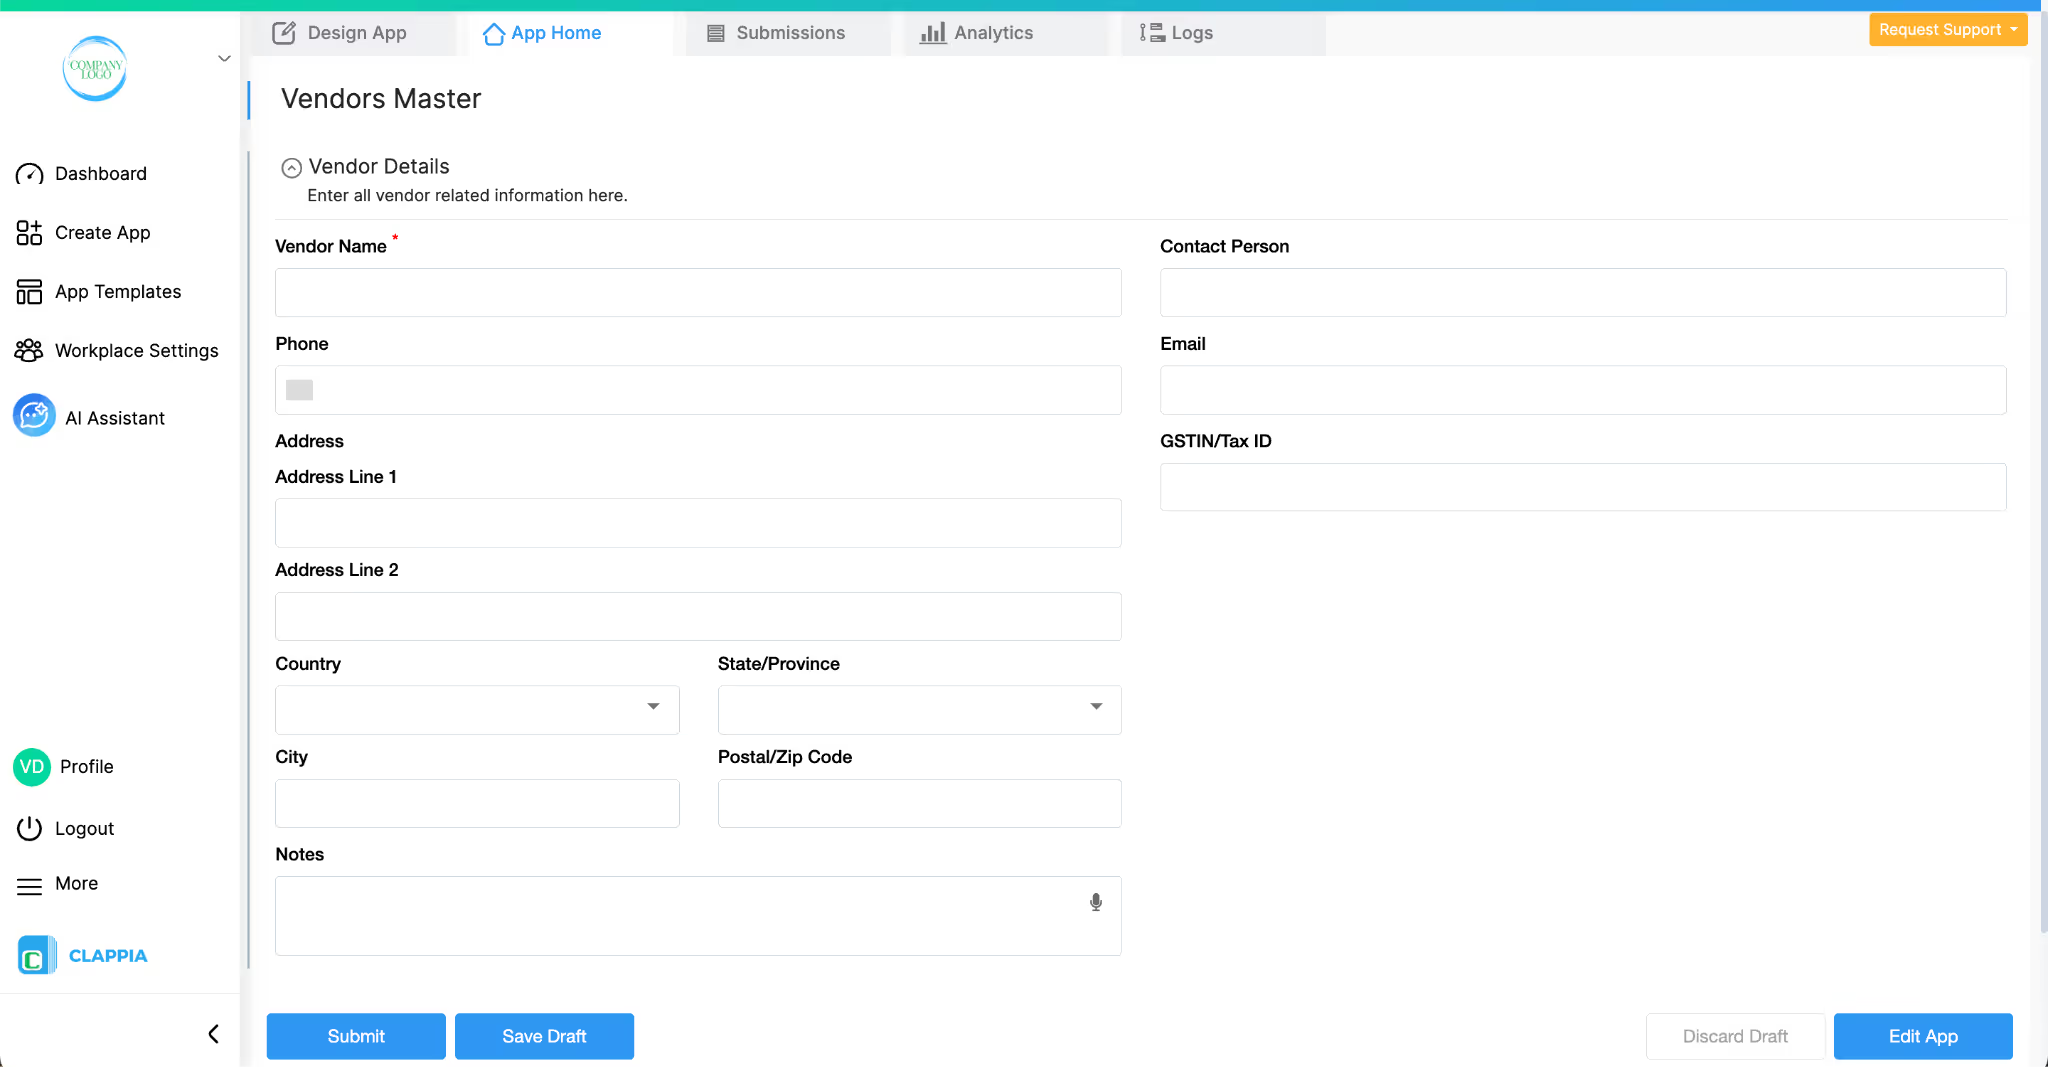
This app holds all your customer-related information in one place. You can keep it as simple as you want or expand it depending on the details your business needs.
A common structure looks like this:
Section: Customer Details
You can add more fields if they help your process, such as:
Once these entries are submitted, they become available for use in the Expenses Tracker app or any future app you build once you link them.
This app stores vendor information with a layout very similar to the Customer Master. Keeping them consistent helps teams switch between apps without confusion.
Section: Vendor Details
You can expand the app to support more specific information, such as:
Both master apps act as your single source of truth. Any changes you make here automatically reflect wherever the data is used.
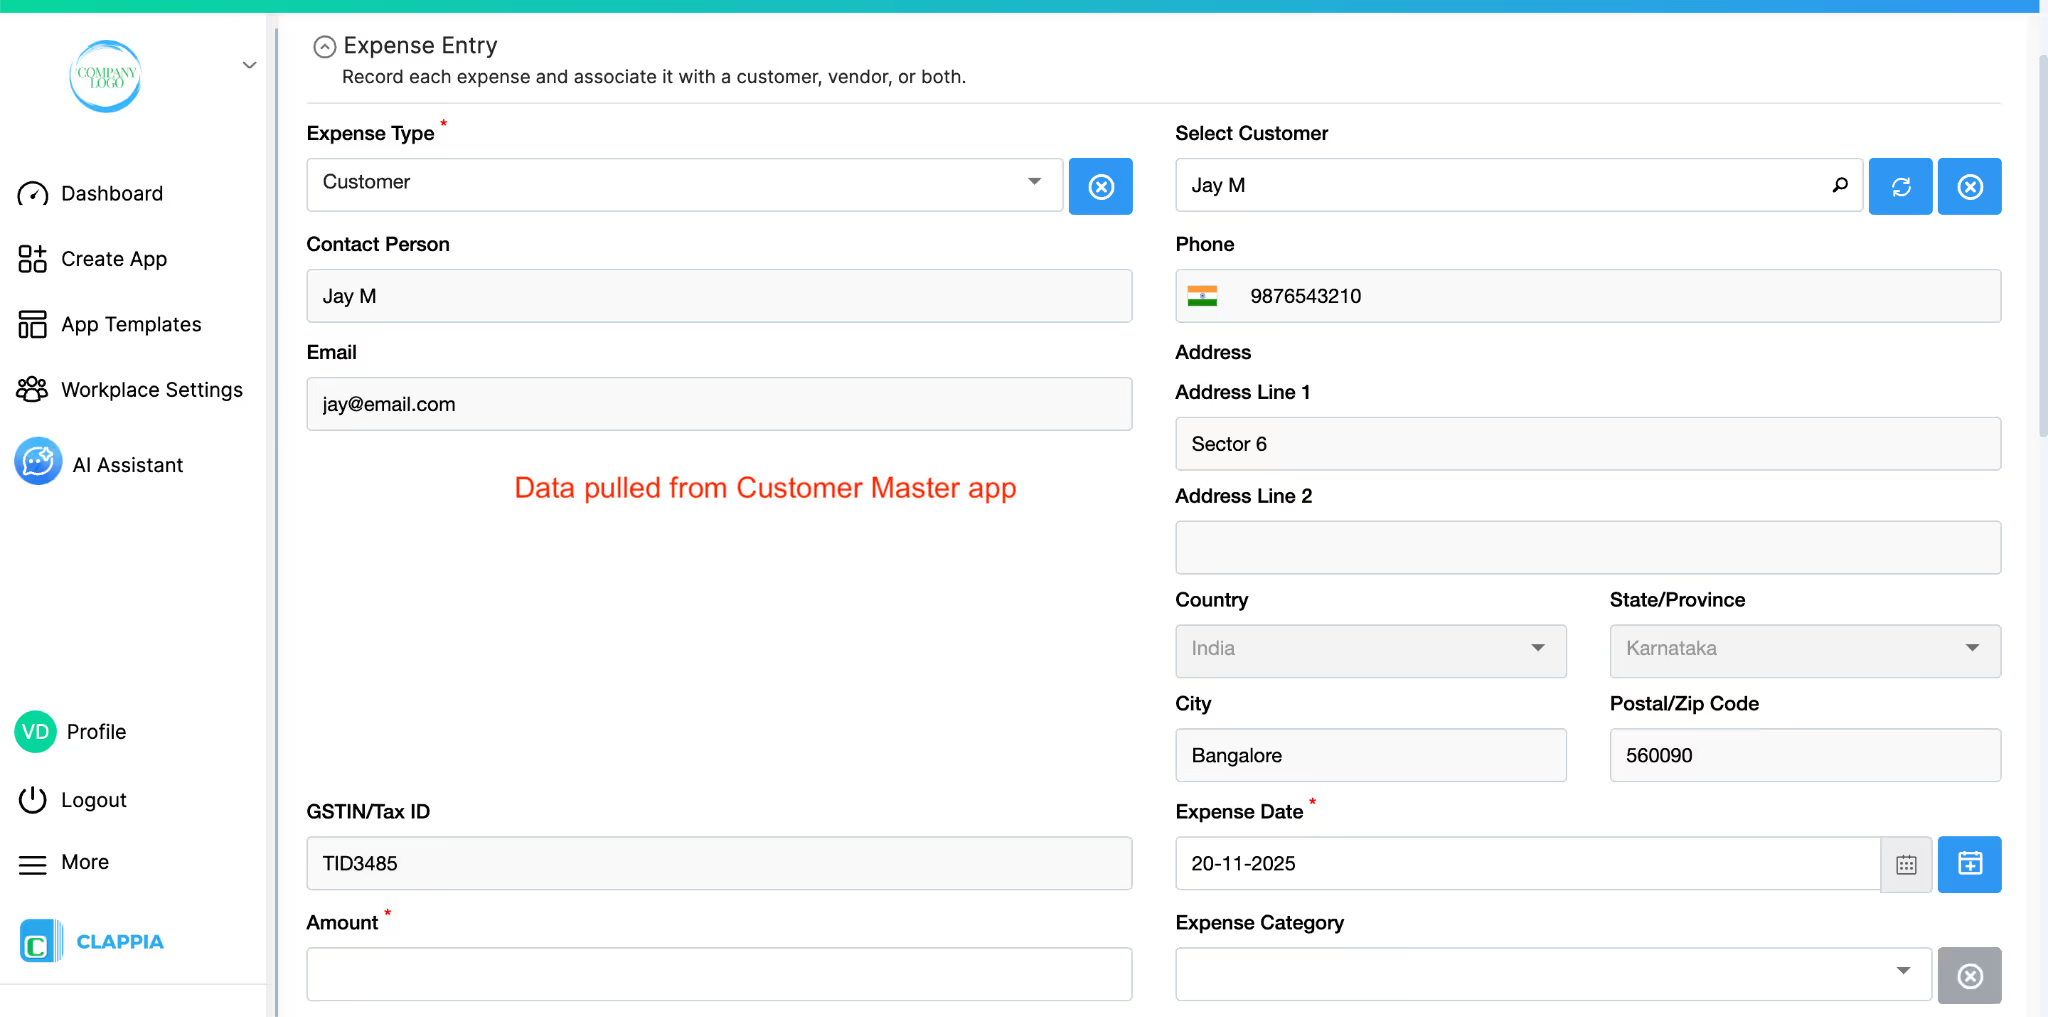
The Expenses Tracker App is where your team records each expense and associates it to either a customer or a vendor or both. What makes it powerful is the ability to pull information directly from both the master apps. This removes typing errors, keeps names and IDs consistent and makes the entire submission process faster. This is the main app in the setup.
Pulling Customer and Vendor Data
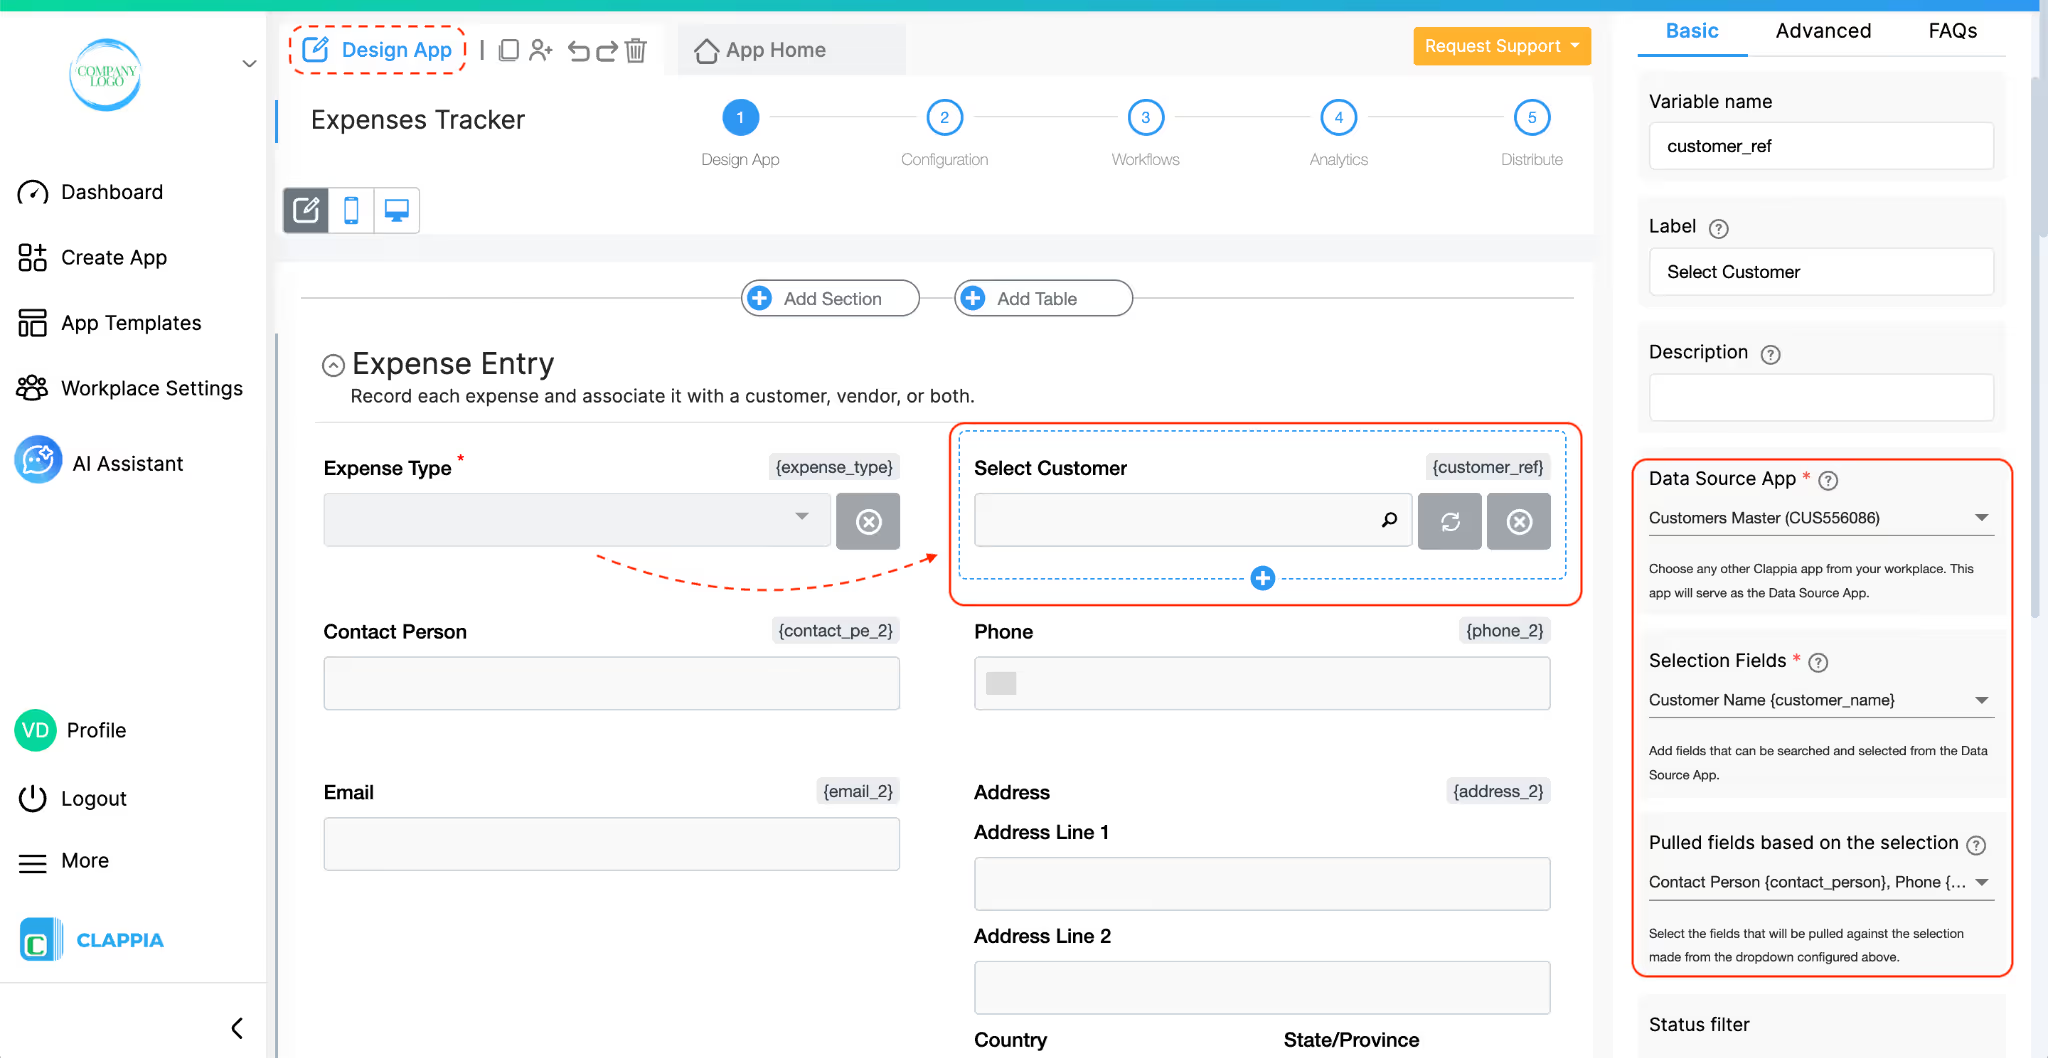
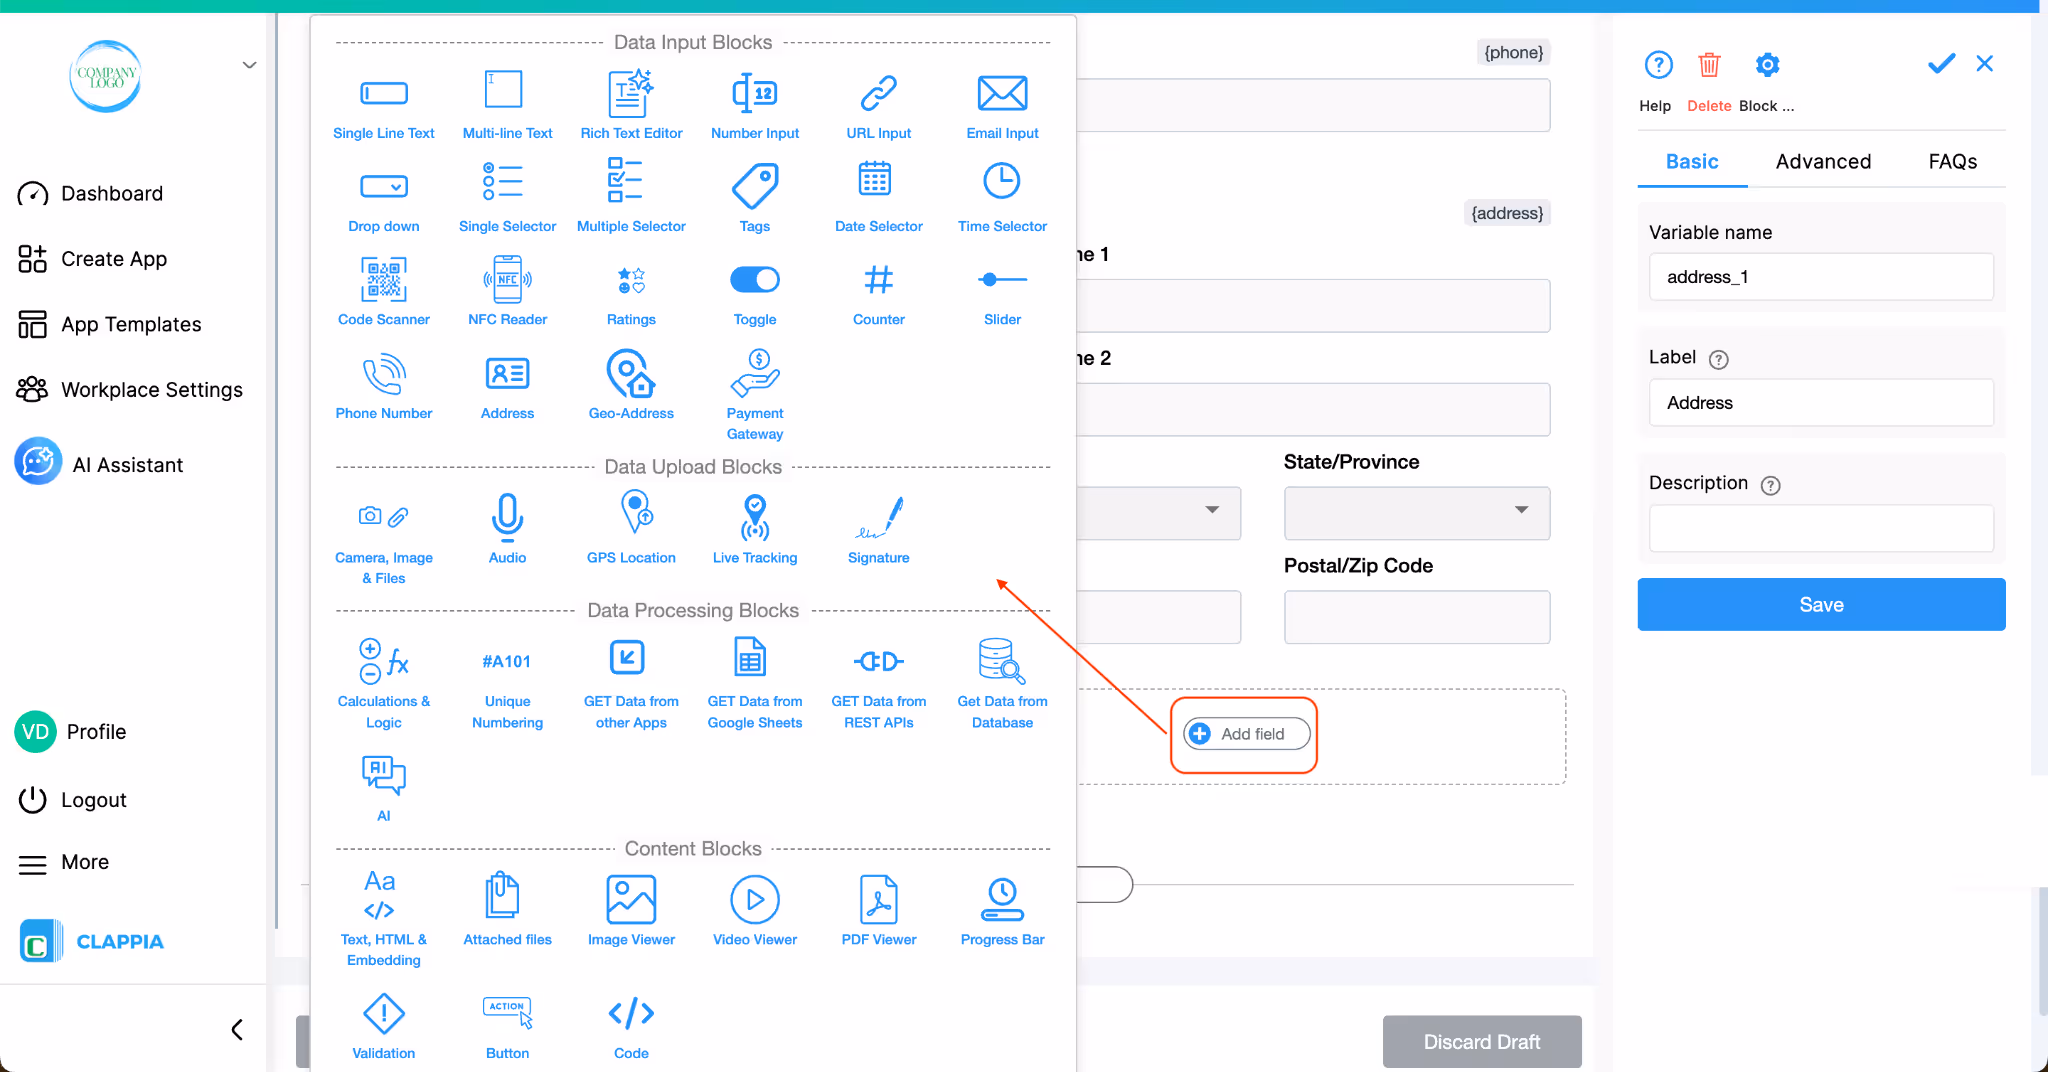
You can use the Get data from other apps block to let users pick a customer or vendor from your master app data. When they select the right one, the app can automatically fill in the associated information you have stored, such as codes or contacts. This is helpful when you want clean, reliable data without manual entry.
You can even show or hide fields based on what the user selects. For example, if the person chooses “Vendor” in the Association Type field, only the vendor-related selector will appear.
App Layout
A typical layout for the Expenses Tracker looks like this:
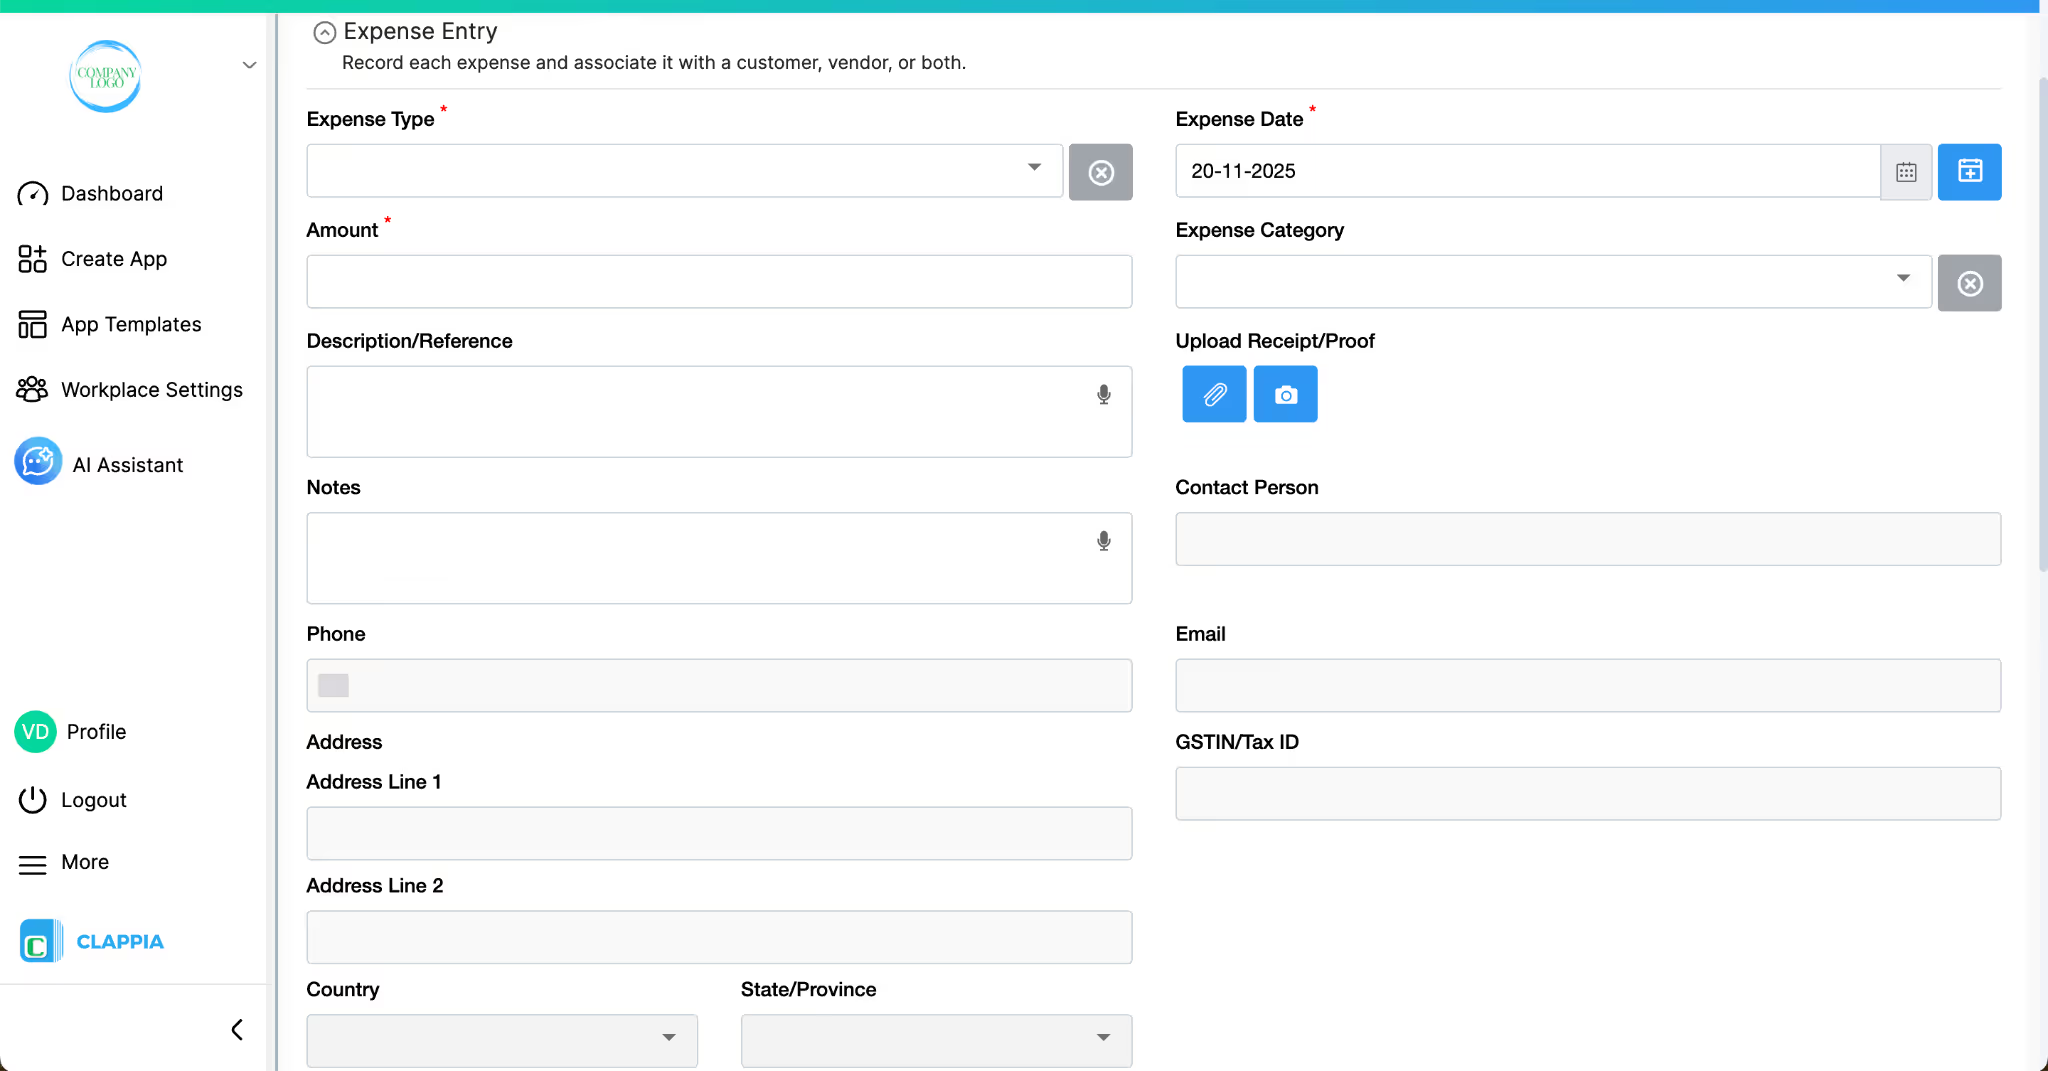
Section: Expense Entry

This dropdown has options like Customer, Vendor and Both. When a user selects an option, the app displays a Get Data from Other Apps block connected to the related option’s master app.
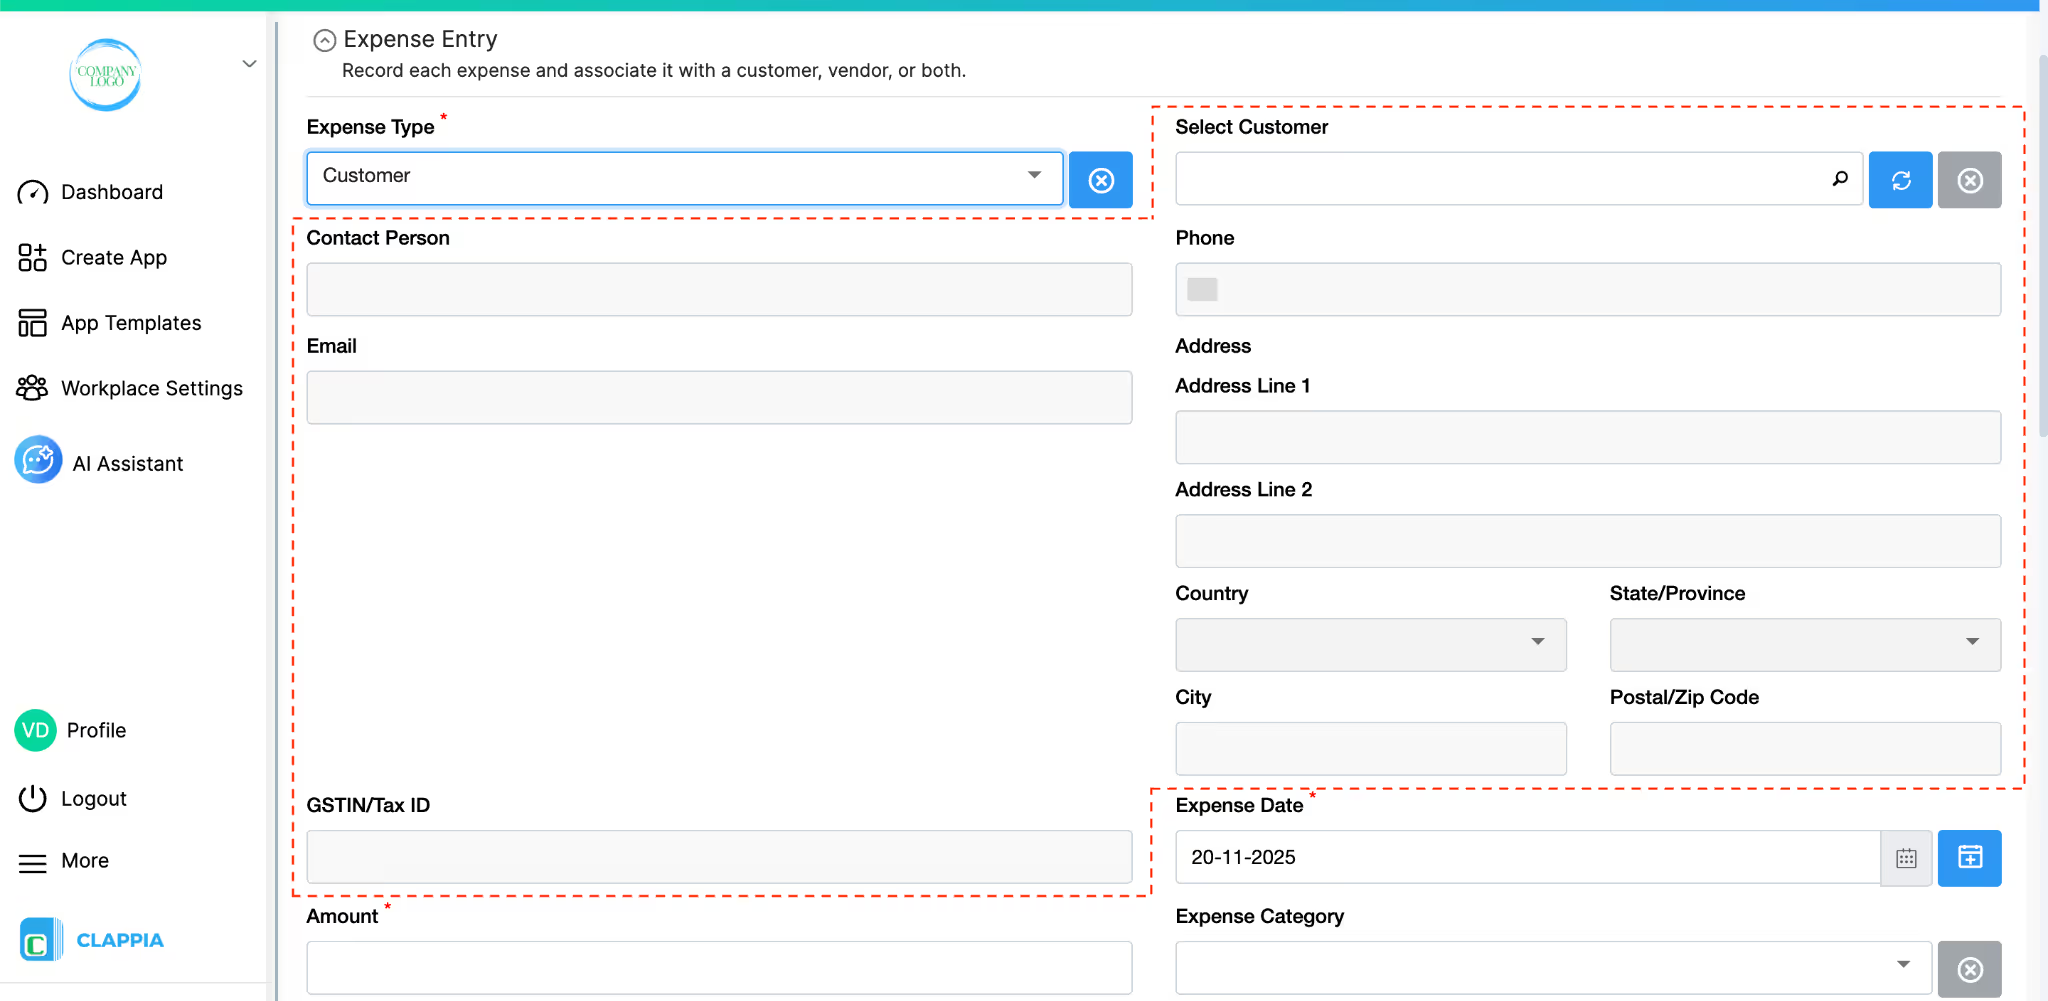
Let’s say the user selects ‘Customer’ from the dropdown, another field called “Select Customer” appears. This field is connected to the Customer Master app. The user can then select a customer and their information is pulled in automatically.

Once the user selects the data, the below fields, tied to this block, are automatically filled in.
Email (Email block)
Phone (Phone block)
GSTIN/Tax ID (Text block)
Address (Address block)
Other blocks in this app:
You can enhance this app further if your team works in the field. For example:
All of these help create a more complete picture of how and where expenses are created.
Once your three apps are connected and working smoothly, you can build additional capabilities around them. For instance:

Since all your customer and vendor information already lives in Clappia, these extensions become easy to build without starting over.
Building your data this way keeps everything organised from the start. Every expense is linked to verified customer or vendor records.
Once your customer, vendor and expense data sit in separate but connected apps, you can start building more workflows around them without changing the foundation.
You can link this setup to other apps you may build later, for example:
As your process grows, you can add new fields, build multi-step workflows or extend analytics without disrupting how users record expenses today.
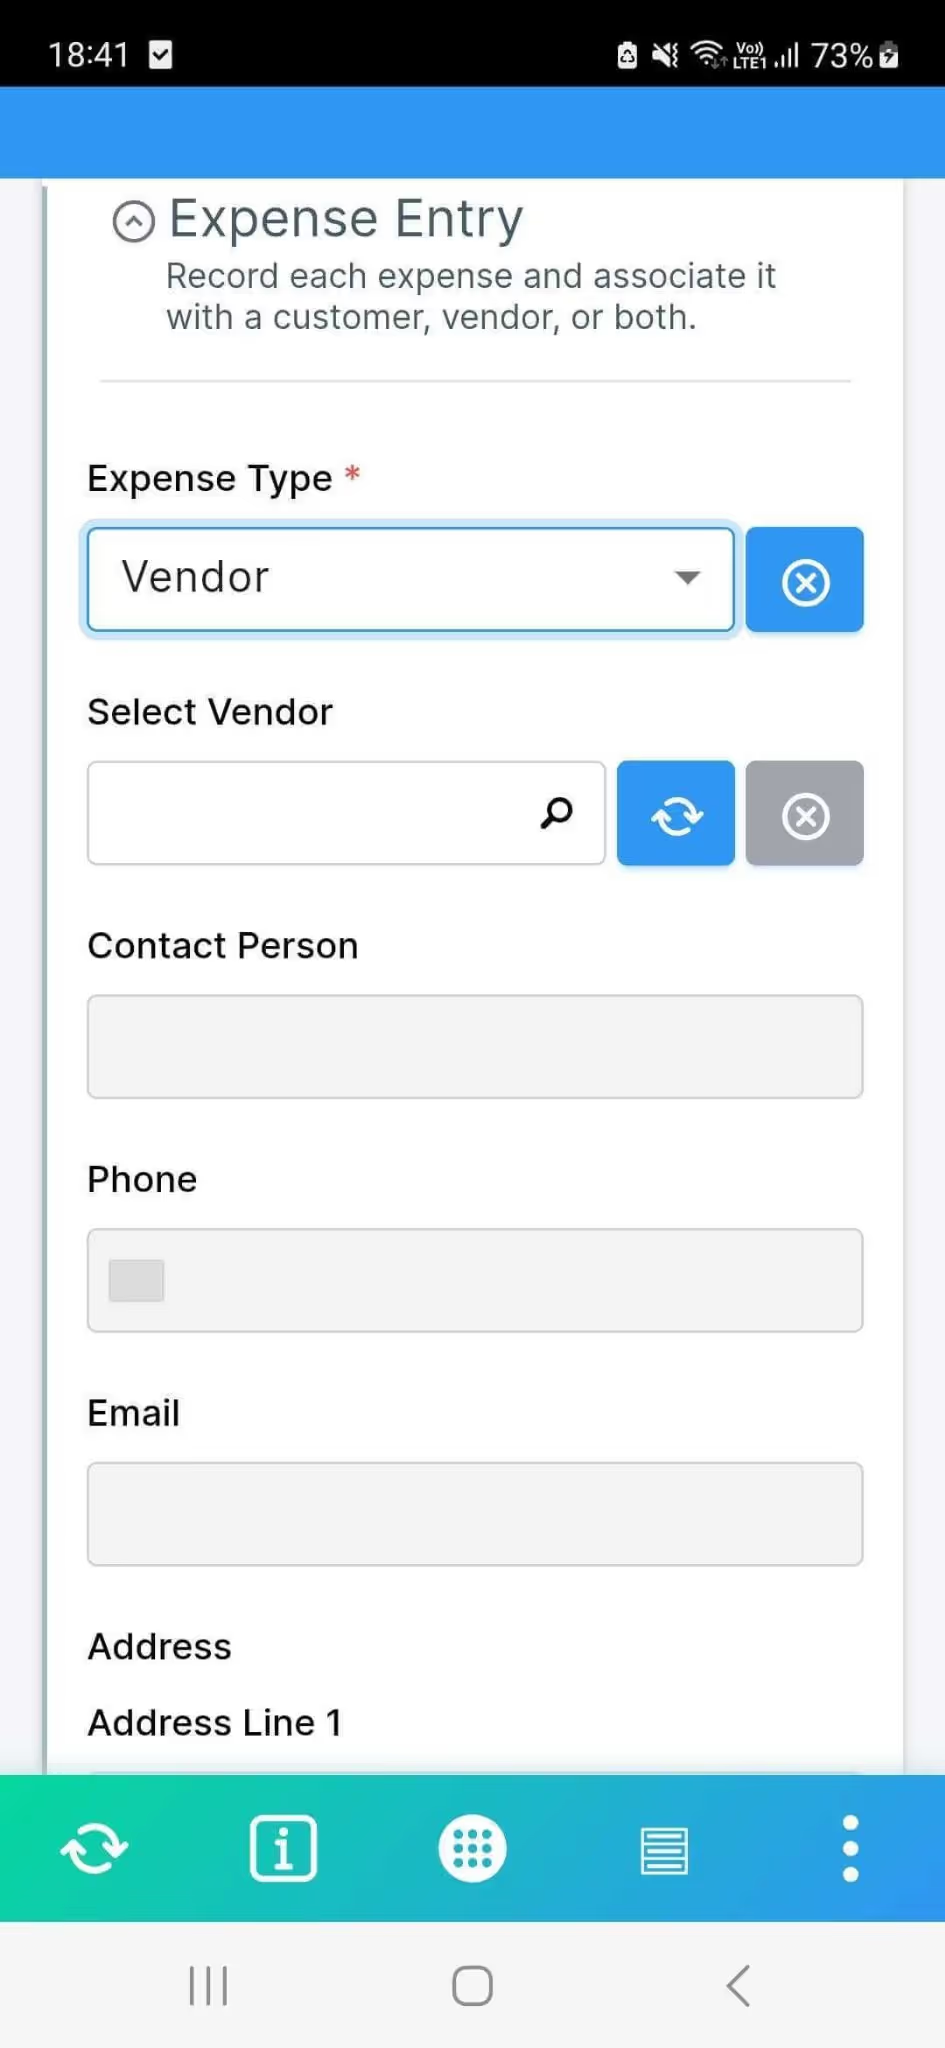
Once these apps are added to your workspace, your teams can start using them immediately without any extra configuration on their devices. Employees using the mobile app can add expenses on the spot, upload receipts, or search for customer/vendor details without switching between tools. Since the master apps hold the main records, fields like customer name, vendor name, contacts, and addresses get filled correctly every time an expense is logged.
Because these apps work together, day-to-day use becomes much faster:
This structure keeps the workflow smooth even if your organisation grows or your expense process becomes more detailed over time.
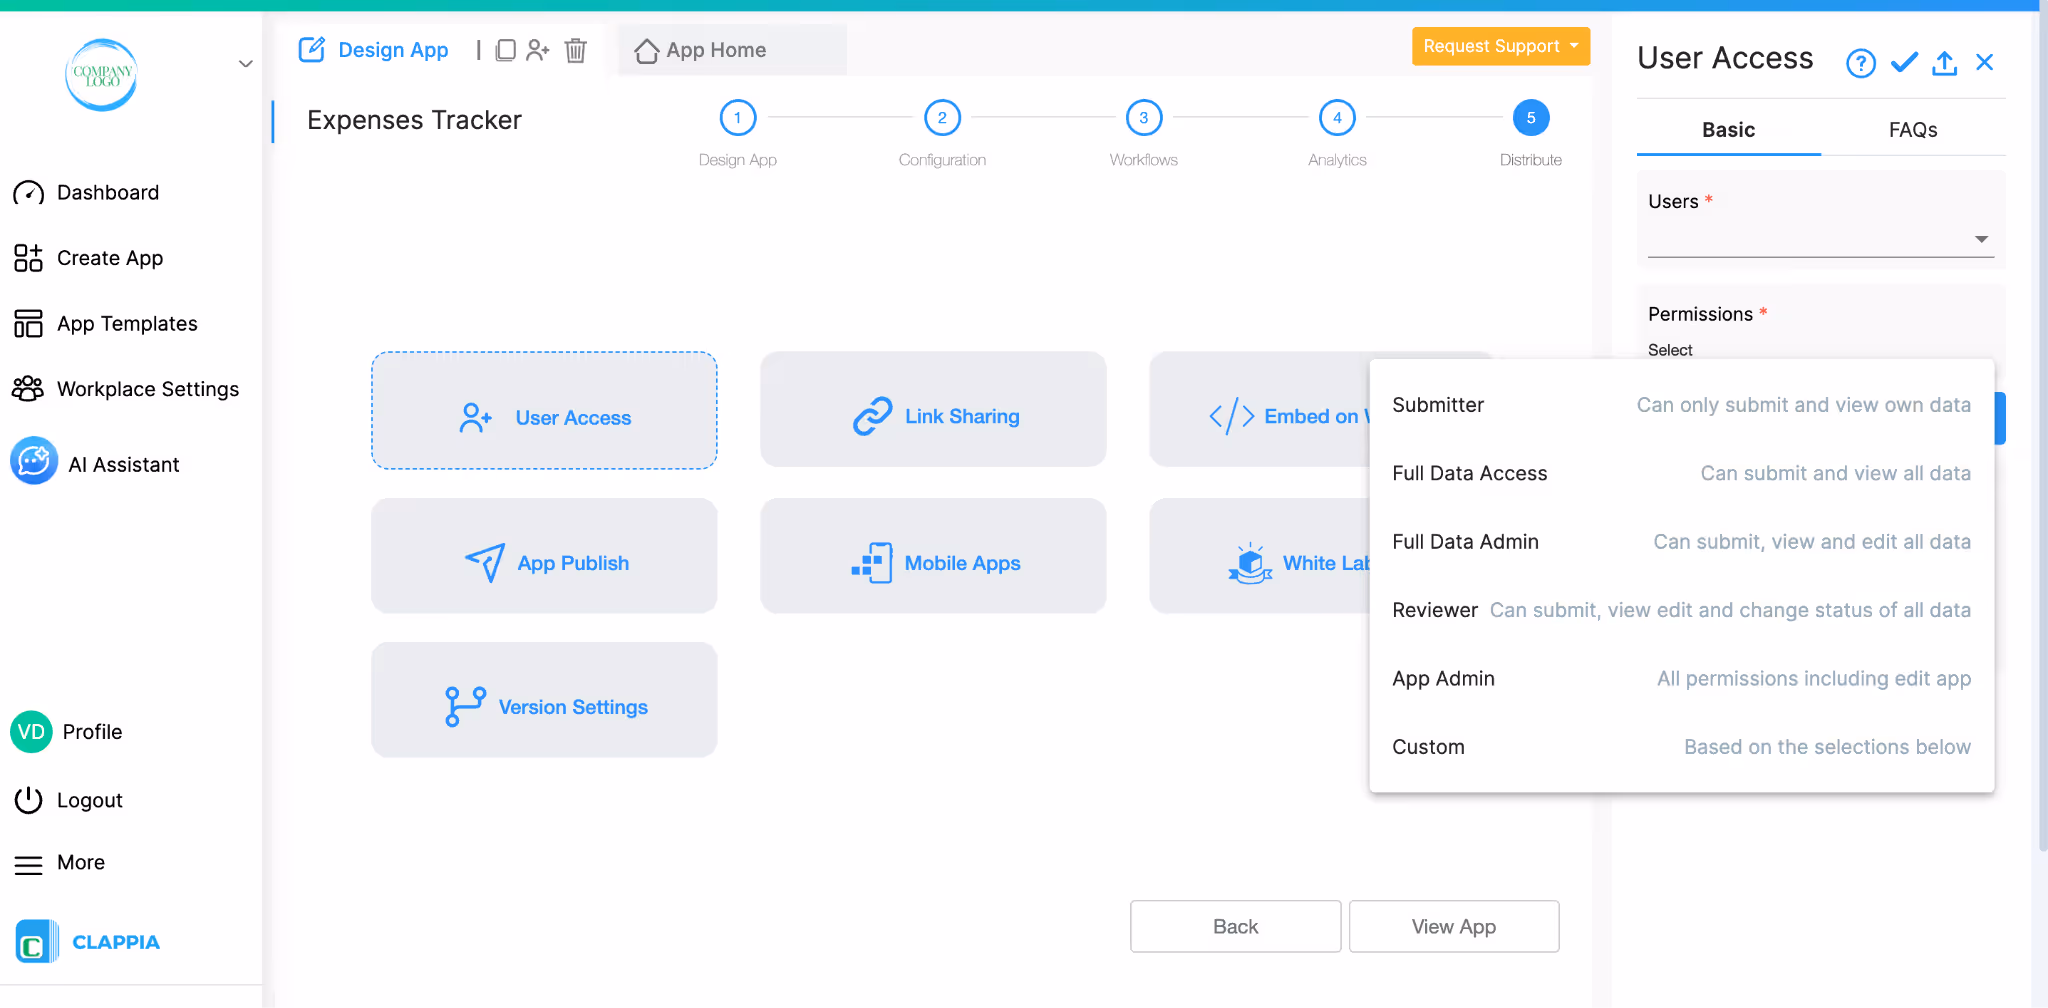
You can control what each person is allowed to do with these apps. Some users may only need to submit expenses, while managers or finance teams may need to view all entries, review them or make changes. These permissions are assigned at the app level, so you decide who can submit, who can see data and who can manage the app.
Access is given from your workplace settings, where you add users and choose which apps they should work with. If you have different teams, such as sales, operations or finance, you can keep their access separate so each group only sees the data relevant to them.
For external or temporary users, you can use link sharing so they can submit information without needing a Clappia account. This still lets you collect data in the same structure without giving them full access to your apps.
Here are some advantages of using Clappia for a customers-vendors-expenses system:
Once you have your customer and vendor master apps and your expense tracker in place, you can continue extending the system. Some teams add approval steps for high-value expenses, others connect expenses to inventory movement or project costs. You can build dashboards for monthly spending, track outstanding invoices, or integrate with your accounting workflows. Since everything is modular, you can expand gradually and your users won’t feel any disruption.
L374, 1st Floor, 5th Main Rd, Sector 6, HSR Layout, Bengaluru, Karnataka 560102, India
3500 S DuPont Hwy, Dover,
Kent 19901, Delaware, USA


3500 S DuPont Hwy, Dover,
Kent 19901, Delaware, USA
L374, 1st Floor, 5th Main Rd, Sector 6, HSR Layout, Bengaluru, Karnataka 560102, India
.svg)


.jpg)
