One of the most common failures in preventive maintenance programmes is the gap between what was planned and what was actually done. A planner schedules a weekly inspection for a machine. A technician runs the inspection but uses the wrong checklist, or records it against the wrong machine, or does not record it at all. By the time the discrepancy is noticed, the maintenance history is unreliable and the planner cannot tell from the data whether the schedule was followed.
That gap is expensive. NIST estimates that US manufacturers lost about $119 billion in 2016 to preventable maintenance issues, on top of more than $57 billion spent on machinery maintenance. A schedule that cannot be matched to actual work makes those losses invisible, because nobody can see which planned jobs were skipped.
This guide explains how to close that gap using a planning-to-execution workflow built in Clappia, a no-code platform for building operational field apps. The workflow connects two apps: a Maintenance Planning app where the planner creates scheduled maintenance events, and a Maintenance Report and Spares Log app where the technician records the actual execution. The connection between them is a filtered checklist dropdown: when the technician selects a machine and a maintenance interval in the report, they see only the checklists that match both. This makes it difficult to execute against the wrong checklist by accident, and it produces a traceable record that links the execution back to the original plan.
If you are new to Clappia: in Clappia, you build apps by adding blocks, which are individual field types such as a dropdown, a text input, or a date field. When someone fills in and submits a form, the entry is called a submission. A Get Data from Other Apps block is a field type that looks up records from another Clappia app and can filter the results based on conditions you define.
The workflow has three stages: the planner creates the maintenance plan, the technician executes it and records the report, and the supervisor closes the loop by updating the plan status. The filtering logic that links plan to execution runs automatically based on the machine and interval selected in each app.
Here is who does what at each stage.
| Stage | Who Does It | What Happens |
|---|---|---|
| 1. Create the plan | Maintenance planner | Selects a machine and maintenance interval. The checklist dropdown filters to show only checklists for that machine and interval. Selects the correct checklist. A plan record with a unique plan ID is created. |
| 2. Execute the maintenance | Technician or operator | Opens the report app. Selects the same machine and the same maintenance interval. The checklist dropdown filters identically. Selects the checklist, which auto-populates the checkpoint rows. Records readings and logs spares used. |
| 3. Close the loop | Supervisor or planner | Reviews the submitted report. Updates the plan status from active to completed. |
The same sequence, step by step:
The planning and execution workflow depends on three master records being populated before any plan is created. If these are not in place, the machine and checklist dropdowns in the planning and report apps will have nothing to select from.
Before configuring the planning app, it helps to see the full chain: masters feed the plan, the plan and the report share the same filtered checklist, and the report closes the loop on the plan. Every arrow in this chain is a lookup, not a typed value, which is what keeps the two records aligned.
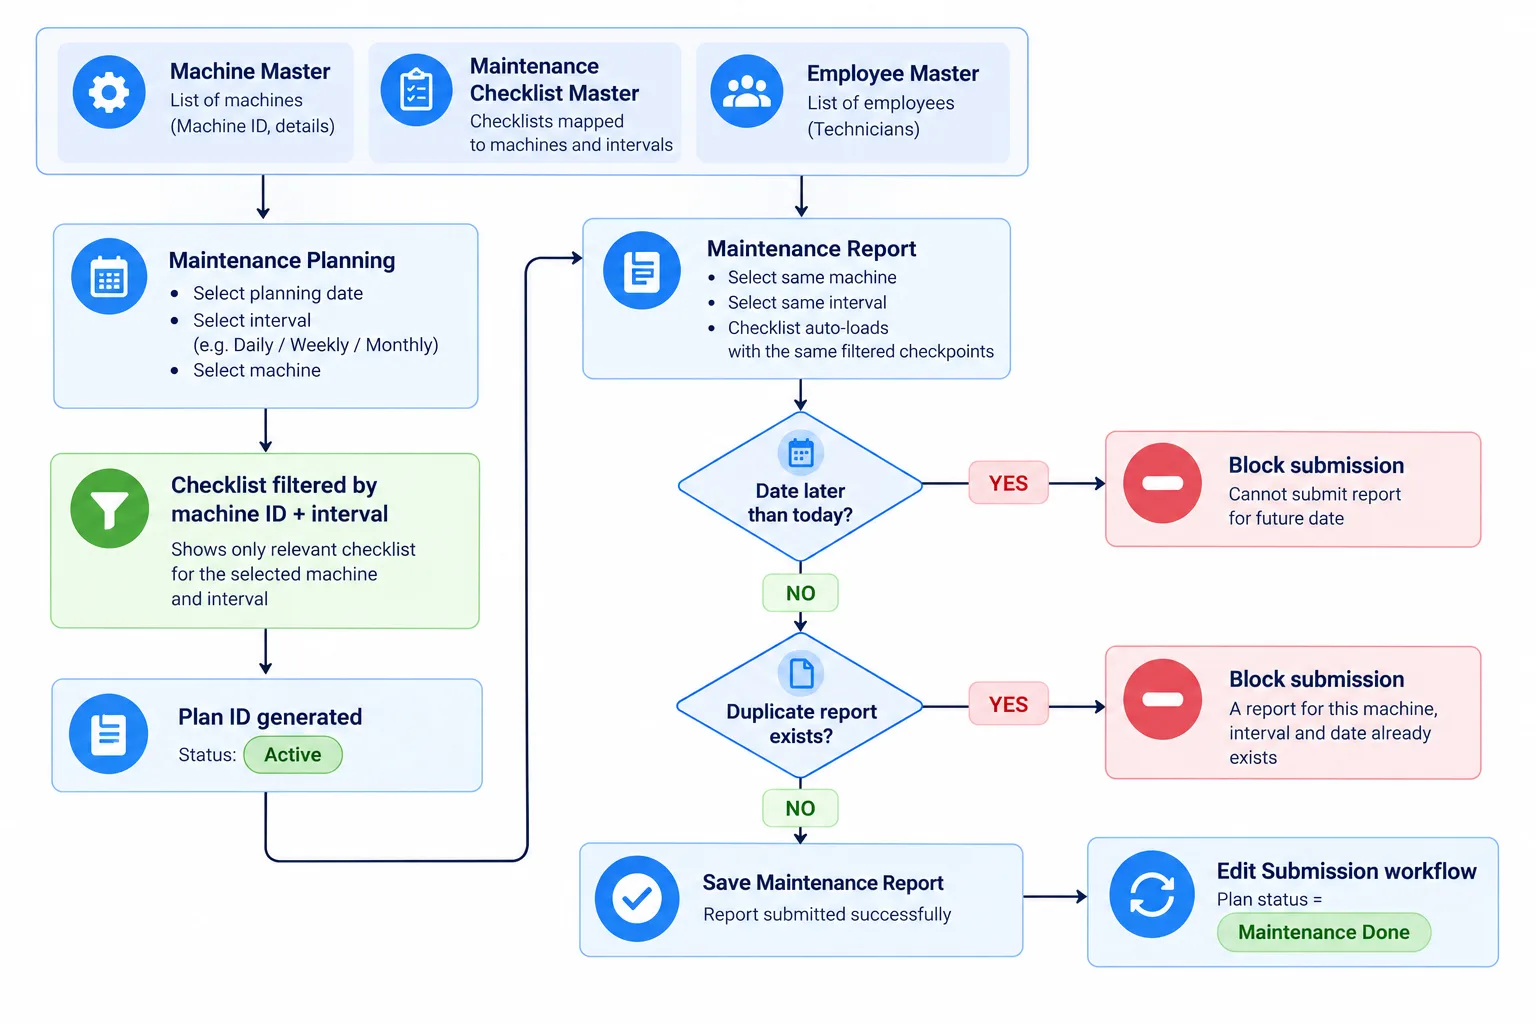
The checklist master is the most important prerequisite. The filtered dropdown logic in both the planning app and the report app depends on each checklist having the correct machine identifier and the correct interval value. A checklist with the wrong interval will not appear in the dropdown when the matching interval is selected, and the technician will have nothing to choose from.
Open the Maintenance Planning app and create a new record. This app is where the planner schedules upcoming maintenance events. The fields work in sequence: each selection narrows what is available in the next field.
Enter the Planning Date for the maintenance event. This is the date the maintenance is scheduled to occur. Then select the Maintenance Interval from the available options: 7 days, 30 days, 90 days, 180 days, or 365 days. The interval you select here must match the interval set on the checklist you intend to link. This is the value that drives the checklist filter.
Select the machine from the Select Machine dropdown. In Clappia, this field uses a Get Data from App block that looks up records from the Machine Master. When you select a machine, the following fields auto-fill from the machine's record:
These auto-filled values are read-only. They confirm that the correct machine was selected and provide the machine identifier that the checklist dropdown will use to filter its results.
Select the checklist from the Select Checklist dropdown. This dropdown is filtered by two values: the machine identifier auto-filled in the previous step, and the maintenance interval selected earlier. Only checklists that are linked to the same machine AND have the same interval appear in the list.
This filtering is the key mechanism that prevents the wrong checklist from being selected. If a machine has three checklists (weekly, monthly, and quarterly), and the planner selected 30 days as the interval, only the monthly checklist appears. The weekly and quarterly checklists are not visible.
When you select a checklist, the checklist name is displayed and the checklist's internal identifier is stored. A unique plan ID is generated automatically for this record using Clappia's auto-generated unique IDs. The plan is now active with a status of submitted.
The plan ID is the traceable link between the plan and its eventual execution record. When reviewing maintenance history, the plan ID tells you whether an execution report was created against a planned event or was an unscheduled ad hoc maintenance.
When the scheduled maintenance date arrives, the technician opens the Maintenance Report and Spares Log app to record the execution. This is a separate app from the planning app but uses the same machine and checklist data. The technician works through three sections: Maintenance Details, Checklist Details, and Spares Used.
The first section captures the context for the maintenance event. The technician fills in the following fields:
After filling in these fields, the technician selects the machine and checklist using the same filtering logic as the planning app.
Select the machine from the Select Machine dropdown. The same machine details auto-fill as in the planning app: identification number, alias, and name. Then select the checklist from the Select Checklist dropdown, which is again filtered by the machine identifier and the maintenance type selected earlier.
When the checklist is selected, several things happen at once:
At this point, a Validation block set to the Duplicate type checks whether a report already exists for the same date, interval, checklist, and machine combination. If one does, submission is blocked with an Error-level message. This prevents duplicate execution records for the same maintenance event. Our guide to preventing duplicate maintenance entries and bad data covers every guardrail in detail.
Connect plans, checklists, and execution in one place, with filtered checklists and duplicate checks built on the free plan.
Get started freeThe Checklist Details section is a copyable section where each copy corresponds to one checkpoint defined in the checklist master. The rows populate automatically when the checklist is selected; the technician does not add them manually.
Each row shows the checkpoint name and the parameter type. Depending on the parameter type, display conditions show different input fields:
A free-text remark field is available on every row for the technician to add notes about that specific checkpoint.
The Spares Used section is a copyable section where the technician logs any spare parts consumed during the maintenance. The section supports up to ten rows. For each row:
The section has the copyable-section setting Fields to prevent duplicates enabled on the item field, so a spare already selected in one copy cannot be selected in another. If the technician needs to log more of the same item, they update the quantity on the existing row rather than adding a new one. The full spares setup is covered in our guide to setting up spare parts logging.
Once the maintenance report has been submitted, the plan record in the Maintenance Planning app should be updated to reflect that the maintenance was completed. Without this step, plans remain open indefinitely even when the work has been done, and the planner cannot tell from the planning app which events are genuinely overdue and which have been executed but not closed.
Open the relevant plan record in the Maintenance Planning app and change its status from active to Maintenance Done. In Clappia, submissions can be edited after the initial save if the app's settings allow it. The planner or supervisor makes this update after reviewing the submitted maintenance report and confirming the work was completed correctly.
If you would rather not rely on a manual update, a workflow in the report app can do it. Add an Edit Submission node to the report's workflow that targets the Maintenance Planning app, matches the plan by its plan ID or by machine, checklist, and date, and sets the status to Maintenance Done when the report is submitted. Many teams keep the manual review for high-criticality machines and automate the rest.
Maintaining this discipline, updating the plan status after every completed execution, keeps the planning app as a reliable view of what is genuinely pending versus what has been done. If the plan status is never updated, the planning data becomes a list of events rather than a live schedule.
The table below summarises each step, the app it happens in, and what Clappia does automatically.
| Step | App | What the User Does | What the System Does |
|---|---|---|---|
| Create plan | Maintenance Planning | Selects planning date, interval, machine, and filtered checklist | Auto-fills machine details; generates unique plan ID; stores checklist identifier |
| Execute maintenance | Maintenance Report | Selects date, shift, maintenance type, machine, and filtered checklist; enters readings and spares | Auto-fills machine and checklist details; populates checkpoint rows; computes OK/Not OK; blocks duplicates and future dates |
| Close plan | Maintenance Planning | Updates plan status to Maintenance Done | Plan record reflects completed status; optionally set automatically by an Edit Submission workflow |
In Clappia, user permissions are configured per app. For the planning and execution workflow, the recommended access structure is:
| Role | Planning App | Report App | What They Do |
|---|---|---|---|
| Technician or Operator | View Only | Submit Only | Executes maintenance; submits reports; views own past submissions |
| Maintenance Planner | Full Access | View Only | Creates and manages plans; reviews execution reports; closes plan status |
| Supervisor or Manager | View Only | View and Edit | Reviews reports; can correct entries if governance allows; prints records for audit |
The Clappia mobile app, available on Android and iOS, is how technicians access the report form on the workshop floor or in the field. The app supports offline mode: technicians preload the app while online, then fill in and submit forms without a network connection, and submissions sync when connectivity returns. One limit matters for this workflow: Get Data from Other Apps lookups, which power the machine and checklist dropdowns, do not work offline. In areas with no signal, have technicians select the machine and checklist before leaving coverage, or capture readings and complete the selection once back online.
A food processing plant schedules weekly and monthly preventive maintenance on its mixers, ovens, and packing lines. Each morning, technicians open the Maintenance Report on their phones, pick the machine and the Maintenance Type from the plan, and see only the matching checklist. The checkpoints load automatically, the result formula marks each reading OK or Not OK, and spares are logged once per item. Because the checklist comes from the same filter the planner used, the technician cannot execute a monthly job against a weekly list.
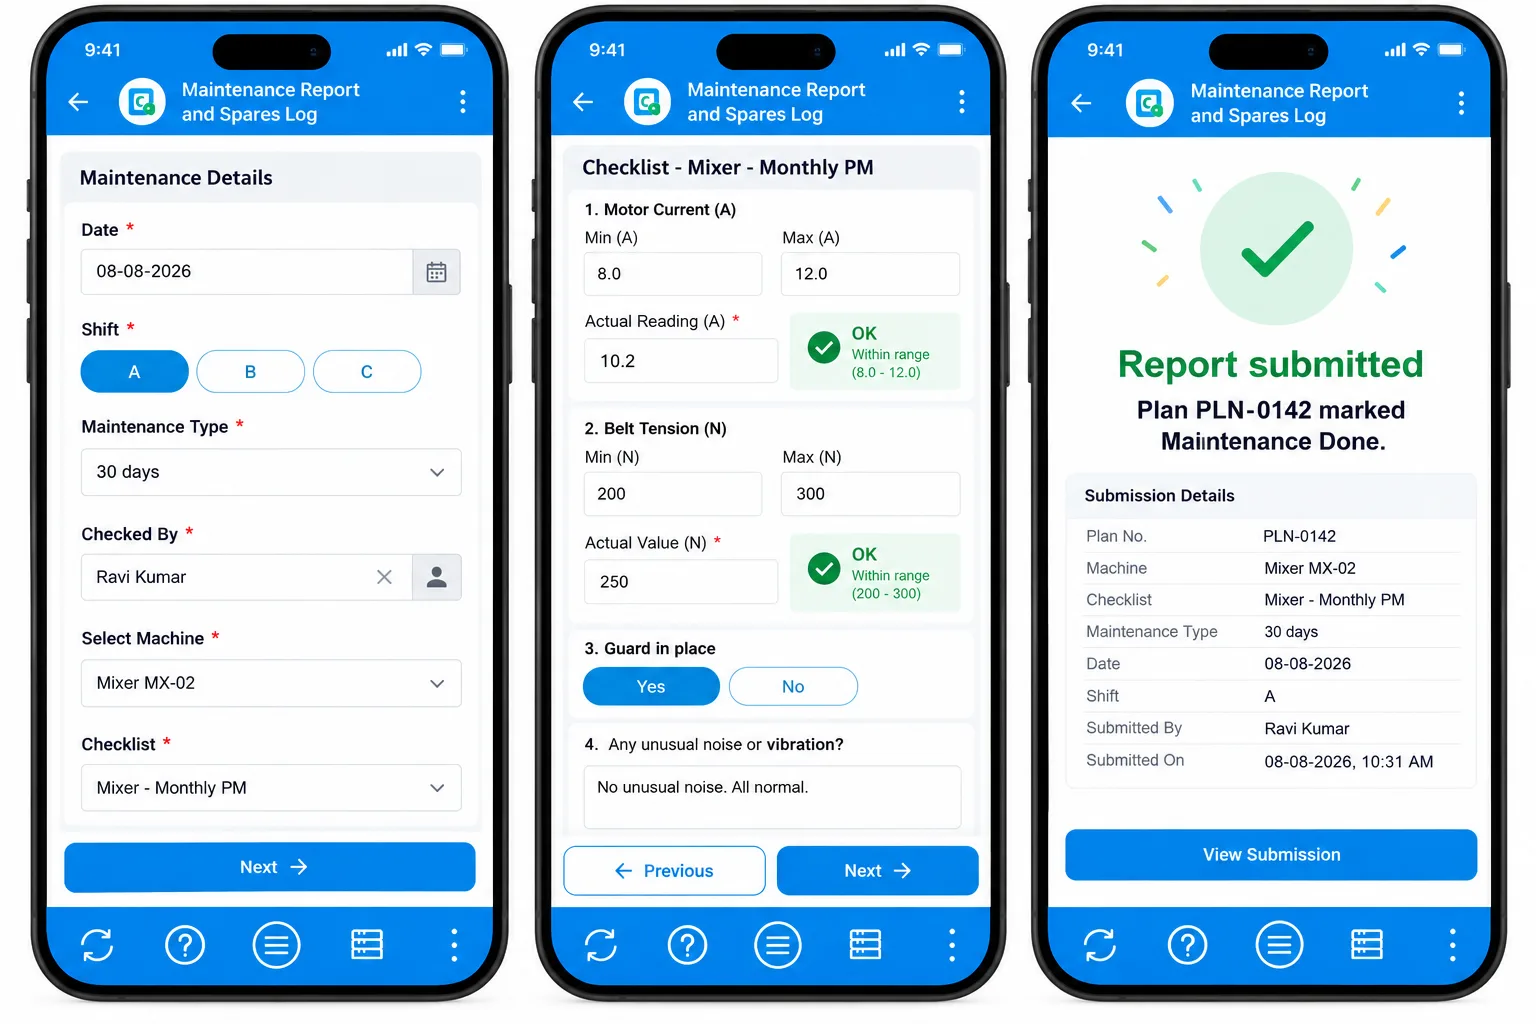
When the report is submitted, the plan's status flips to Maintenance Done, so the shift supervisor sees at a glance which planned jobs are finished and which are still open. The same structure works for an equipment maintenance scheduler or a building maintenance checklist.
A maintenance planner at an EPC contractor manages plans for equipment across three project sites. From the Clappia web app, the planner filters the Maintenance Planning submissions by site and status to see every plan still marked active past its planning date. Each overdue plan is cross-checked against the report app by plan ID, machine, and date: either the work was skipped, or it was done and the status was never closed.
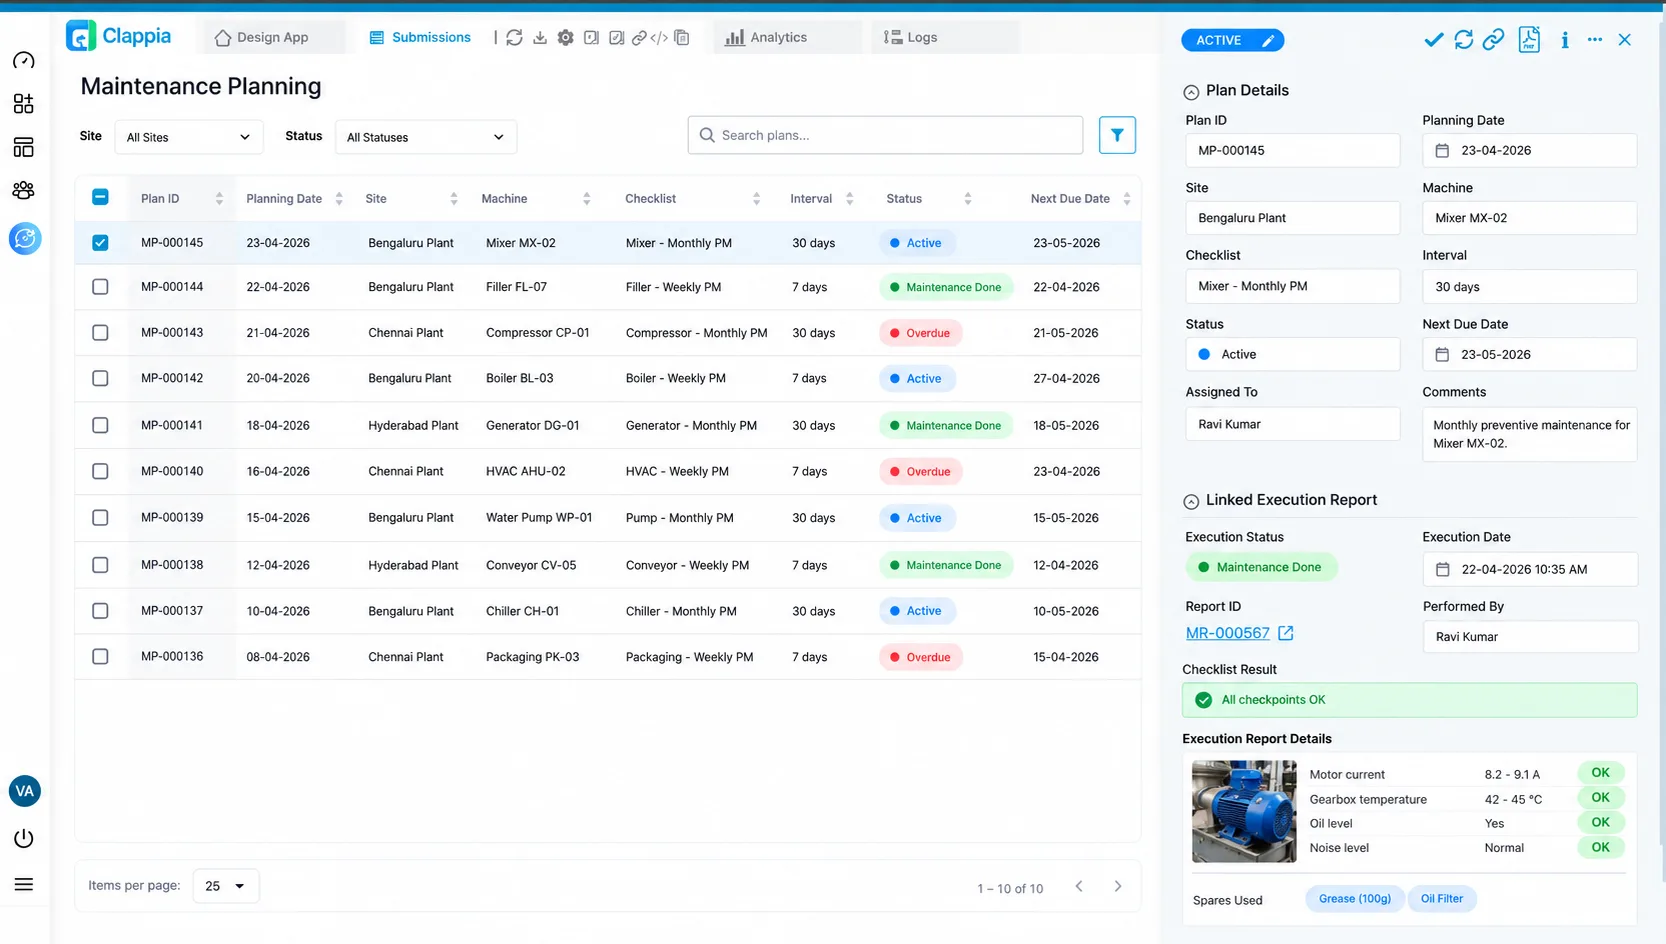
With the status update automated for most machines, the overdue list is short and accurate. The planner spends the review chasing genuinely missed work rather than reconciling records, and exports a plan-versus-actual history for client audits. Teams that also manage requests can extend the setup into a work order management system.
The connection between a maintenance plan and its execution record is the filtered checklist dropdown. Both the planning app and the report app filter their checklist lists using the same two values: the machine identifier and the maintenance interval. When the planner and the technician select the same machine and the same interval, they are guaranteed to be looking at the same set of checklists, making it structurally difficult to execute against the wrong one.
The data quality guardrails (blocking future dates and blocking duplicate reports for the same machine, checklist, and date) ensure the execution records that flow from this process are reliable. And updating the plan status after execution closes the feedback loop that makes the planning app useful as a live schedule rather than a static list.
To build this workflow, set up your machine master and checklist master first, then configure the planning and report apps with the filtered checklist dropdowns as described above. The complete setup, including the filtering logic, can be configured in Clappia's visual builder without any coding. For broader context on running a disciplined programme, the US Department of Energy's operations and maintenance guidance for federal facilities is a useful reference.
Ready to see plan versus actual for every machine? Start building for free and connect your maintenance plans to execution in an afternoon. Your planners get a live schedule, and your technicians get a form that always shows the right checklist.
Use Get Data from Other Apps blocks in both apps that filter checklists by the same two values, machine identifier and maintenance interval. Store a unique plan ID on the plan so the execution can be traced back to it.
The dropdown only shows checklists that match both the selected machine and the selected interval. An empty list usually means the checklist's interval in the Checklist Master does not match the interval chosen in the plan or report.
Yes. Add an Edit Submission workflow node to the report app that finds the matching plan and sets its status to Maintenance Done on submission.
Add a Duplicate validation on Date, Maintenance Type, Checklist, and Machine at the Error level. A second report for the same event is blocked before it is saved.
Forms can be filled and submitted offline on the mobile app after it is preloaded, but Get Data from Other Apps lookups such as the machine and checklist dropdowns need a connection.
Technicians typically get Submit access on the report and view access on plans, planners get full access to planning, and supervisors get view and edit access on reports for review and audit.
Link maintenance planning to execution by making the plan and the report select the same checklist. In Clappia, both apps use a Get Data from Other Apps block that filters checklists by machine identifier and maintenance interval, the plan carries a unique plan ID, validations block future dates and duplicate reports, and the plan status is closed after execution, manually or with an Edit Submission workflow.
L374, 1st Floor, 5th Main Rd, Sector 6, HSR Layout, Bengaluru, Karnataka 560102, India
3500 S DuPont Hwy, Dover,
Kent 19901, Delaware, USA


.svg)




3500 S DuPont Hwy, Dover,
Kent 19901, Delaware, USA
L374, 1st Floor, 5th Main Rd, Sector 6, HSR Layout, Bengaluru, Karnataka 560102, India


.jpg)