
Still need help?

When running periodic stock counts, audits, or any process where the list of items is known in advance, having users re-enter the item names and reference values every time they fill a form is inefficient and error-prone. A better approach is to load that data automatically into the table when the form opens and let users focus only on entering the necessary data.
In Clappia, this is done by combining a Code block, Calculation blocks, and the Table. The Code block generates or fetches your list of values. Calculation blocks bridge those values into the table. The table then renders each row with the pre-filled columns already populated, while the remaining columns stay editable for the user to complete.
This guide walks through how to build this using an Inventory Stock Count app as the example, where items and expected stock quantities are loaded automatically into a table, and users simply enter the actual count they receive.
This example is a single app. From the Clappia dashboard, click Create App and name it something like "Inventory Stock Count".
Click Add Section and name it Basic Details on the right panel. This section captures contextual information about the stock count being recorded.
Click Add Field and add the following fields:
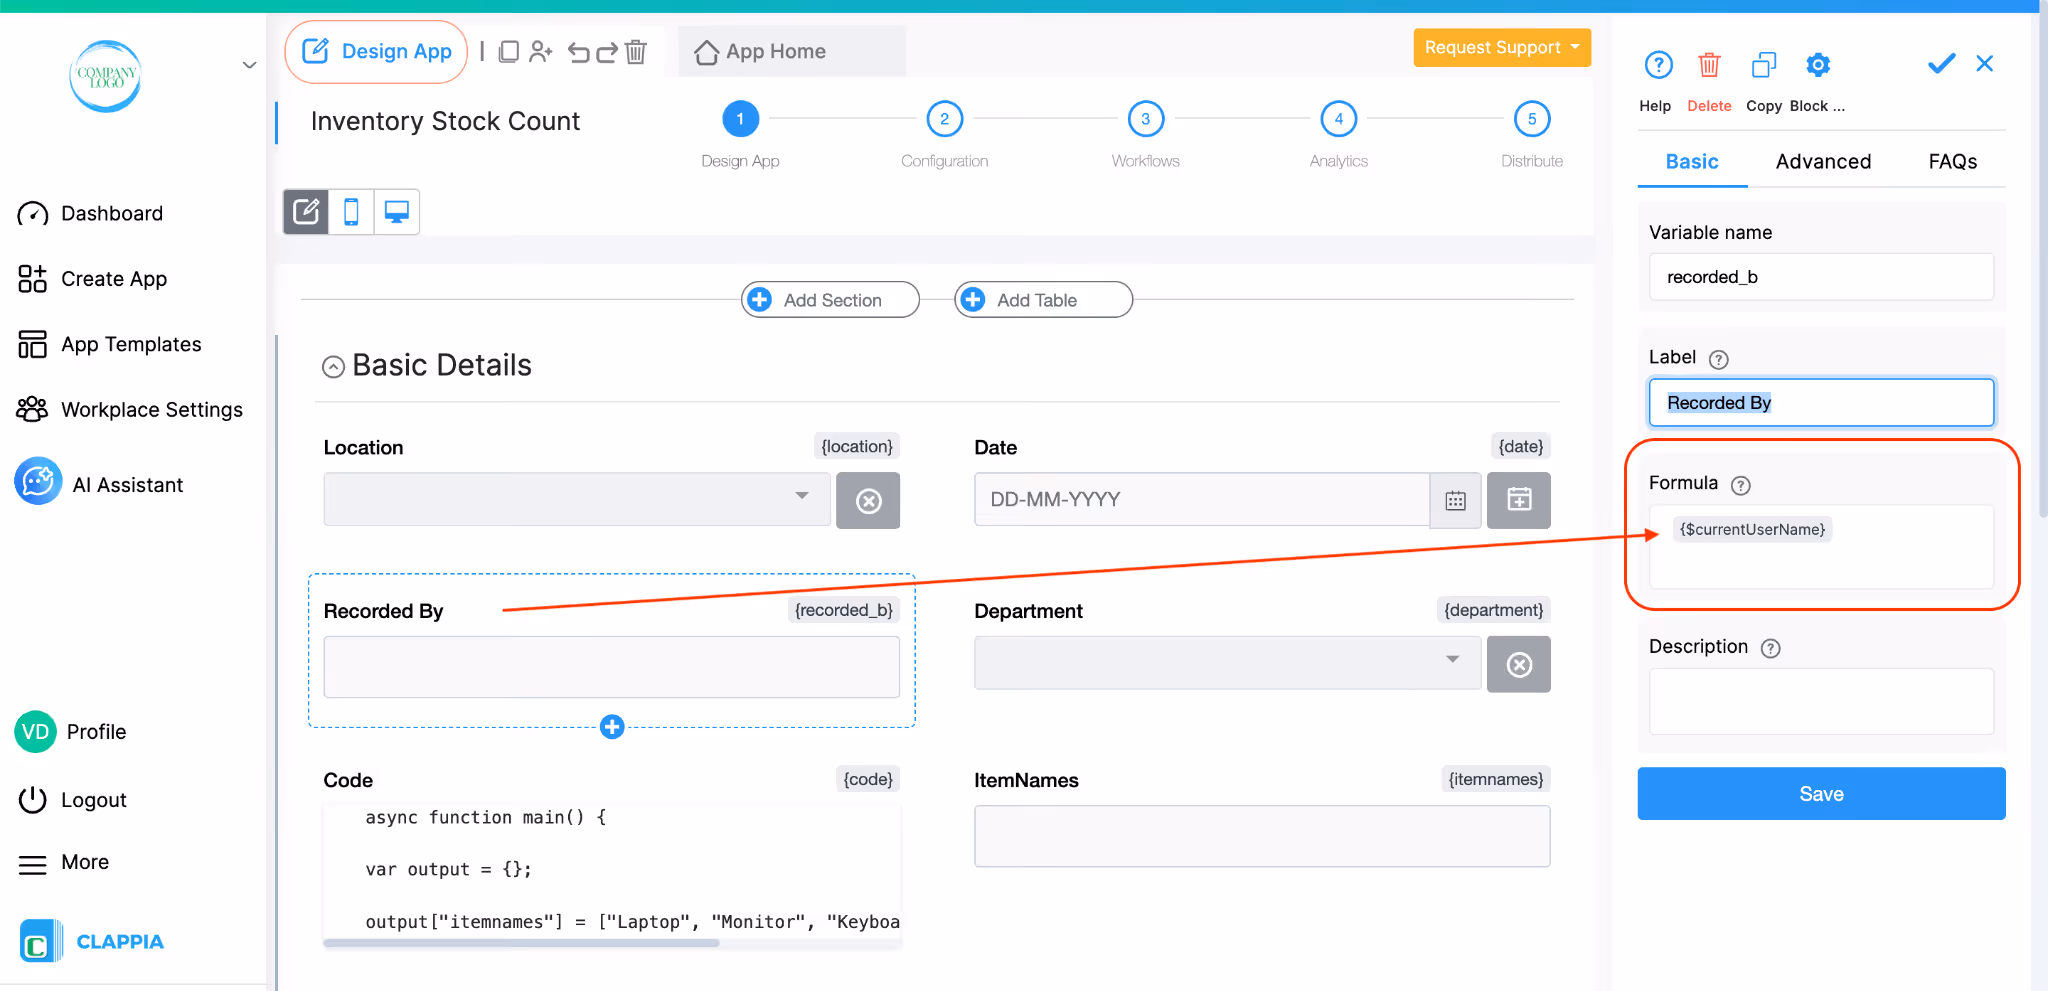
For the Recorded By field, you can use a Single Line text field to capture the name of the person manually or if you want this automatically filled in then add a Calculations & logic block, name it accordingly on the right panel. Then in the formula option type in @ and select current user name. It will appear as:
{$currentUserName}
This is a system variable that automatically pulls in the name of the logged-in user, so the person conducting the count does not need to type their name manually. This will only work for those users logged in to Clappia.
This is the technical backbone of the pre-population. These fields live in the same section but are hidden from the user. They do the work of loading and passing the item list and expected stock values into the table.
Note - You can keep these blocks in a separate section if you want and also keep that entire section hidden if there are too many blocks to do it individually.

Click Add Field and select the Code Block. Name it "Code". In the code editor, this is the code used:
If you are unsure on how to write the code for your requirement, you can always copy the default code given in the code block and ask an AI to give you a similar code.
This code defines two arrays: one for item names and one for their corresponding expected stock quantities.
In the Output Fields section on the right panel of the Code block, two output keys are added: itemnames and expectedstock, exactly as it is written in the output part of the code. These become the variables that other fields can reference.
Note - If you want to load this data from an external source rather than hardcoding it, you can replace the hardcoded arrays with an API call inside the async function main(). The rest of the setup remains the same.
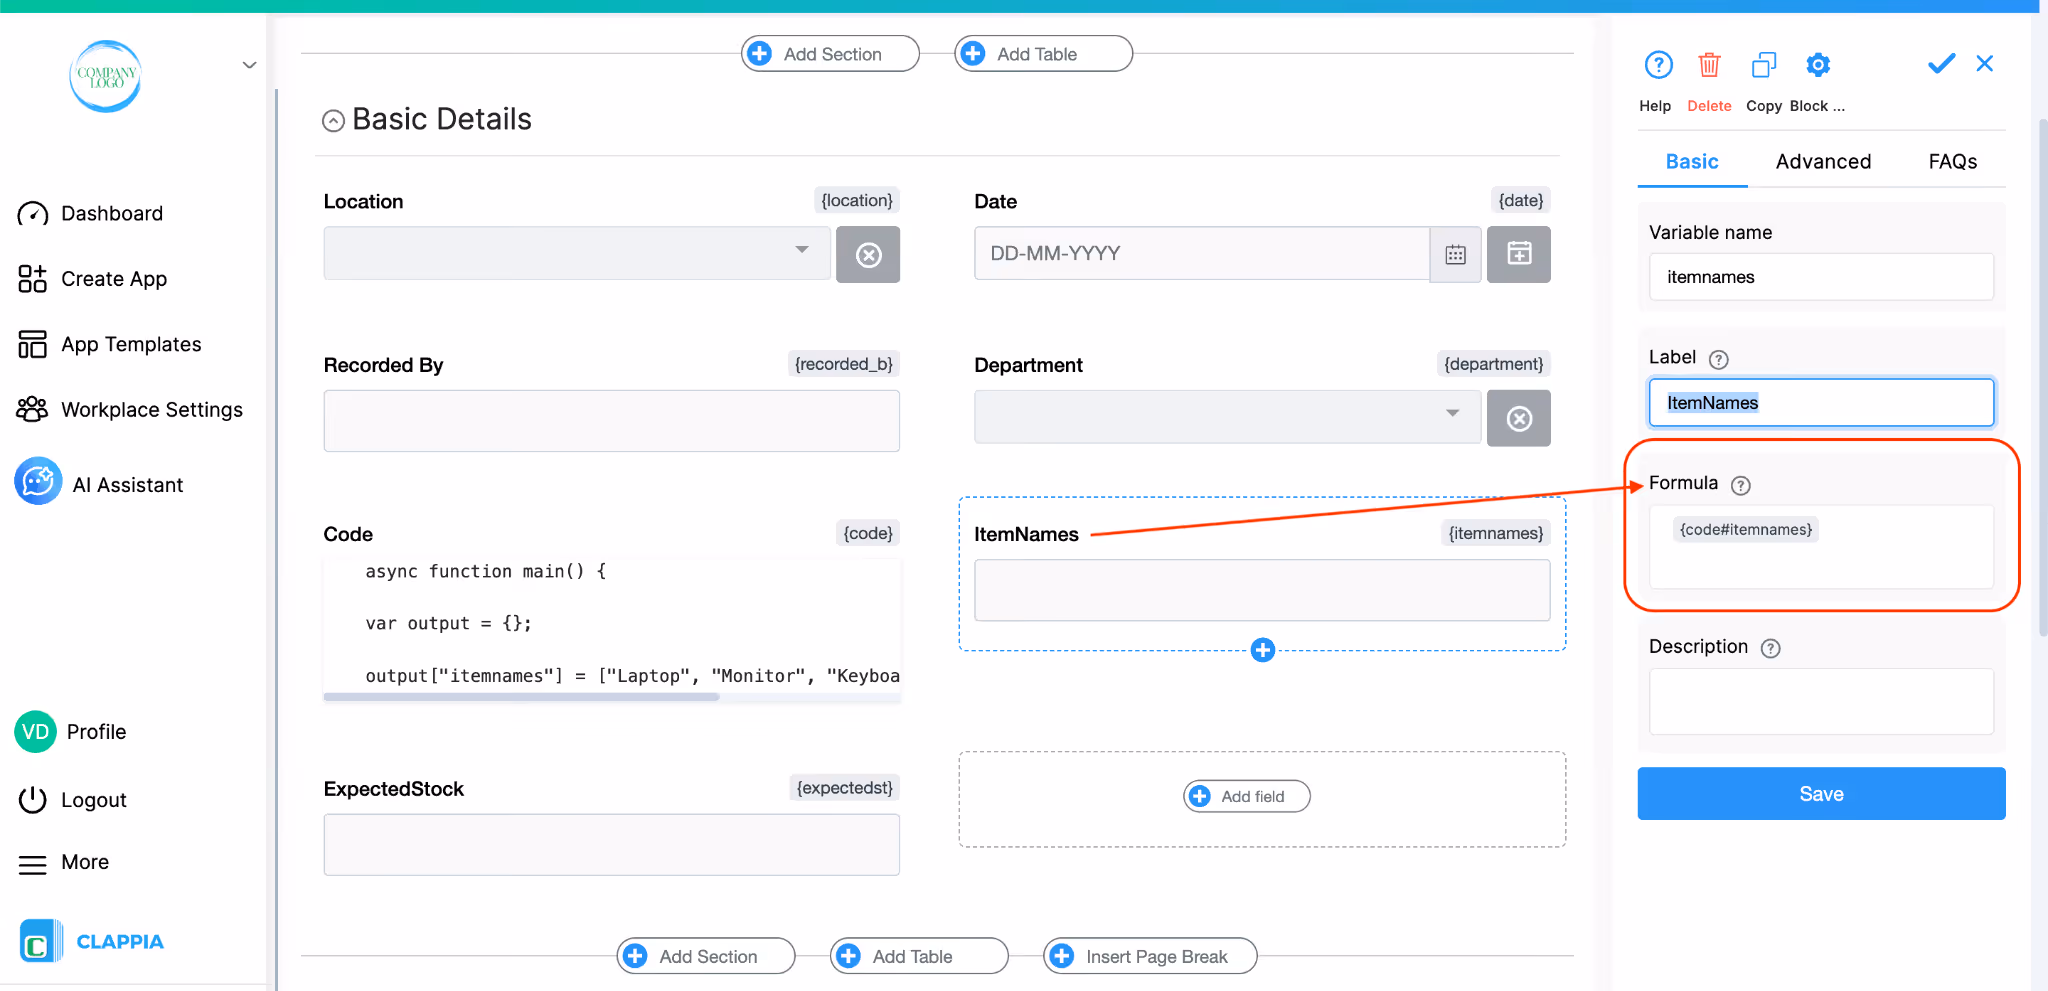
Click Add Field and add a Calculation Block. Name it "Item Name". In the Formula field, type @ and find the variables of the code block, they begin with “code”:
{code#itemnames}
This references the itemnames output from the Code block.
The variable format {code#outputkey} is how you access a specific output from a Code block; code is the variable name of the Code block field, and itemnames is the output key.
Now go to the Advanced tab on the right panel and enable the Hidden toggle. This field does not need to be visible to the user as it is only used to pass data into the table column formula.
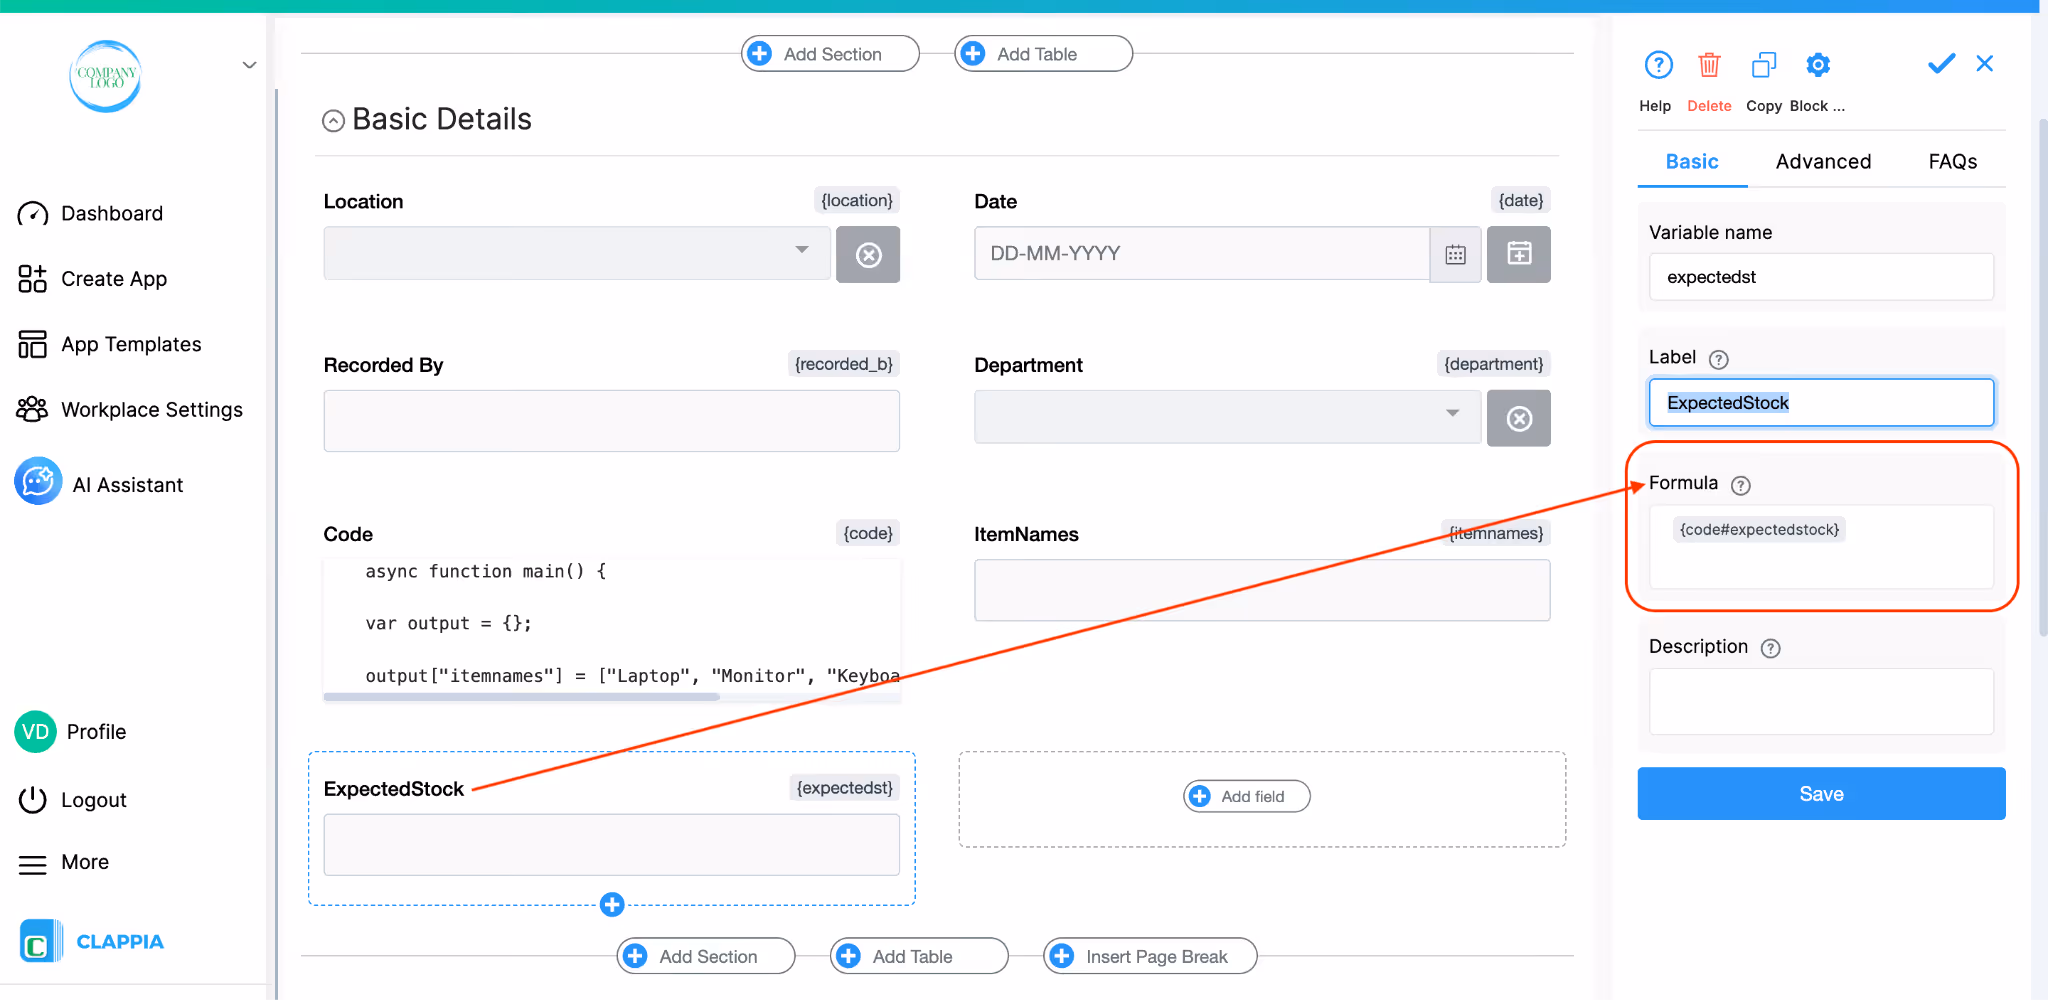
Add another Calculation Block and name it "Expected Stock". In the Formula field, enter:
{code#expectedstock}
Go to the Advanced tab and enable Hidden here as well.
These two hidden calculation blocks now hold the full comma-separated string of item names and expected values, which the table columns will read from row by row.

Below the first section, click Add Table. Click on the table to configure it on the right panel. Set the following:
The initial row count should match the number of items in your Code block arrays. In this example there are 5 items, so 5 rows are set by default.
By default, the table comes with placeholder columns. Remove the default columns and build your own by clicking the + icon at the top of the table to add each column. Select the field type for each column from the dropdown that appears.
Column 1: Item Name

Add a Calculation Block column. Name it "Item Name". In the Formula field, enter:
SPLITSTR({itemnames}, ",", {$index}-1)
This formula uses SPLITSTR to extract one value from the itemnames string for each row.
{itemnames} references the hidden Calculation block from Section 1. It is it’s variable which you can see at the top of that field
The second argument "," is the separator.
The third argument {$index}-1 is the special table row index variable. It starts at 1 for the first row, so subtracting 1 gives you position 0 for the first item, position 1 for the second, and so on, matching how arrays are indexed.
The result is that row 1 shows "Laptop", row 2 shows "Monitor", row 3 shows "Keyboard", and so on automatically, without the user typing anything.
Column 2: Expected Stock
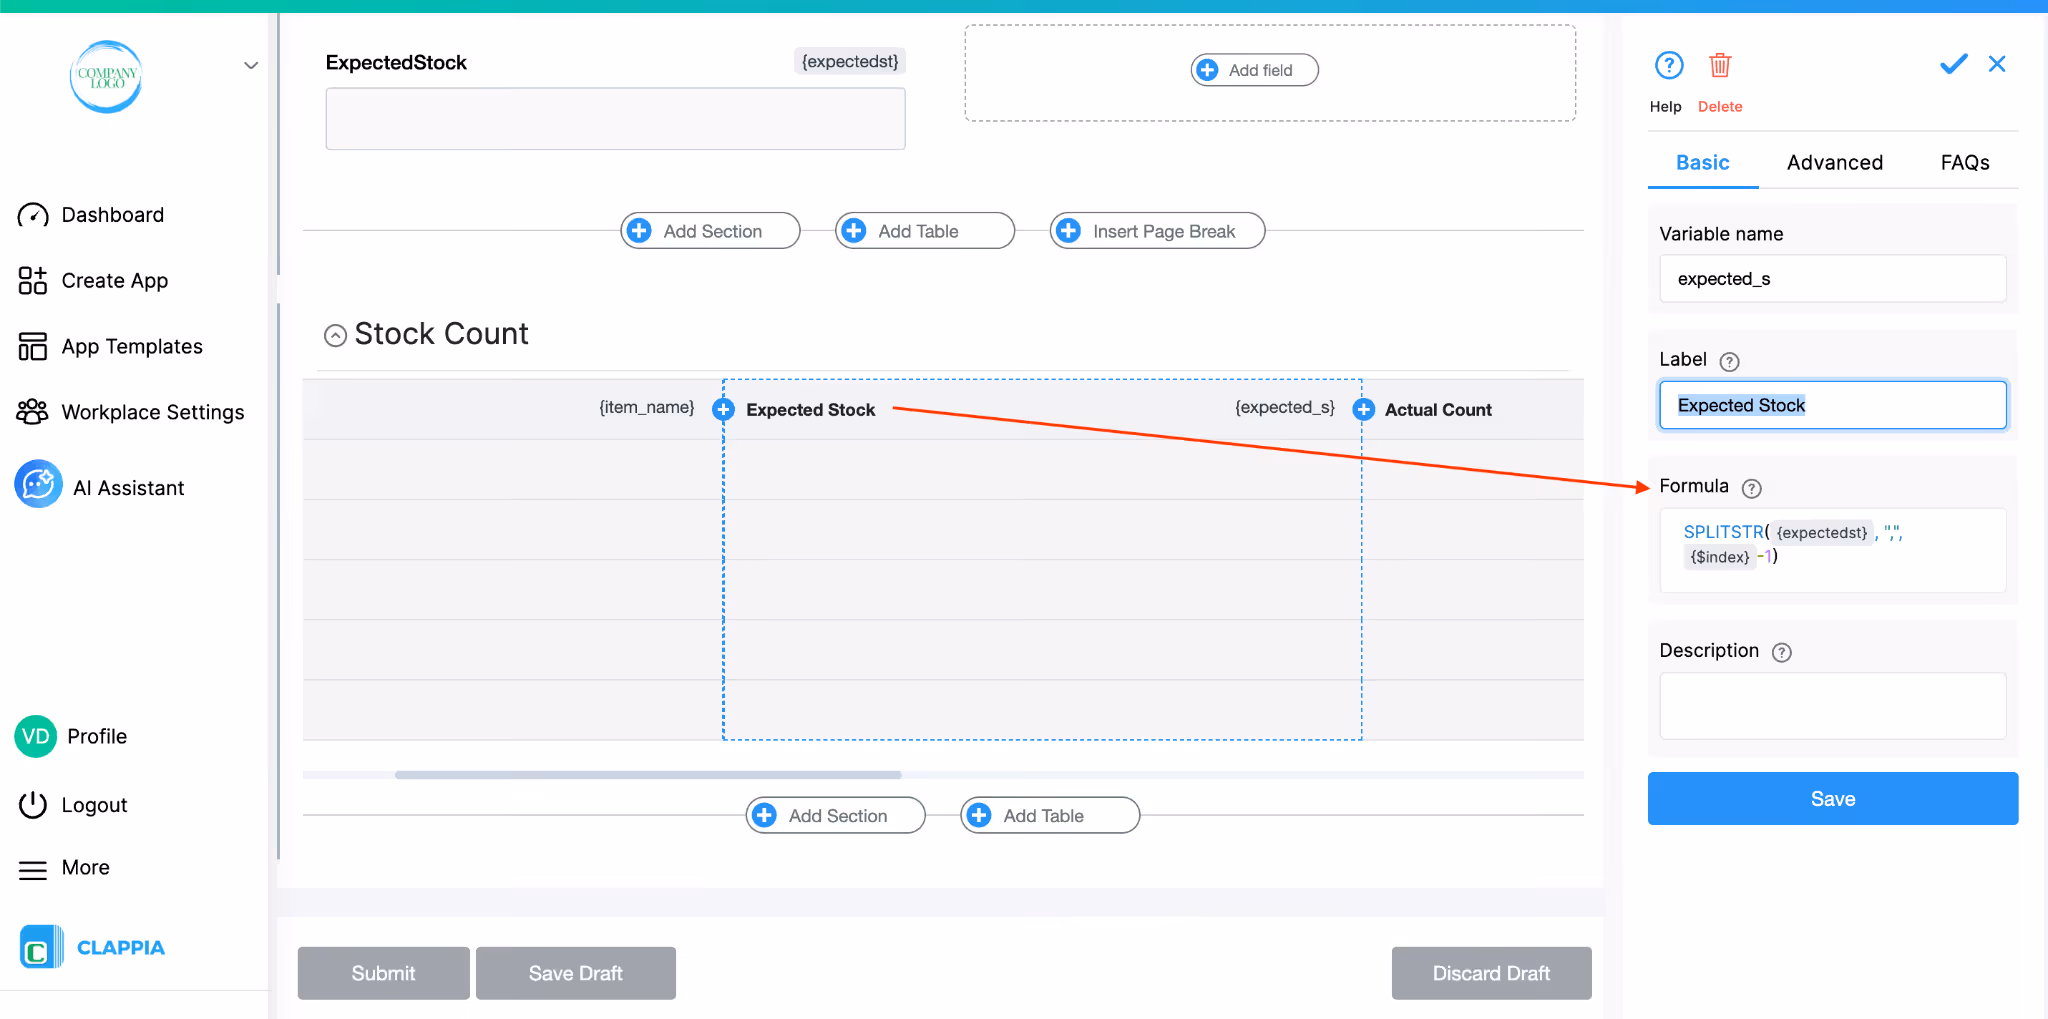
Add another Calculation Block column. Name it "Expected Stock". In the Formula field, enter:
SPLITSTR({expectedst}, ",", {$index}-1)
Note that {expectedst} is the variable name of the ExpectedStock hidden calculation block.
The same SPLITSTR logic applies here, pulling the expected quantity for each row based on its position.
Column 3: Actual Count
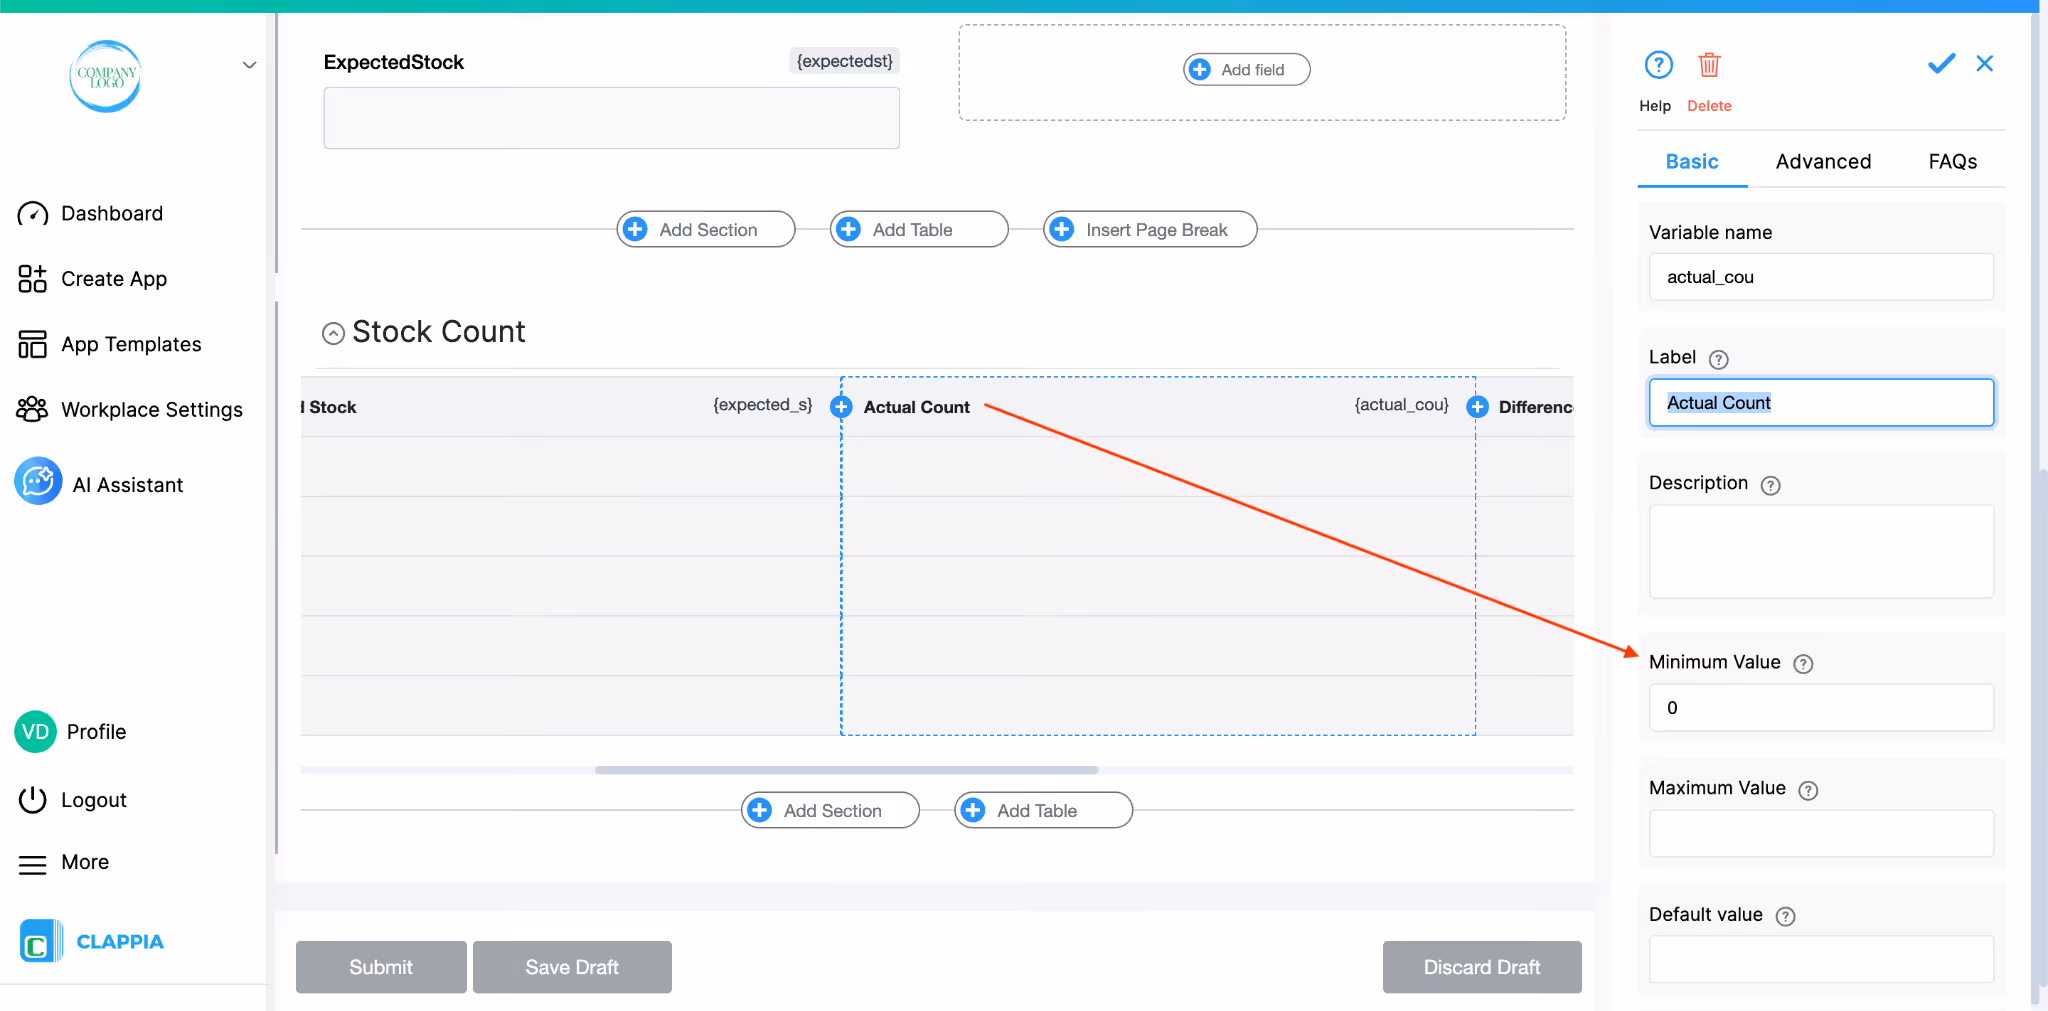
Add a Number Input column. Name it "Actual Count".
In the right panel, set Minimum Value to 0 to prevent negative entries. Leave the Default value empty. This column is fully editable, the user physically counts the stock and enters the number here.
Column 4: Difference
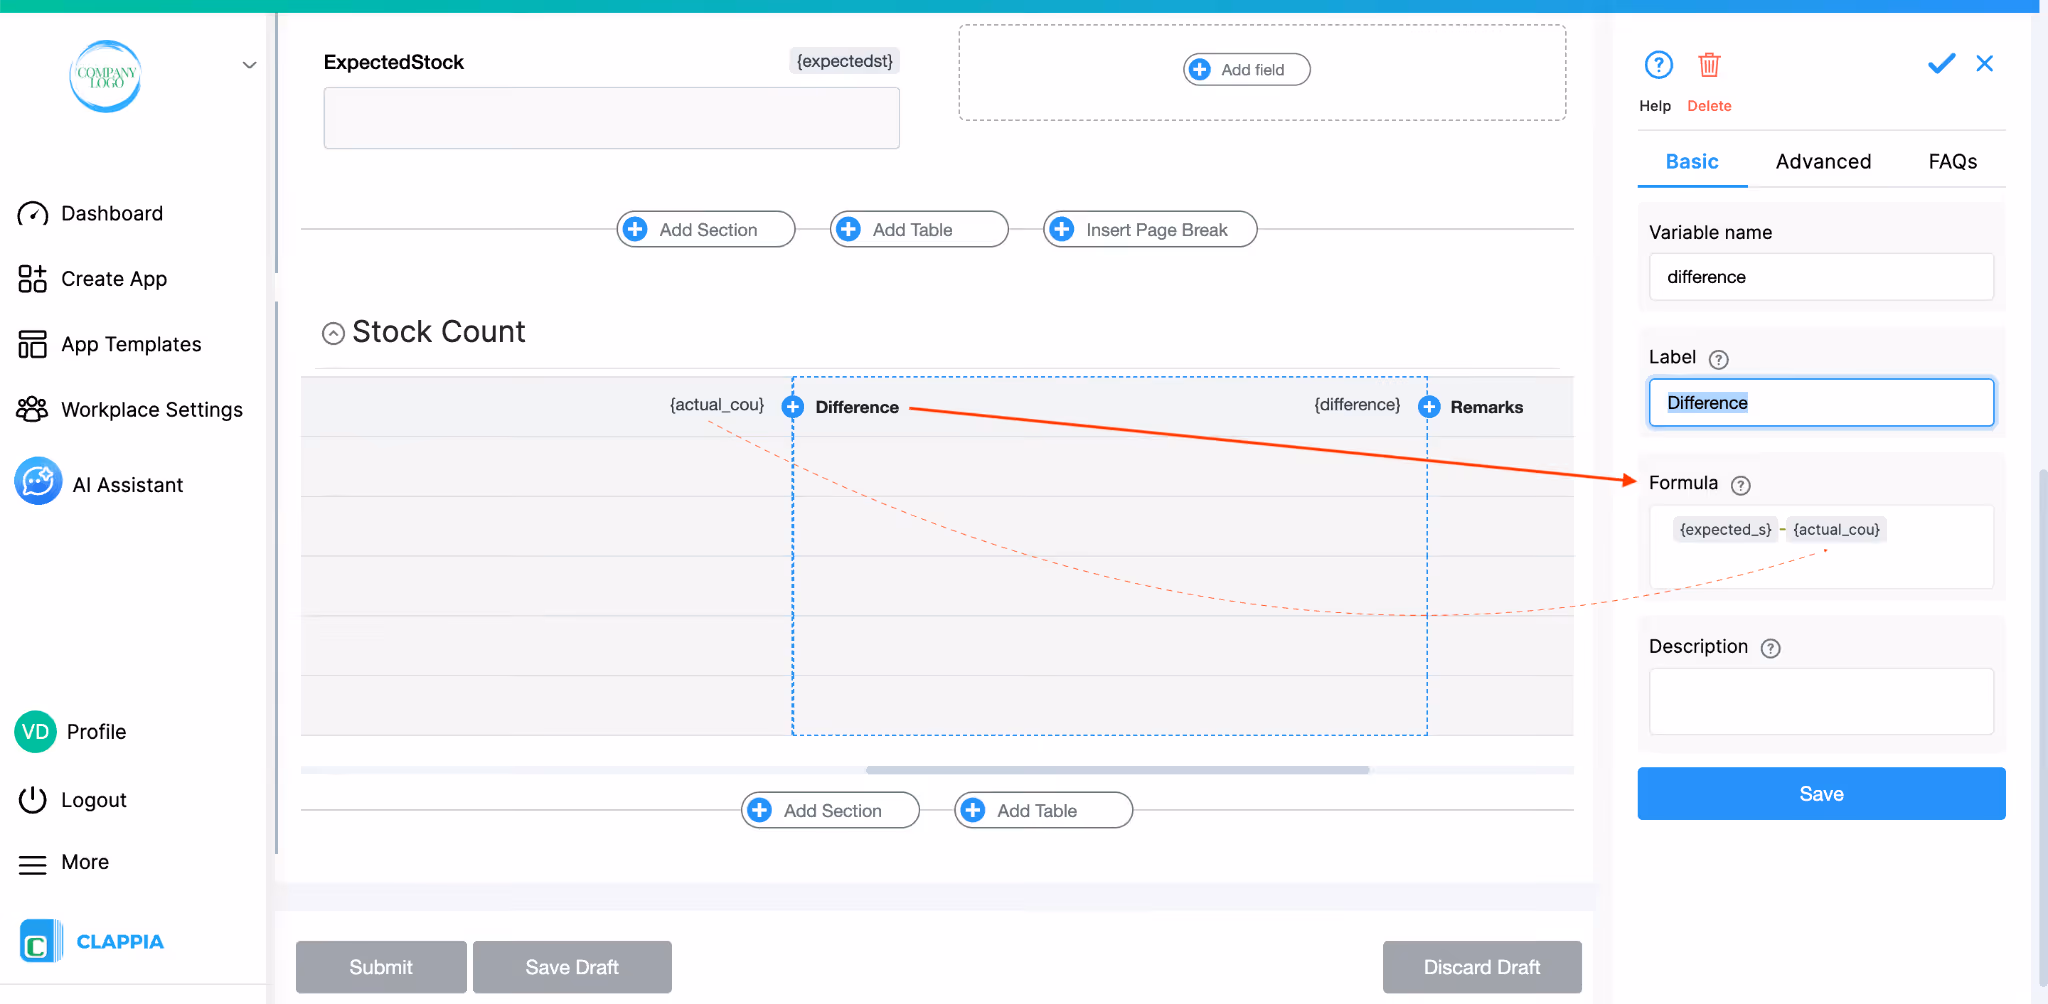
Add a Number Input column. Name it "Difference". This column can either be left editable for the user to calculate manually, or you can make it a Calculation column using the formula:
{expected_s} - {actual_cou}
where {expected_s} and {actual_cou} are the variable names of the Expected Stock and Actual Count columns respectively. This would auto-calculate the variance for each row the moment the user enters their actual count.
Column 5: Remarks
Add a Single Line Text column. Name it "Remarks". This is a free-text editable field where the user can note anything specific about a particular item,for example, why stock is lower than expected or if an item was recently received.

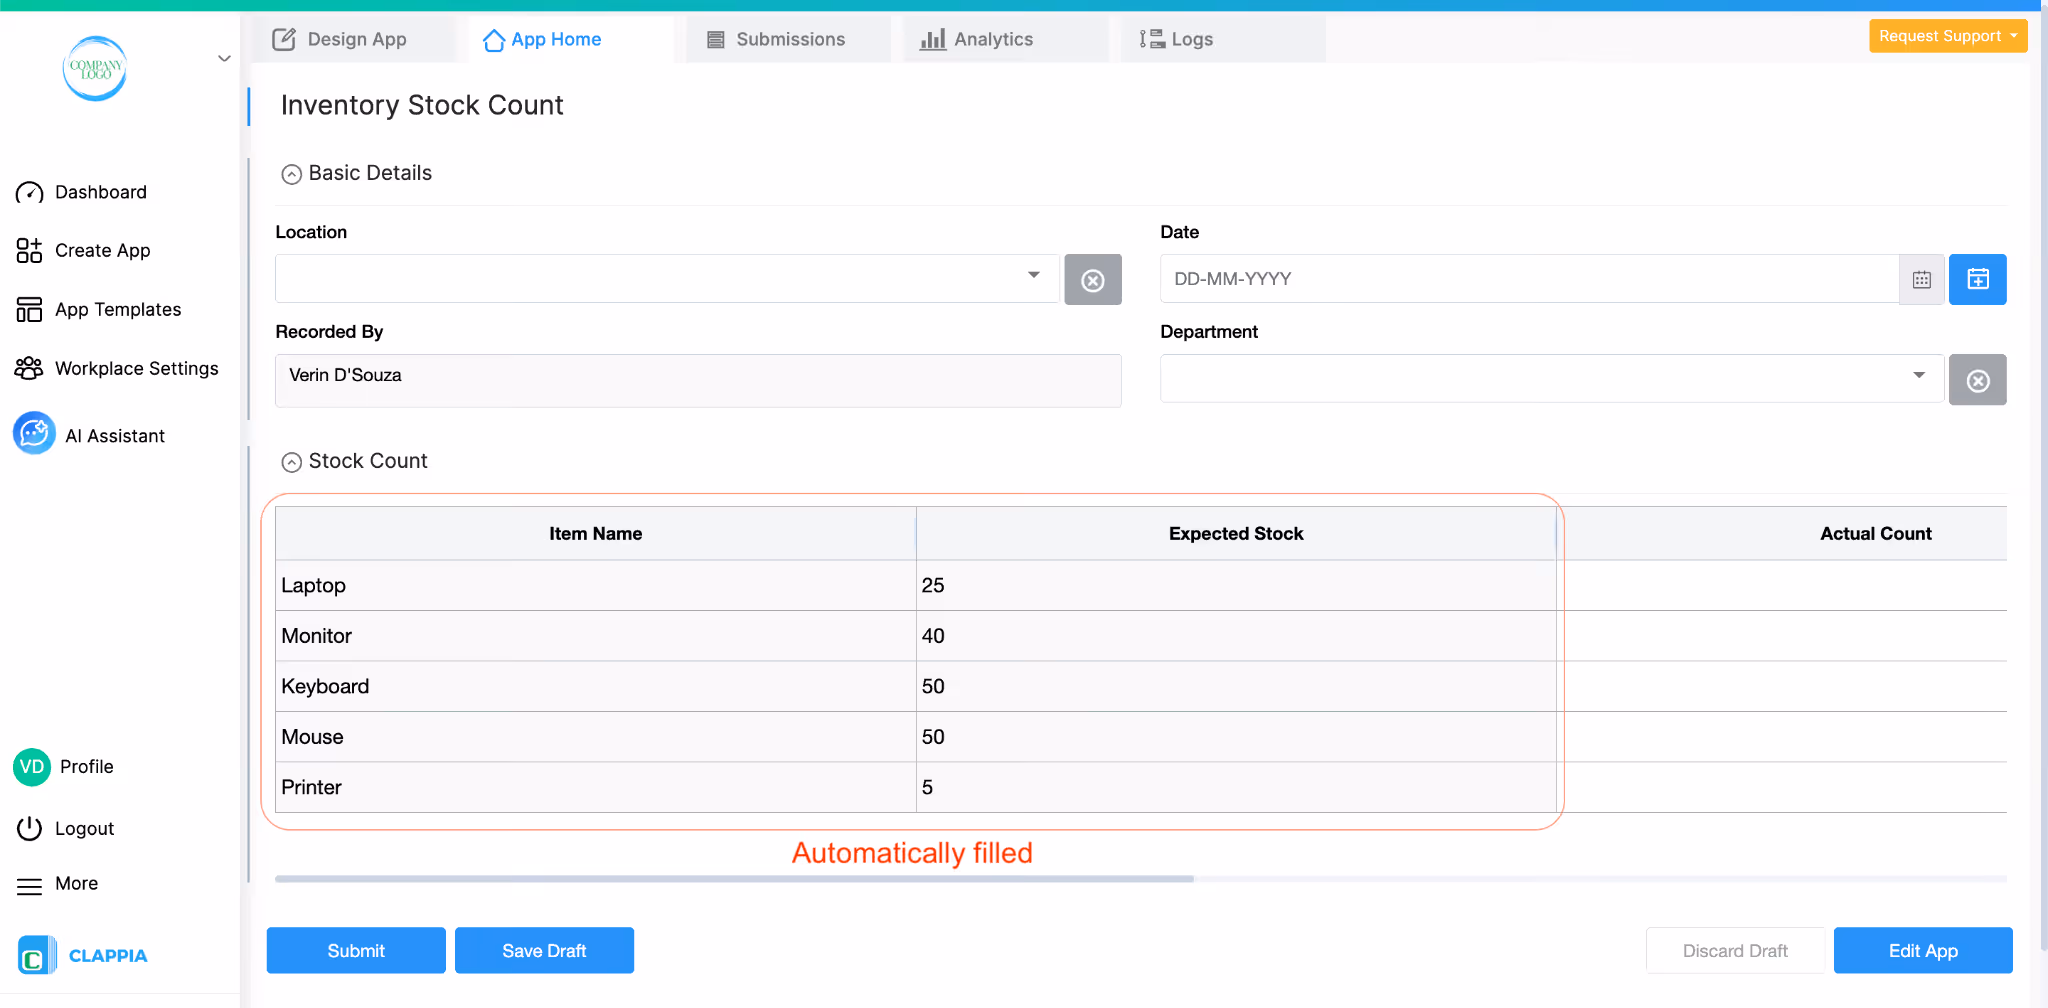
When a user opens the app in App Home, the Basic Details section appears at the top. The Recorded By field is already filled in with their name. They just need to fill in the Location, Date, and Department.
Below that, the Stock Count table appears with all five rows already populated. The Item Name column shows Laptop, Monitor, Keyboard, Mouse, and Printer. The Expected Stock column shows 25, 40, 50, 50, and 5. The user does not enter any of this as it is loaded automatically from the Code block.
The user physically counts the items in the warehouse and enters the observed quantity into the Actual Count column for each row. If the Difference column is set up as a formula, it immediately shows the variance. They can add any remarks in the last column if needed, then submit.
Every submission is stored in the Submissions tab with the full table data intact, giving you a timestamped record of every stock count by location, date, and department.
Since the item names and expected quantities are defined in the Code block, updating them is straightforward. Go to Design App, click on the Code block, and edit the arrays in the code editor. Update the itemnames and expectedstock arrays with the new values. Make sure both arrays have the same number of elements and that they remain positionally aligned.
If your item list comes from a system rather than being hardcoded, you can replace the hardcoded arrays with a fetch() call inside the async function main() to pull the data from an external API endpoint. The output structure remains the same, as long as you return itemnames and expectedstock as arrays, the table formulas will continue to work without any changes to the table setup.
Once the core app is working, you can extend it depending on your needs.
For analytics, go to the Analytics tab inside Design App. You can build a bar chart showing average stock variance by location, or a data table listing all submissions where any item had a negative difference, flagging potential stockouts or discrepancies.
For notifications, you can add a workflow in the New Submission Flow. Using an IF Node, check if any Difference value falls below a threshold and trigger an Email or push notification to the relevant manager. For example, if actual count is more than 10 units below expected stock for any item, send an alert.
For user access, go to Workplace Settings > Users and add your team. Then go to Design App > Distribute to assign access to the app. Warehouse staff who conduct counts need access to fill in the form. Managers who review submissions may only need read access to the Submissions tab.
This approach can be applied to any scenario where you want a table pre-loaded with a known list while keeping some columns editable. The item list in this example is hardcoded, but the same pattern works whether your data comes from an API, another app, or a reference sheet. To get started, log in to your Clappia workspace and create the app. If you need help with any step, the linked help articles and the Clappia support team are available.
L374, 1st Floor, 5th Main Rd, Sector 6, HSR Layout, Bengaluru, Karnataka 560102, India
3500 S DuPont Hwy, Dover,
Kent 19901, Delaware, USA


3500 S DuPont Hwy, Dover,
Kent 19901, Delaware, USA
L374, 1st Floor, 5th Main Rd, Sector 6, HSR Layout, Bengaluru, Karnataka 560102, India
.svg)
