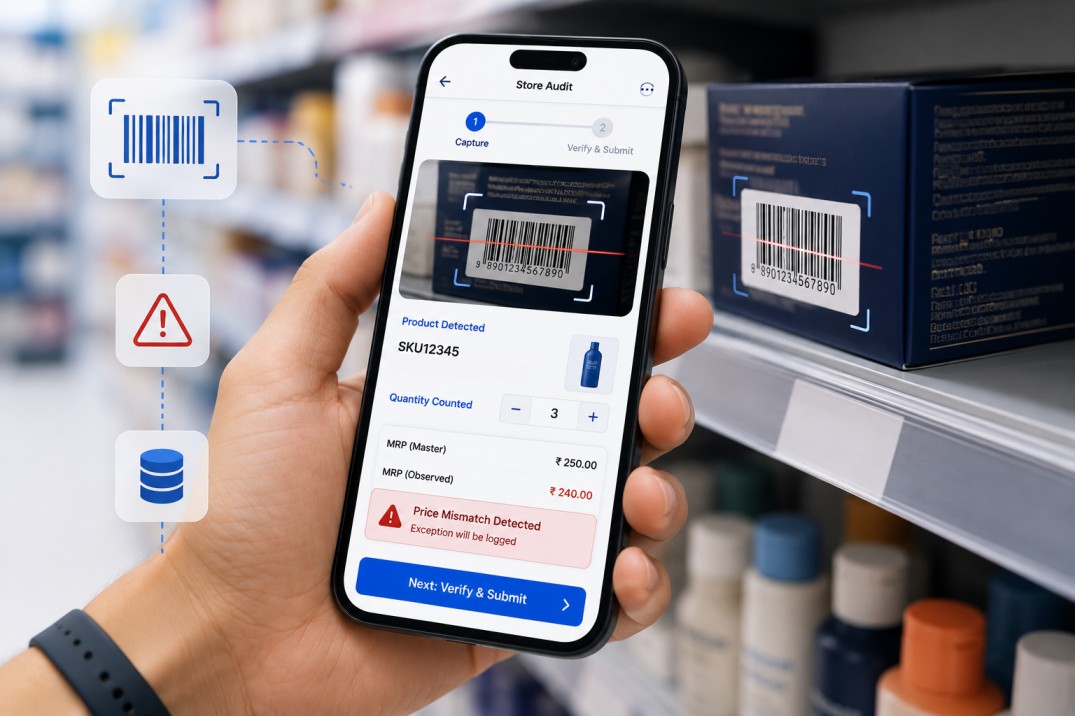
Paper-based maintenance checklists have a fundamental weakness: the result of each inspection depends entirely on the person doing it. A technician who checks that a temperature reading is within range has to know the acceptable range, compare the reading mentally, and write down whether it passed or failed. When the same technician is checking fifty items across multiple machines in a shift, the chance of a miscalculation or a missed threshold is real.
Those misses add up. NIST estimates that US manufacturers lost about $119 billion in 2016 to preventable maintenance issues. A reading that drifted out of range but was marked as fine is exactly the kind of early warning that gets lost on paper.
A digital checklist built in Clappia, a no-code platform for building operational mobile apps, removes the mental arithmetic from the technician's job. The acceptable thresholds are defined once in the checklist master. When the technician enters their actual reading in the report, the result, OK or Not OK, is computed automatically. The technician sees the result immediately without having to compare anything.
This guide walks through building both the checklist definition and the reporting form that uses it, with particular attention to how the different checkpoint parameter types work and how the result formula evaluates each one. If you are new to Clappia: in Clappia, you build apps by adding blocks, which are individual field types. A Formula block is a field that calculates a value automatically based on other fields. A copyable section is a section of the form the user can repeat, each copy with the same set of fields.
The auto-evaluation system depends on two apps working in coordination. The Maintenance Checklist Master is where maintenance engineers define what should be checked and what the acceptable thresholds are. The Maintenance Report and Spares Log is where technicians record their actual readings and see the computed results.
The connection between them is the checklist selection in the report. When a technician selects a checklist in the report app, the checkpoint rows from that checklist populate automatically in the report's Checklist Details section. Each row carries the checkpoint name, the parameter type, and the defined thresholds from the master. The technician sees exactly what to measure and what fields to fill in. The result formula evaluates immediately as they enter each reading.
The full sequence looks like this:
Defining thresholds in the checklist master rather than in the report means the same thresholds apply consistently every time that checklist is used, regardless of which technician runs the maintenance. The decision about what is acceptable is made once by an engineer, not repeatedly by whoever happens to be doing the inspection.
Open the Maintenance Checklist Master app and create a new record. This app is where all checklists are defined. Work through the fields in order.
Select the machine this checklist applies to from the Select Machine field. In Clappia, this field uses a Get Data from App block that looks up records from the Machine Master app. When you select a machine, the following details auto-fill from the machine's record:
These auto-filled values confirm that the checklist is linked to the correct machine and provide the machine identifier that the report app uses to filter which checklists are available for a given machine.
Set the Maintenance Type to Preventive. This is the default and the type covered in this guide. Then select the Frequency from the available options: daily, weekly (7 days), monthly (30 days), quarterly (90 days), semi-annual (180 days), or annual (365 days). The frequency you select here must match the maintenance interval you plan to use in the report. The report app filters its checklist dropdown by frequency, so a checklist set to monthly will only appear when the technician selects monthly as the maintenance type in the report.
For frequencies other than daily, the app also allows you to enter a Last Maintenance Date. When this is provided, the app calculates and displays a Due Date (last maintenance date plus the frequency interval) and a Reminder Date (one day before the due date). These fields give the planning team visibility into when the next maintenance is scheduled.
Enter a Checklist Name and an optional reference number or format code. The checklist name should be descriptive enough for a technician to recognise it unambiguously from a dropdown: for example, Weekly Lubrication Check or Monthly Electrical Inspection. A Validation block set to the Duplicate type, at the Error level, blocks submissions where the same combination of frequency, checklist name, and machine name already exists, preventing accidental duplicate checklists.
The lower section of the checklist record is a copyable section called Checkpoint Details. Each row defines one thing to check during the maintenance. A checklist can have up to fifty rows. For each row, you define two things: what to check and how to evaluate it.
Enter the Checkpoint Name for the row: a short description of the specific item being checked, such as Oil temperature, Drive belt tension, or Emergency stop function. This is what the technician will see in the report when they are running the maintenance.
The Parameter field determines how this checkpoint will be evaluated. This is the most important field in each row because it controls both what input the technician sees in the report and how the result is computed. The available parameter types are:
Here is how each parameter type behaves:
| Parameter Type | What the Technician Enters | How the Result Is Computed |
|---|---|---|
| Observed Range | A minimum and maximum actual value (two numbers) | OK if both values fall within the defined threshold range; Not OK if either falls outside |
| Observed Value | A single actual value (one number) | OK if the value falls within the defined threshold; Not OK if it falls outside |
| Yes/No | Yes or No | Not applicable; result is NA; no threshold comparison |
| OK/Not OK | OK or Not OK | Not applicable; result is NA; technician judgment recorded directly |
| Pass/Fail | Pass or Fail | Not applicable; result is NA; technician judgment recorded directly |
| Remark | Free text | Not applicable; result is NA; used for observations that do not fit a structured response |
For parameter types that require numeric evaluation (Observed Range and Observed Value), you must also define the acceptable threshold. For all other parameter types, the result is Not Applicable and no threshold is needed.
When the parameter type is Observed Range or Observed Value, two additional fields appear in the row: Threshold Type and the corresponding threshold values. The Threshold Type has three options:
In Clappia, these additional threshold fields are controlled by Display Conditions, which are rules that control whether a field is visible based on the value of another field. The minimum threshold field appears only when the threshold type is Min and Max or Min Only. The maximum threshold field appears only when the threshold type is Min and Max or Max Only. This keeps the row clean: the technician who will later fill in the report sees a row with only the threshold information that is actually relevant to that checkpoint.
Enter the numeric threshold values in the appropriate fields. For a temperature sensor that must read between 60 and 85 degrees, set Threshold Type to Min and Max, Minimum Threshold to 60, and Maximum Threshold to 85. For a pressure gauge that must read at least 2.5 bar, set Threshold Type to Min Only and Minimum Threshold to 2.5.
Once the checklist is saved in the master, it becomes available in the Maintenance Report and Spares Log app. Open a new report record and work through the Maintenance Details section first: enter the date, shift, maintenance type (which must match the checklist's frequency), the technician's name, and the machine. When you select the checklist from the filtered dropdown, the Checklist Details section below populates with the checkpoint rows from the master.
Each row in the Checklist Details section shows the checkpoint name and the parameter type. The input fields that appear depend on the parameter type, controlled by display conditions in the report app that mirror the parameter type set in the checklist master:
A free-text Remark field is available on every row regardless of the parameter type. Technicians can use this to add context to any checkpoint, such as noting a borderline reading, describing a visual observation, or flagging something for follow-up.
Each checkpoint row has a Result field that is computed automatically by a Formula block. In Clappia, a Formula block calculates its value based on other fields in the form. The result field is read-only; the technician cannot edit it. The formula logic for each parameter type works as follows:
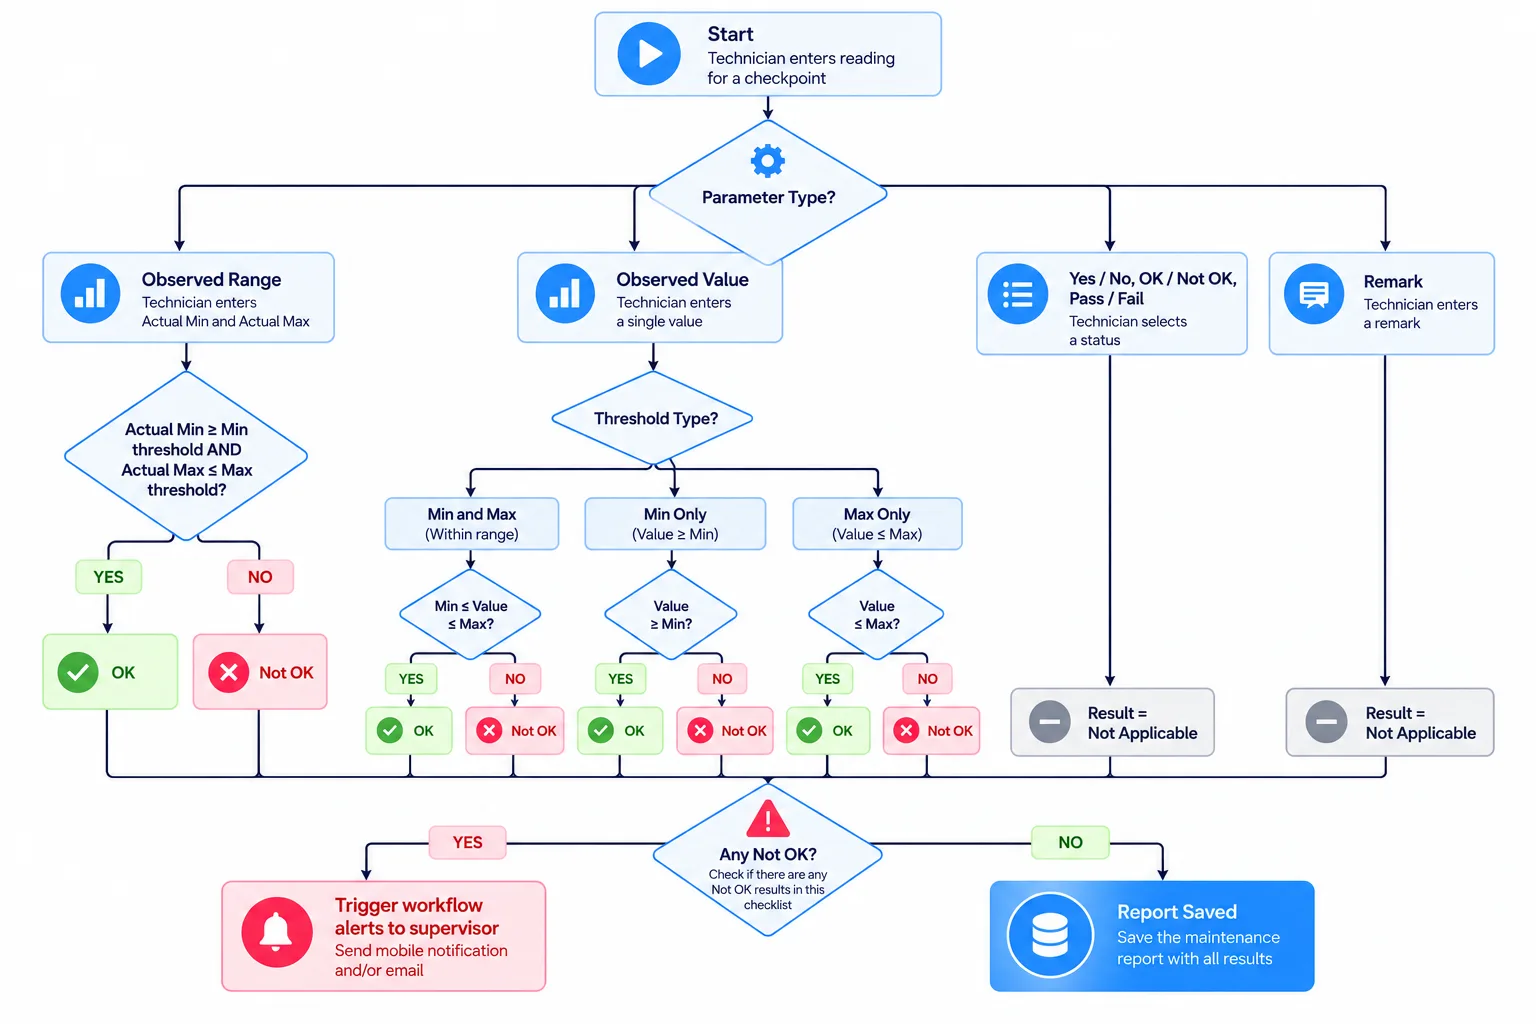
For Observed Range checkpoints, the formula checks whether the Actual Minimum is greater than or equal to the defined minimum threshold, AND whether the Actual Maximum is less than or equal to the defined maximum threshold. In Clappia formula syntax, field values are referenced using curly braces (type @ in the formula editor to pick a field):
IF(AND({Actual Minimum} >= {Defined Minimum}, {Actual Maximum} <= {Defined Maximum}), "OK", "Not OK")
If both conditions are true, the result displays OK. If either condition fails (the actual minimum is below the threshold, or the actual maximum is above the threshold), the result displays Not OK.
For Observed Value checkpoints, the formula checks whether the Actual Value falls within the defined threshold range:
IF(AND({Actual Value} >= {Defined Minimum}, {Actual Value} <= {Defined Maximum}), "OK", "Not OK")
For Observed Value with a minimum-only threshold, the formula checks the lower bound only:
IF({Actual Value} >= {Defined Minimum}, "OK", "Not OK")
For Observed Value with a maximum-only threshold, it checks the upper bound only:
IF({Actual Value} <= {Defined Maximum}, "OK", "Not OK")
For categorical parameter types (Yes/No, OK/Not OK, Pass/Fail, Remark), no numeric comparison is possible, so the result formula returns Not Applicable. The technician's categorical response is the record; no further evaluation is applied.
The result appears immediately after the technician enters their reading. They do not need to wait until submission to see whether a checkpoint passed or failed.
You can also act on the results. A workflow in the report app can check whether any checkpoint returned Not OK and, if so, send an email or mobile push alert to the maintenance supervisor, so an out-of-range reading becomes a follow-up job instead of a line in a report.
Build a maintenance checklist that grades every reading for you, with thresholds, formulas, and alerts on the free plan.
Get started freeUse this as a quick reference when designing checkpoints:
| Parameter Type | Input Fields in Report | Threshold Required? | Result Formula Output |
|---|---|---|---|
| Observed Range | Actual Minimum, Actual Maximum | Yes (Min and Max) | OK if both actuals within threshold; Not OK otherwise |
| Observed Value (Min and Max) | Actual Value | Yes (Min and Max) | OK if actual within threshold range; Not OK otherwise |
| Observed Value (Min Only) | Actual Value | Yes (Min threshold only) | OK if actual at or above minimum; Not OK otherwise |
| Observed Value (Max Only) | Actual Value | Yes (Max threshold only) | OK if actual at or below maximum; Not OK otherwise |
| Yes/No | Yes or No selection | No | Not Applicable |
| OK/Not OK | OK or Not OK selection | No | Not Applicable |
| Pass/Fail | Pass or Fail selection | No | Not Applicable |
| Remark | Free text | No | Not Applicable |
The Checklist Details and Spares Used sections of the maintenance report can be edited after submission if your governance process requires corrections. In Clappia, submissions are editable after submission if the app's settings allow it. Supervisors reviewing a submitted report can update readings, add remarks, or correct an entry that was recorded incorrectly, without creating a new report record.
When a value is updated in an editable field, the result formula recalculates automatically. If a technician entered an incorrect reading that produced a Not OK result, and the supervisor corrects it to the accurate value, the result updates to OK immediately. The report record reflects the corrected data.
The decision to allow post-submission editing is a governance question rather than a technical one. Some organisations prefer to lock reports after submission to preserve the record as submitted; others allow corrections to ensure the historical data reflects what actually happened rather than what was accidentally typed. Configure the app's editing permissions in Clappia's user management settings to match your governance policy.
For the checklist and reporting system, configure user permissions in Clappia's user management settings as follows:
The Clappia mobile app, available on Android and iOS, is the primary interface for technicians running maintenance on the floor. The form renders the same display conditions and formula results on mobile as on desktop. Clappia supports offline mode: technicians preload the app while online, then complete and submit reports without a network connection, and submissions sync when connectivity returns. The machine and checklist selections use Get Data from Other Apps, which does not work offline, so technicians should select the checklist while they still have signal before heading into a dead zone.
A pharmaceutical manufacturer runs weekly preventive maintenance on its compressors, HVAC units, and purified-water pumps. Technicians open the report on their phones, select the machine and the weekly checklist, and enter readings such as discharge pressure, motor current, and vibration. Each reading turns green OK or red Not OK instantly against the thresholds the engineering team defined, and categorical checks such as guard in place are answered with a tap.
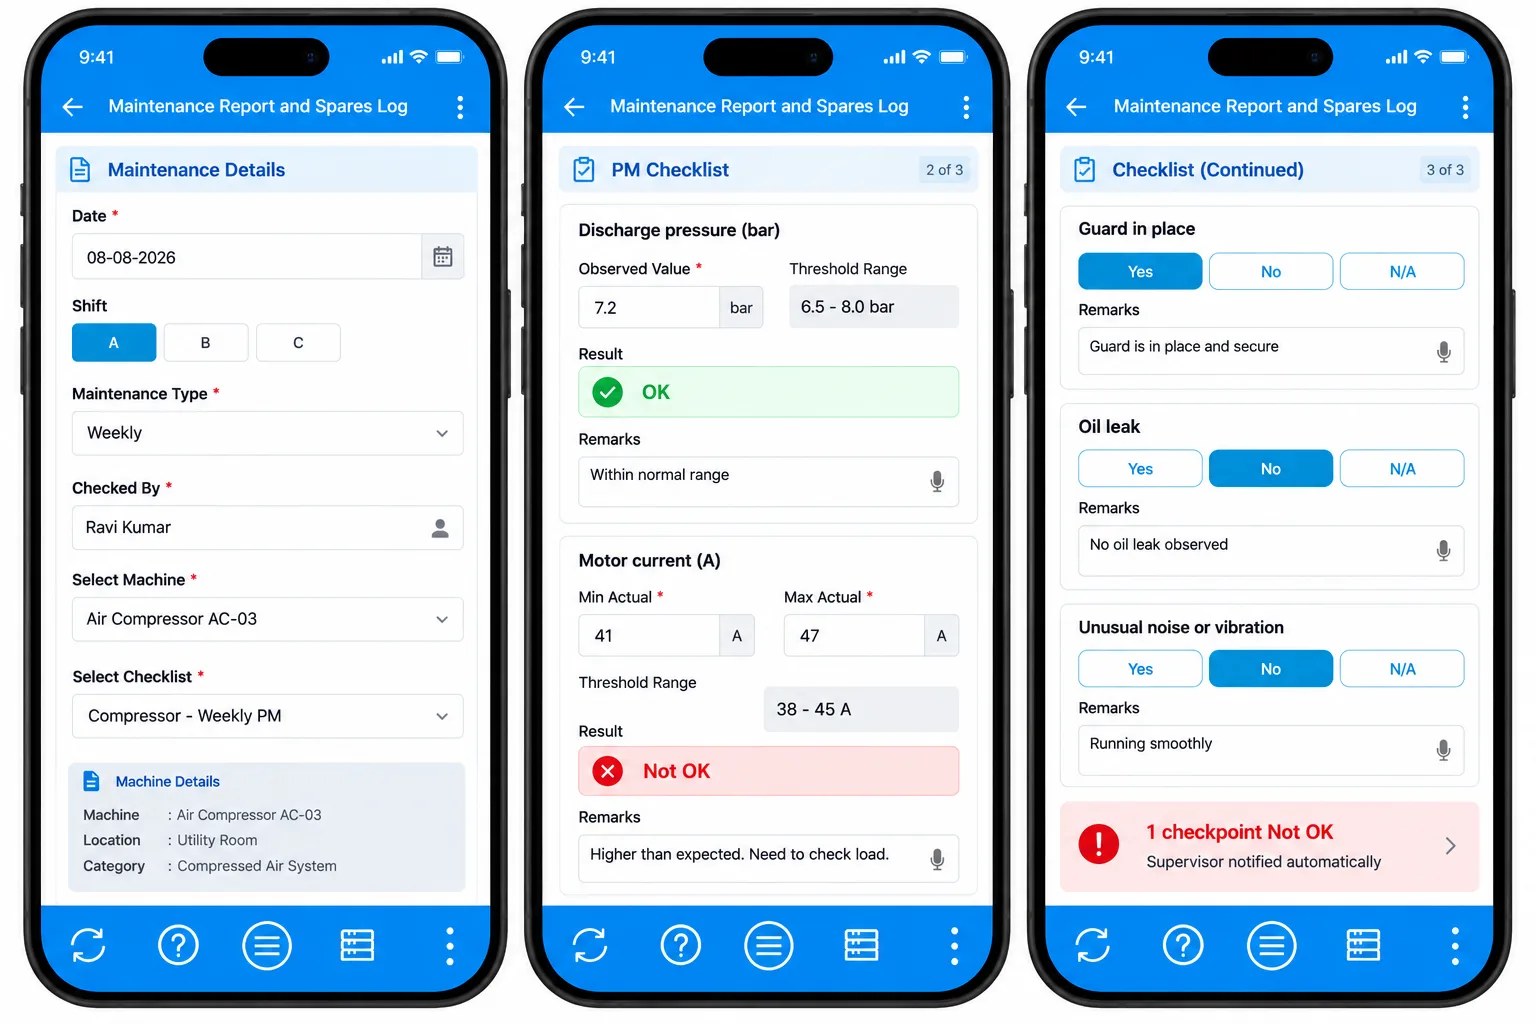
Because no one has to remember acceptable ranges, new technicians produce the same quality of record as veterans, and any Not OK reading triggers an alert to the supervisor before the shift ends. The approach fits any checklist-driven programme, from a quality inspection checklist to a building maintenance checklist.
A maintenance engineer at a solar EPC company maintains checklists for inverters, transformers, and tracker motors from the Clappia web app. When a manufacturer updates an operating range, the engineer changes the threshold once in the Checklist Master and every future report uses the new value. The Submissions view of the report app, filtered by machine and result, shows which assets are trending toward Not OK.
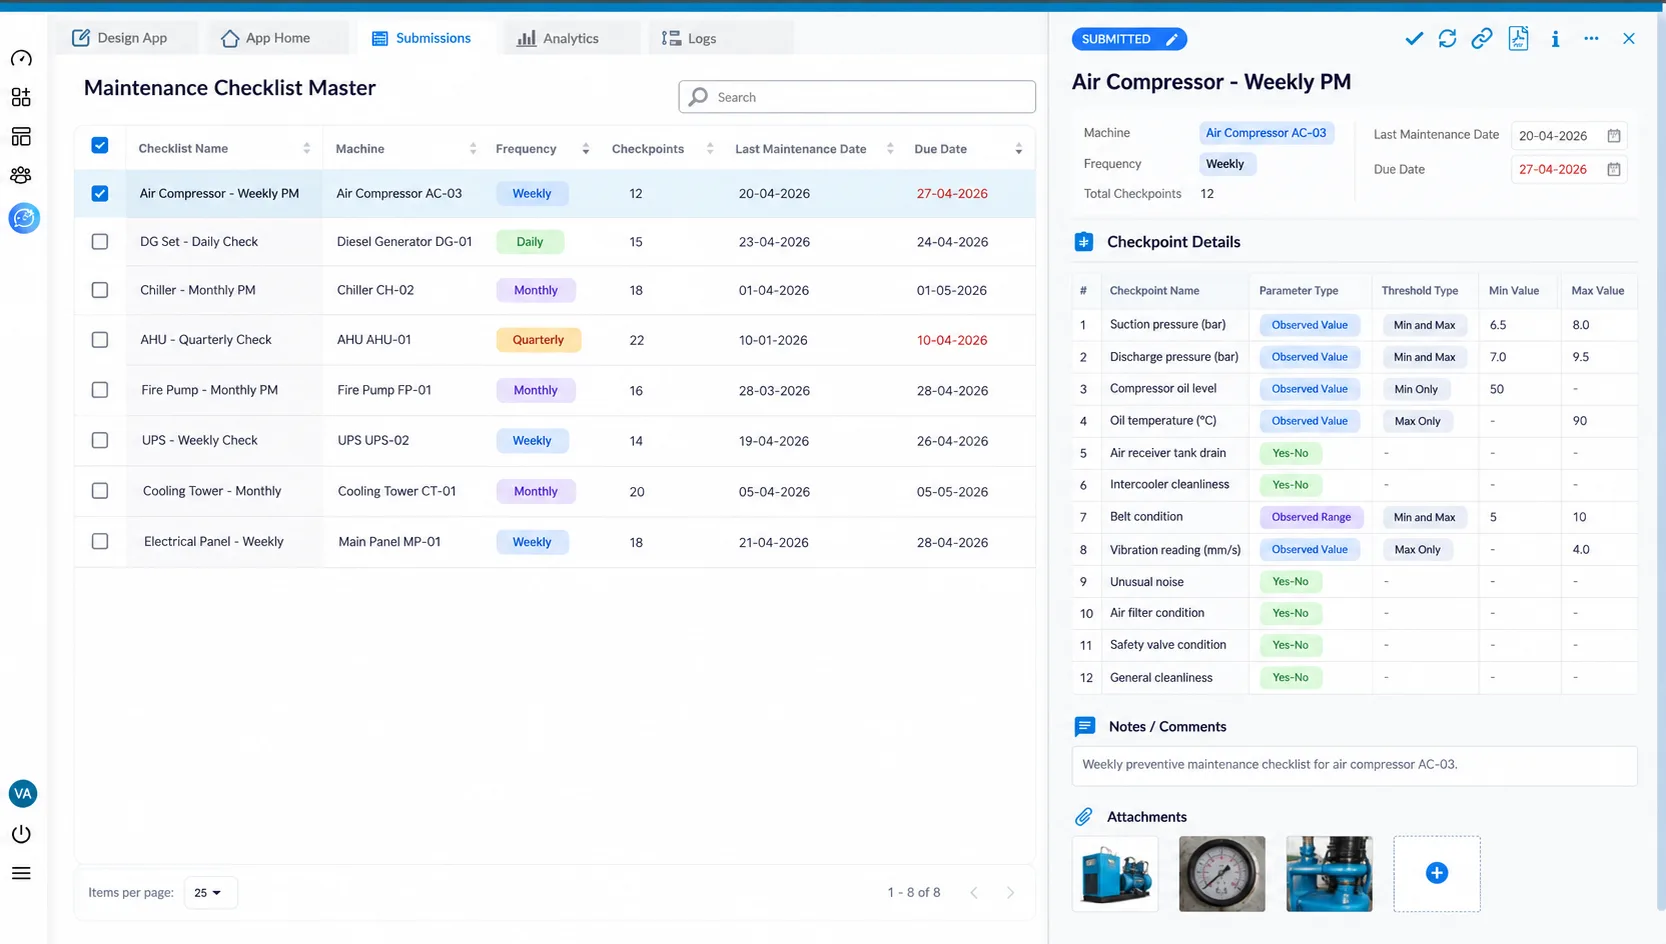
The engineer reviews those trends weekly, adjusts maintenance frequency where readings drift, and exports evaluated reports for client audits. Teams that also need to schedule this work can pair it with an equipment maintenance scheduler and our guide to linking maintenance planning to execution.
The automatic OK/Not OK evaluation in a Clappia maintenance checklist works because the thresholds are defined once in the checklist master and travel with the checklist whenever it is used in a report. When the technician enters a reading, the formula block compares it against the stored threshold and displays the result immediately. The technician never has to do the comparison manually.
The parameter type on each checkpoint row is the key configuration decision. Observed Range and Observed Value checkpoints produce numeric results (OK or Not OK) based on the threshold comparison. Categorical checkpoints (Yes/No, Pass/Fail, and so on) produce Not Applicable results and record the technician's direct judgment instead.
To build this system, start by defining your machines in the Machine Master, then create checklists in the Maintenance Checklist Master for each machine and maintenance frequency. Once the checklists are in place, the report app can use them to generate structured, automatically evaluated maintenance records. The complete setup is done in Clappia's visual builder without any coding. To keep the resulting records clean, see our guide to preventing duplicate maintenance entries and bad data, and for broader programme guidance the US Department of Energy's operations and maintenance guidance for federal facilities is a useful reference.
Ready to take the guesswork out of every inspection? Start building for free and turn your paper checklists into auto-evaluated digital ones in an afternoon. Your technicians get instant results, and your engineers get consistent data they can trust.
Create a Checklist Master app that defines each machine's checkpoints, parameter types, and thresholds, then a Maintenance Report app that pulls the selected checklist's checkpoints and computes OK or Not OK with Formula blocks as technicians enter readings.
A Formula block compares the technician's reading with the threshold stored in the Checklist Master, for example IF(AND({actual_min} >= {min_threshold}, {actual_max} <= {max_threshold}), "OK", "Not OK"). The result updates the moment the reading is entered.
Observed Range and Observed Value are evaluated against numeric thresholds. Yes/No, OK/Not OK, Pass/Fail, and Remark record the technician's judgment directly and return Not Applicable.
Yes. Set Threshold Type to Min and Max, Min Only, or Max Only. Display conditions show only the threshold fields that apply, and the formula checks only the relevant bound.
Yes, if the app allows edits after submission. When a reading is corrected, the result formula recalculates automatically.
Reports can be filled and submitted offline on the mobile app after it is preloaded, and formulas still calculate. The machine and checklist lookups use Get Data from Other Apps, which needs a connection.
Build a digital preventive maintenance checklist by defining each machine's checkpoints, parameter types, and thresholds once in a Checklist Master, then using them in a Maintenance Report. In Clappia, Formula blocks compare each reading with its threshold and show OK or Not OK instantly, display conditions show only the right input, and workflows can alert supervisors on any Not OK result.
L374, 1st Floor, 5th Main Rd, Sector 6, HSR Layout, Bengaluru, Karnataka 560102, India
3500 S DuPont Hwy, Dover,
Kent 19901, Delaware, USA


.svg)




3500 S DuPont Hwy, Dover,
Kent 19901, Delaware, USA
L374, 1st Floor, 5th Main Rd, Sector 6, HSR Layout, Bengaluru, Karnataka 560102, India





resized.jpg)