.avif)
Attendance tracking looks simple on paper, but anyone who has managed teams on the move knows it becomes complicated very quickly. People may be working at different client sites, stores, warehouses or offices. Some teams start their day in the field. Others move around throughout the day. Traditional attendance systems don’t usually handle this well because they expect everyone to be in one fixed location or use one specific device.
GPS-based attendance solves that problem. Instead of depending on biometric kiosks or manual registers, employees simply check in and check out from their phones. The app automatically captures the time and location, which keeps the process clean and removes the need for supervisors to follow up or verify entries.
But sometimes you want more than just the exact pin on a map. You may want to make sure the person is actually close enough to the assigned site before their attendance is accepted. If someone is required to be within 500 meters of a store or project site, you can enforce that too. This is where Clappia’s flexibility becomes useful.
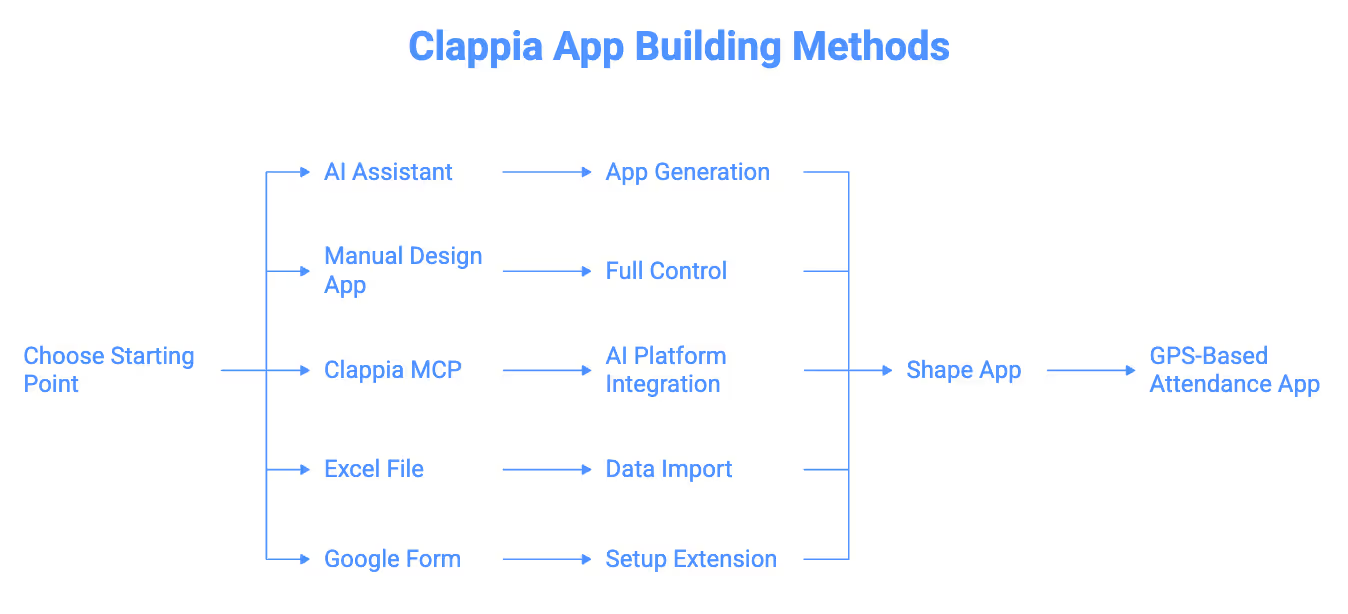
You can set up a GPS-based attendance system in Clappia in multiple ways depending on how you prefer to start:
Using the AI Assistant
If you want to get started quickly, you can tell the AI chat in Clappia exactly what kind of app you want including check-in, check-out, time capture, GPS restrictions, etc. and it will generate it for you.
Building Manually in the Design App
If you want full control from the start, you can add every field yourself and configure the logic the way your process needs.
Through Clappia MCP
You can give instructions to other AI platforms like Claude to actually build a fully functional app in Clappia by connecting it with Clappia MCP.
From an Excel File
If you already maintain a list of employees or attendance records in Excel, you can import that structure and let Clappia turn it into an app.
From a Google Form
If you use Google Forms today, you can bring that setup into Clappia and extend it with GPS and automation.
After choosing your method, you can shape the attendance app in whichever way works best for your teams. Below is an example of a GPS based Attendance app in Clappia that was created through the use of AI Chat. It will give you a basic idea of what you can create, how it looks like and what else can be done.
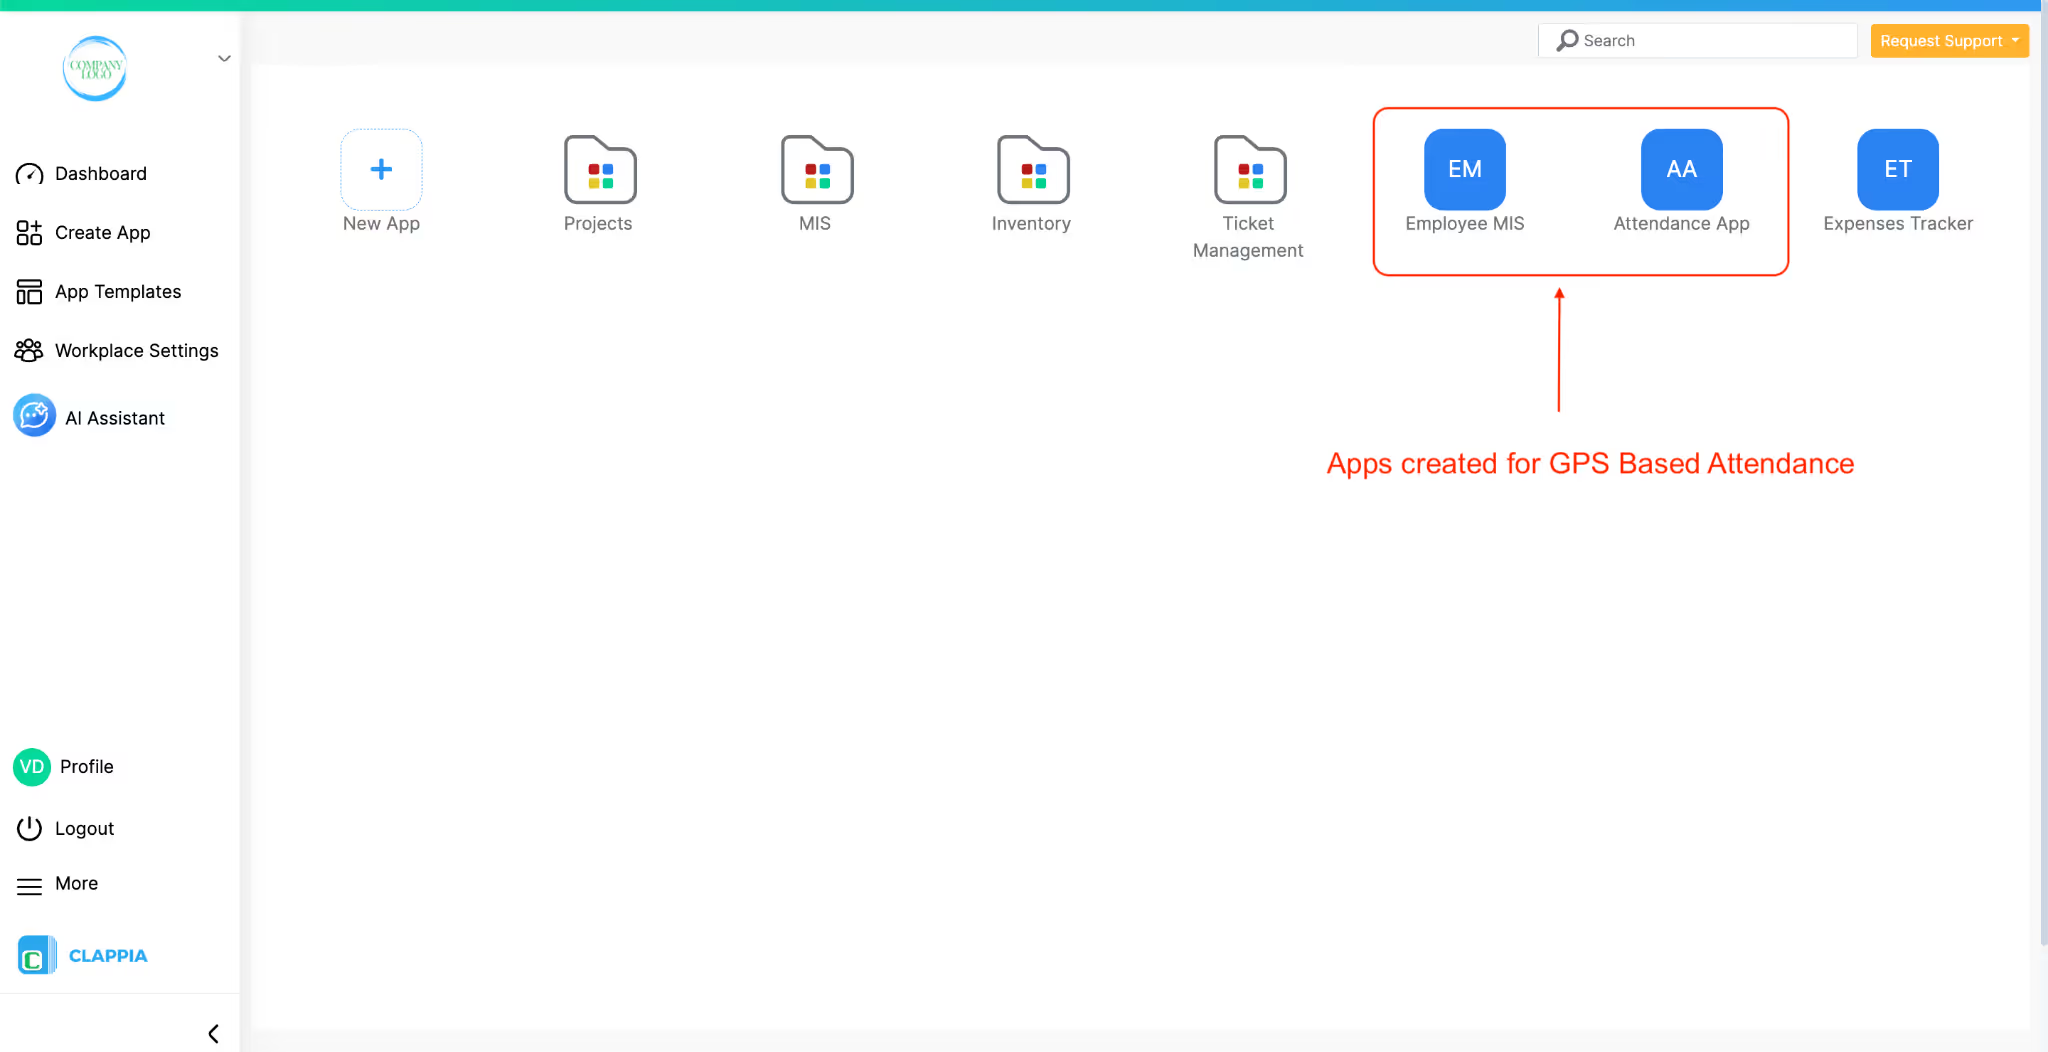
If you want to build a GPS based attendance tracker in Clappia, the cleanest way is to use two apps that work together:
The master app holds your employee records in one place. The attendance app pulls from it and records each day’s entries with time and location. Below is an example of how you can structure this setup and the different pieces you can add to support your process.
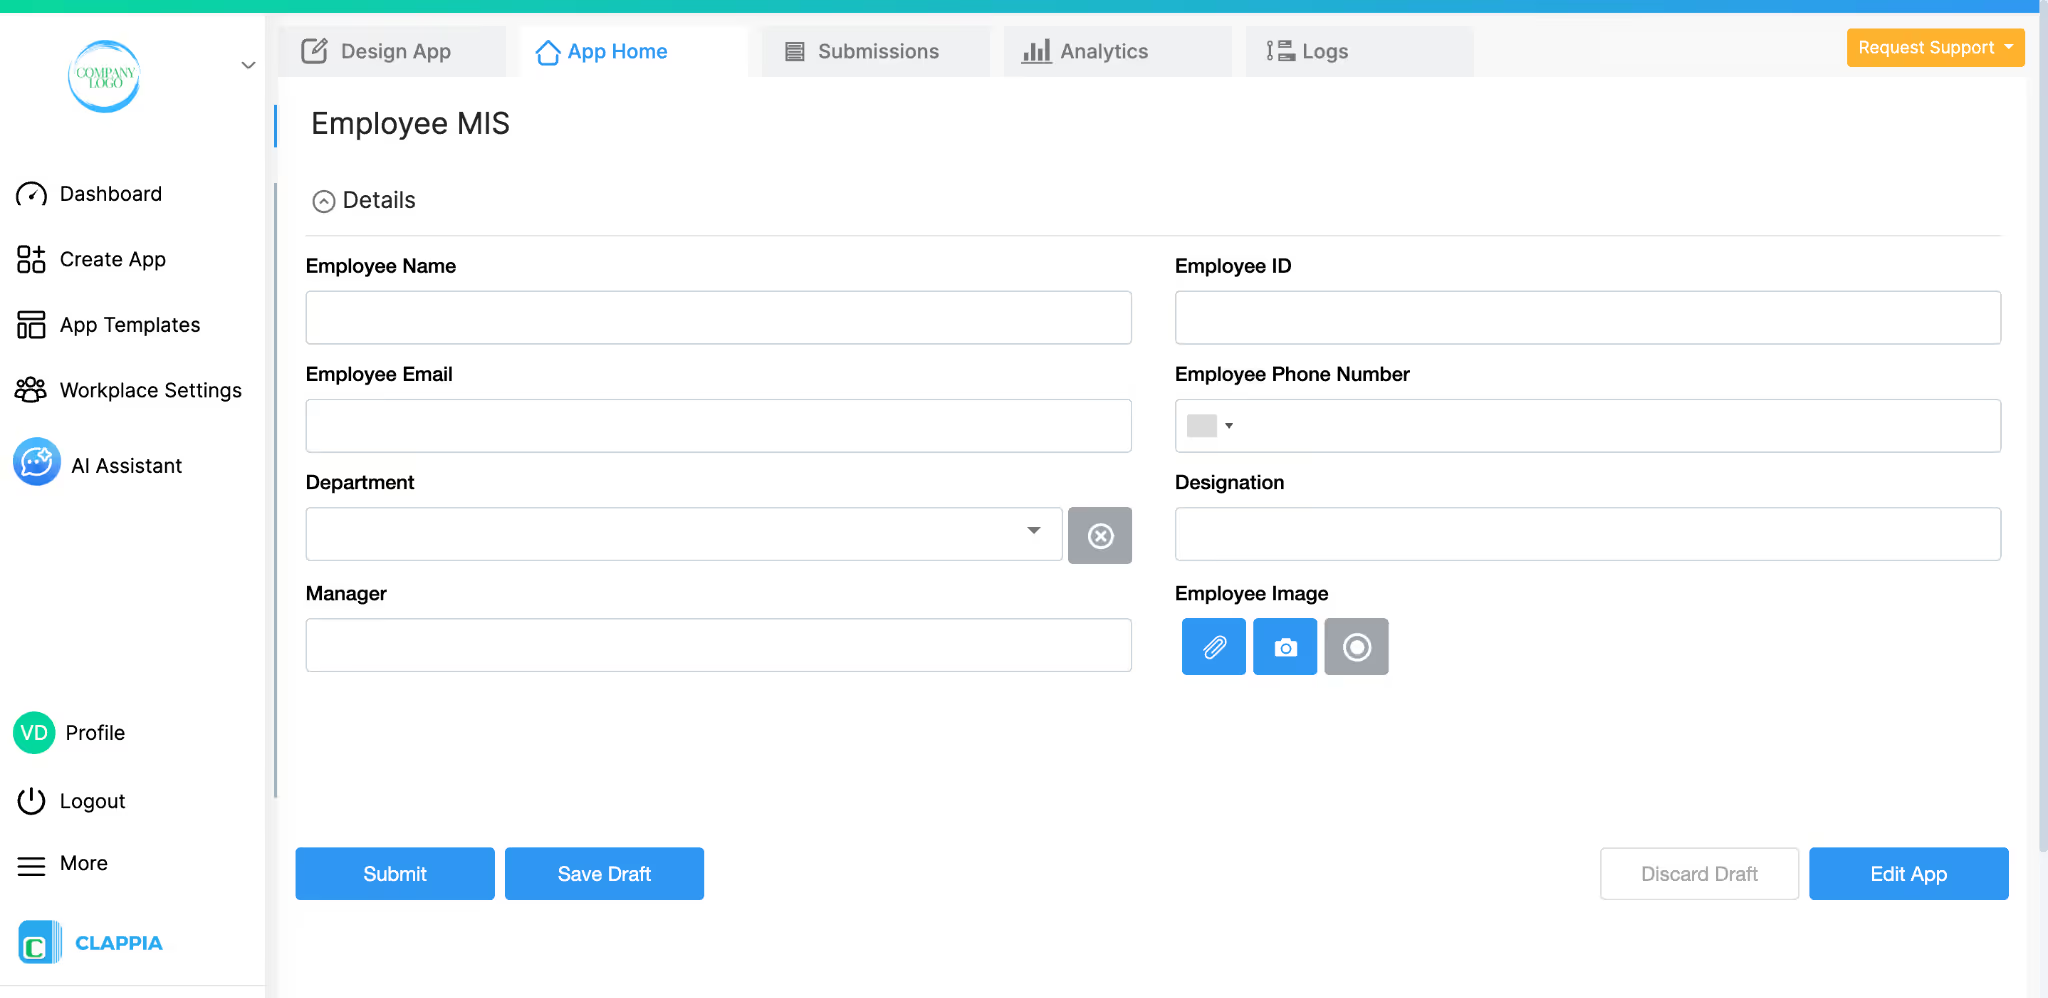
The Employee Master app is your central list of people. Once this is in place, you do not have to type employee details again in every form. Simply use the ‘Get data from other apps’ feature and connect this app to other apps.
A basic layout usually includes fields like:

You can add these one by one if you have a small team, or you can bulk-upload everything from an Excel file if you already maintain an employee sheet. This makes the app useful right away, without extra data entry.
Use the ‘Camera, image & Files block’ to capture employee images.

Later, if you want to track more information, you can always add fields for things like work location, employment type or shift pattern. Because this is a separate app, it can also act as a reference for other apps, not just attendance. For example, you might link it to a leave management app or a reimbursement app so they all pull from the same employee data.
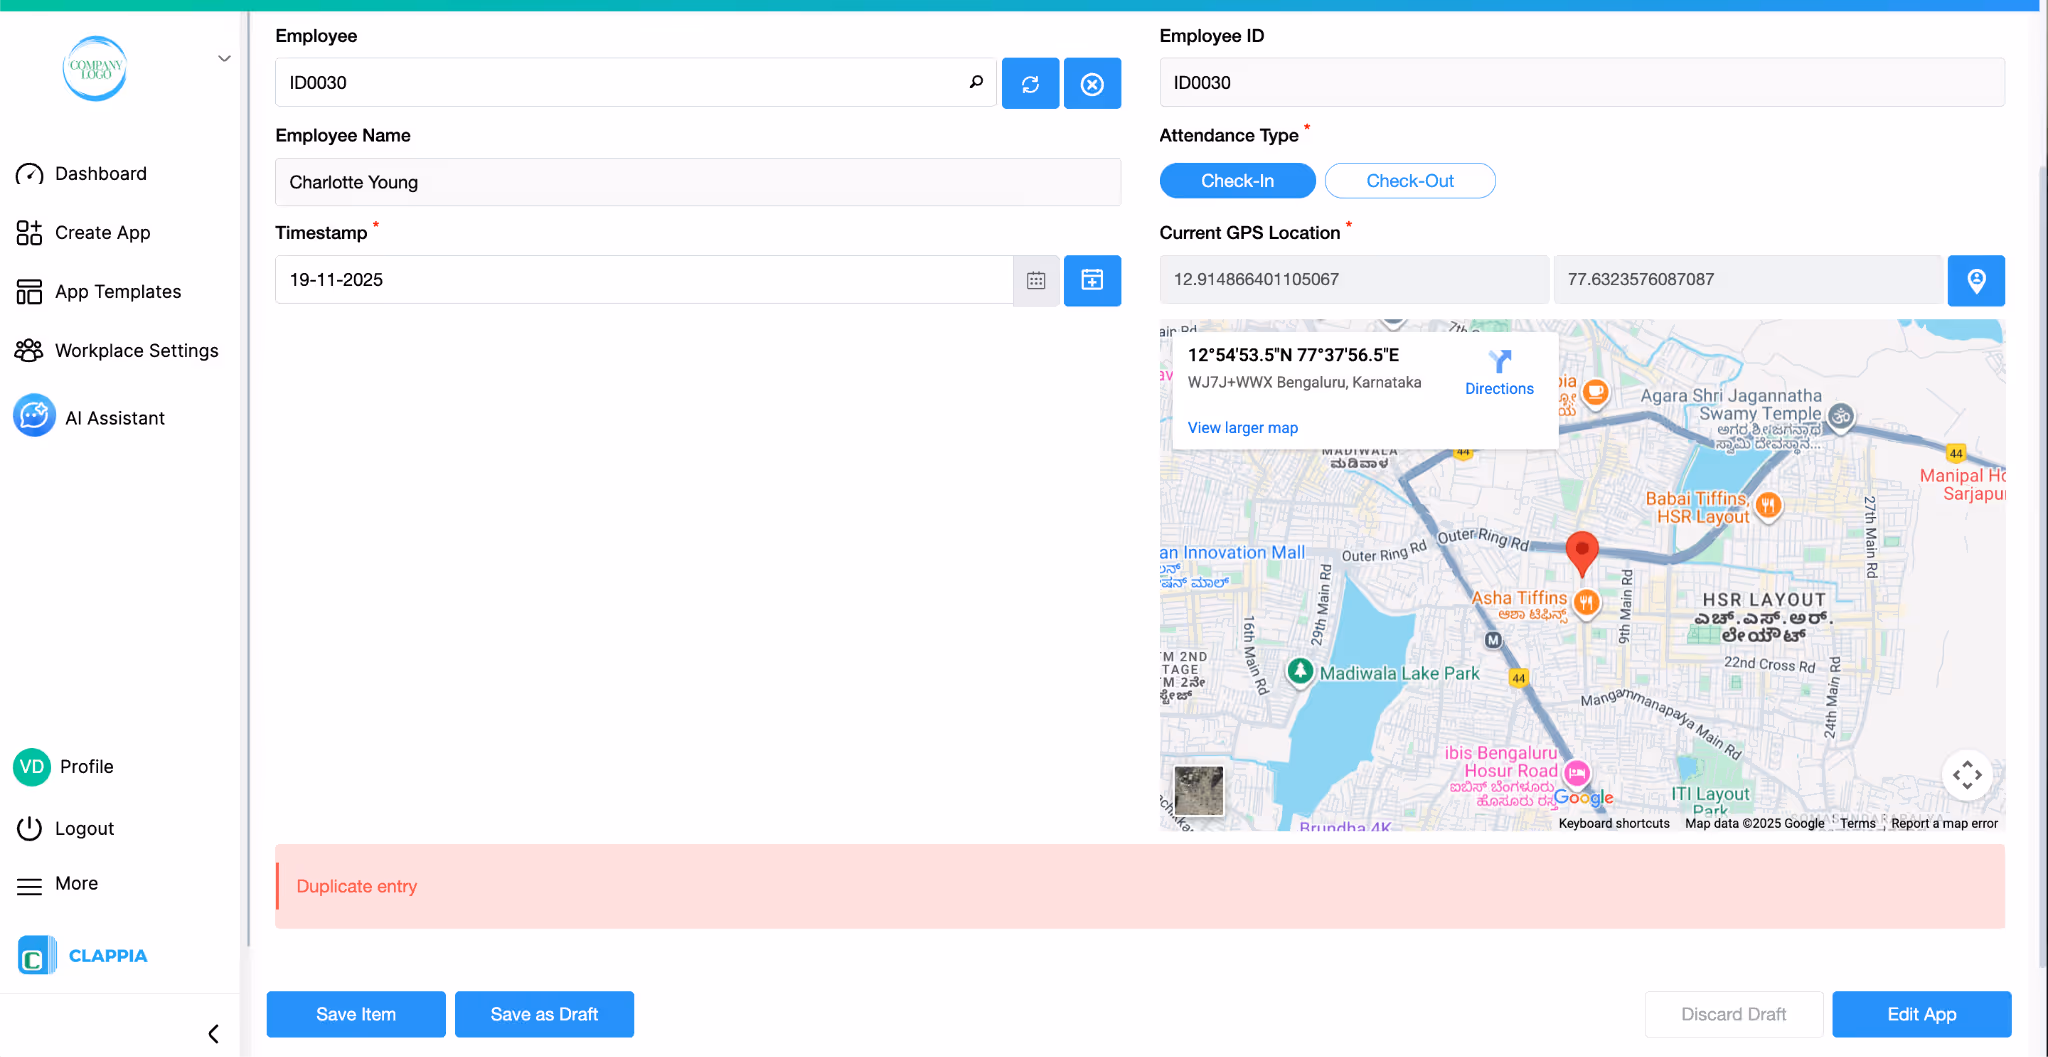
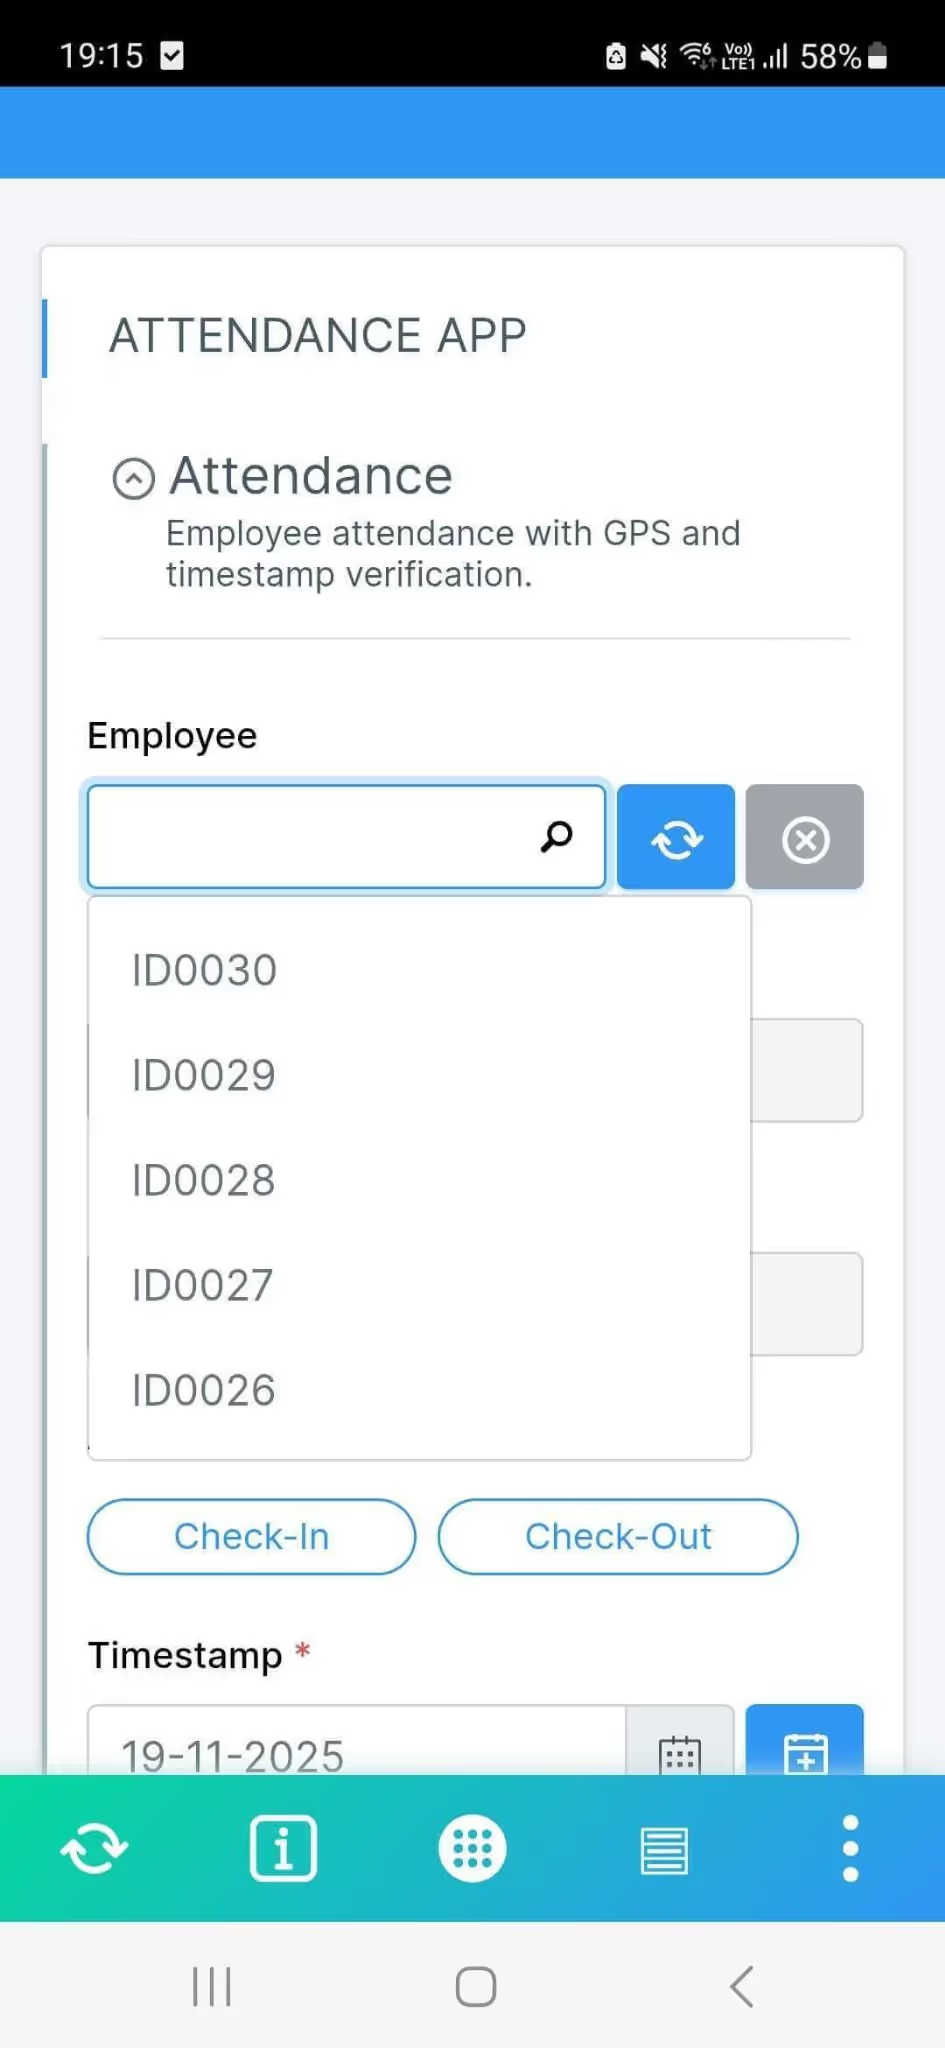
The Attendance app is where daily check-ins and check-outs happen. This is also where GPS is used to make sure people are marking attendance from the right place.
A simple version of this app can include:
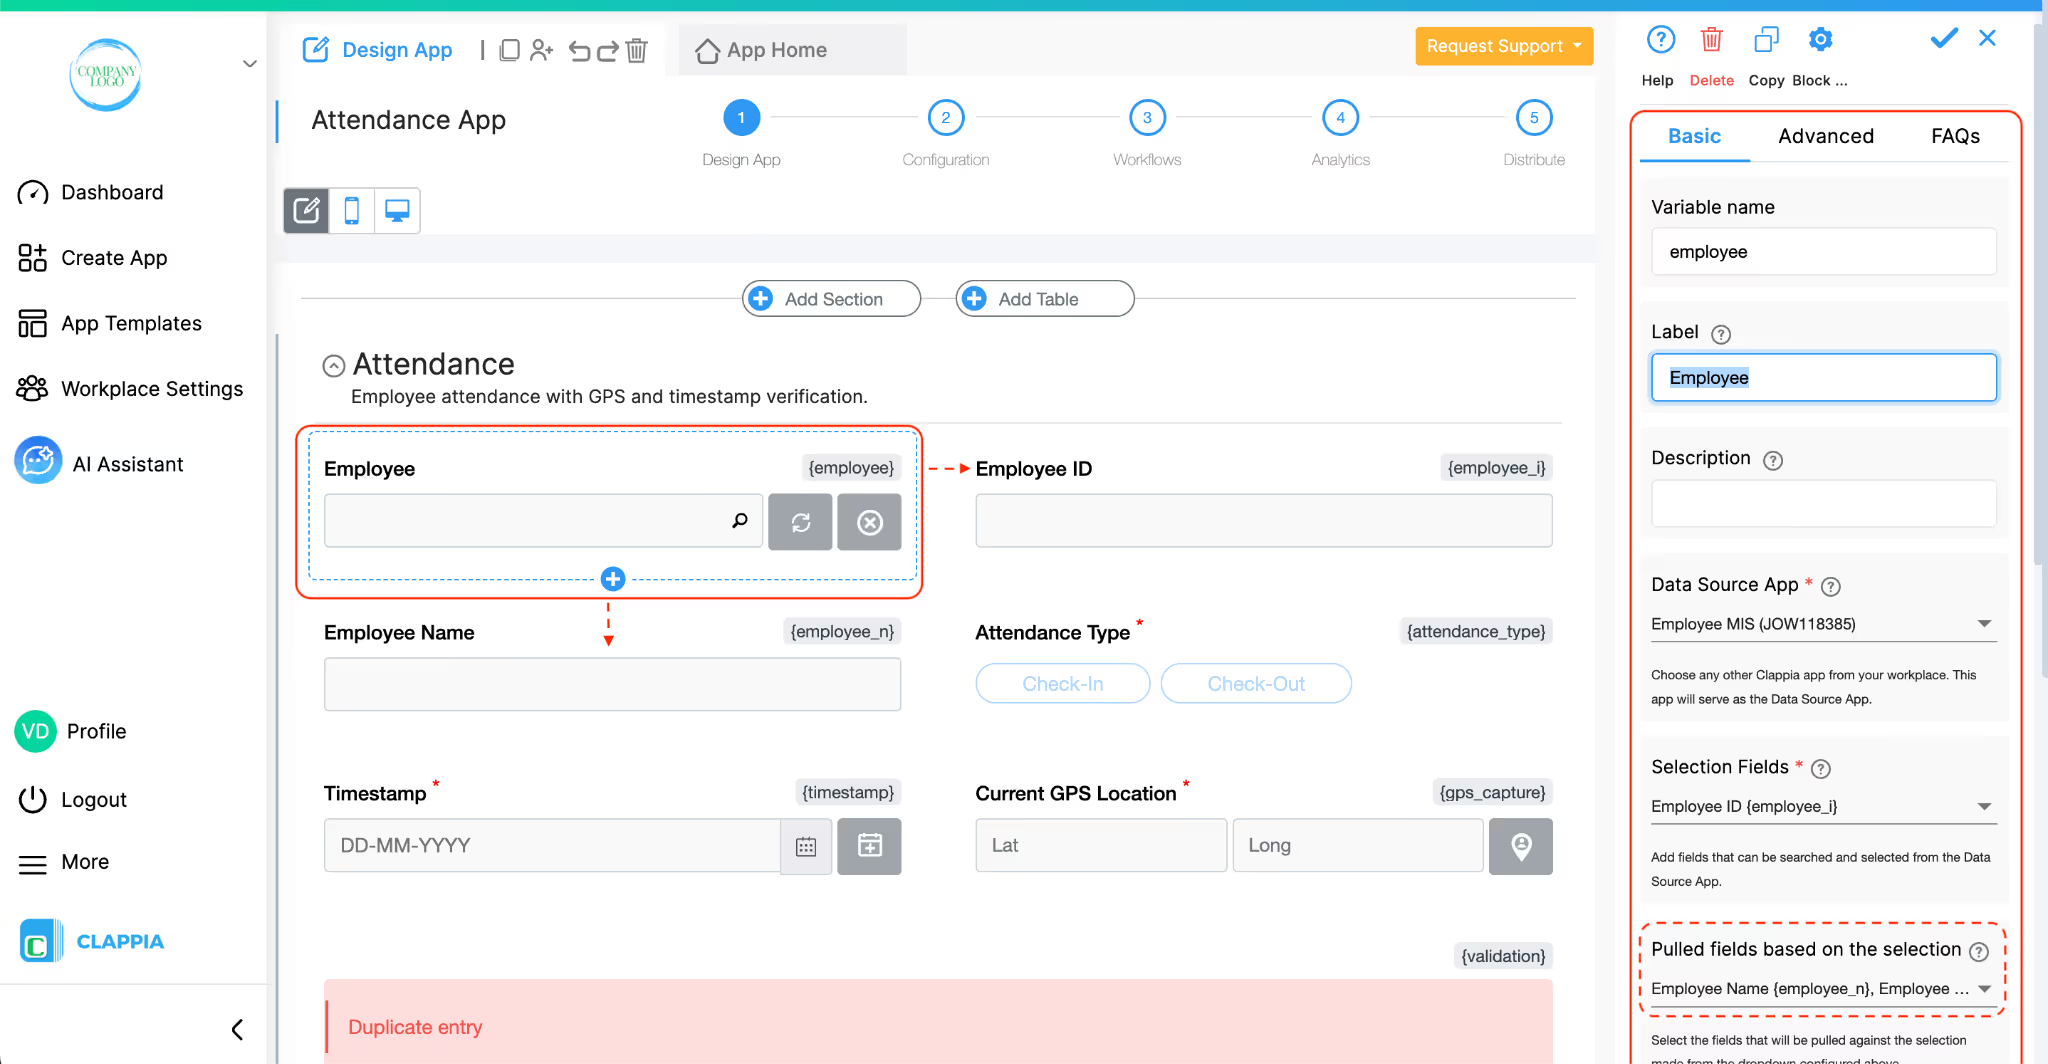
By pulling the name and other basic details from the Employee Master app, you avoid spelling mistakes. Employees only need to choose their ID or name, and the rest fills on its own.
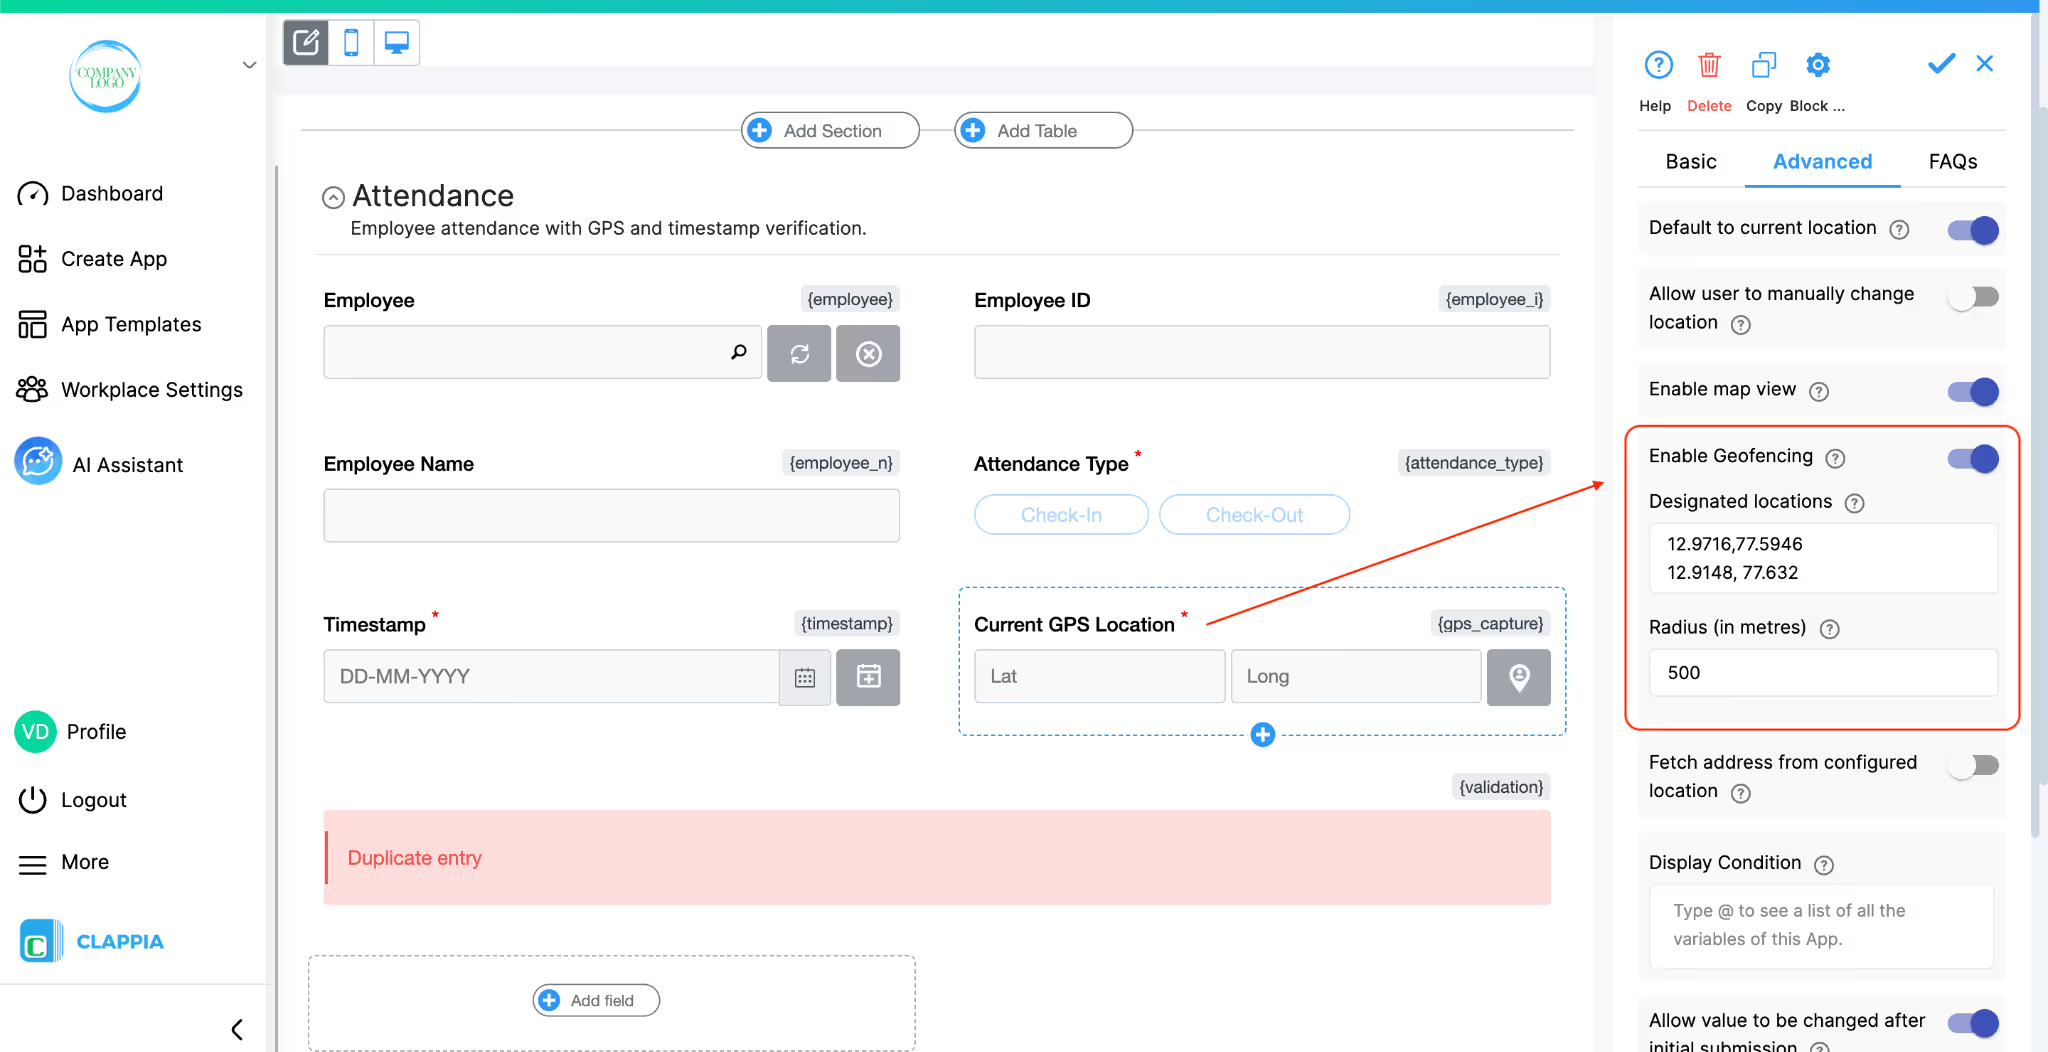
For GPS based attendance, the user’s actual location is captured and you can disable the option of letting them change the location on the map. You can also set up Geofencing, so that a submission is only allowed if the user is within a certain distance from approved locations. For example, you can configure the app to accept entries only when the GPS coordinates are within 500 metres of any listed office, branch, or site. This helps when you want to be sure people are actually near the workplace and not just marking attendance from anywhere.
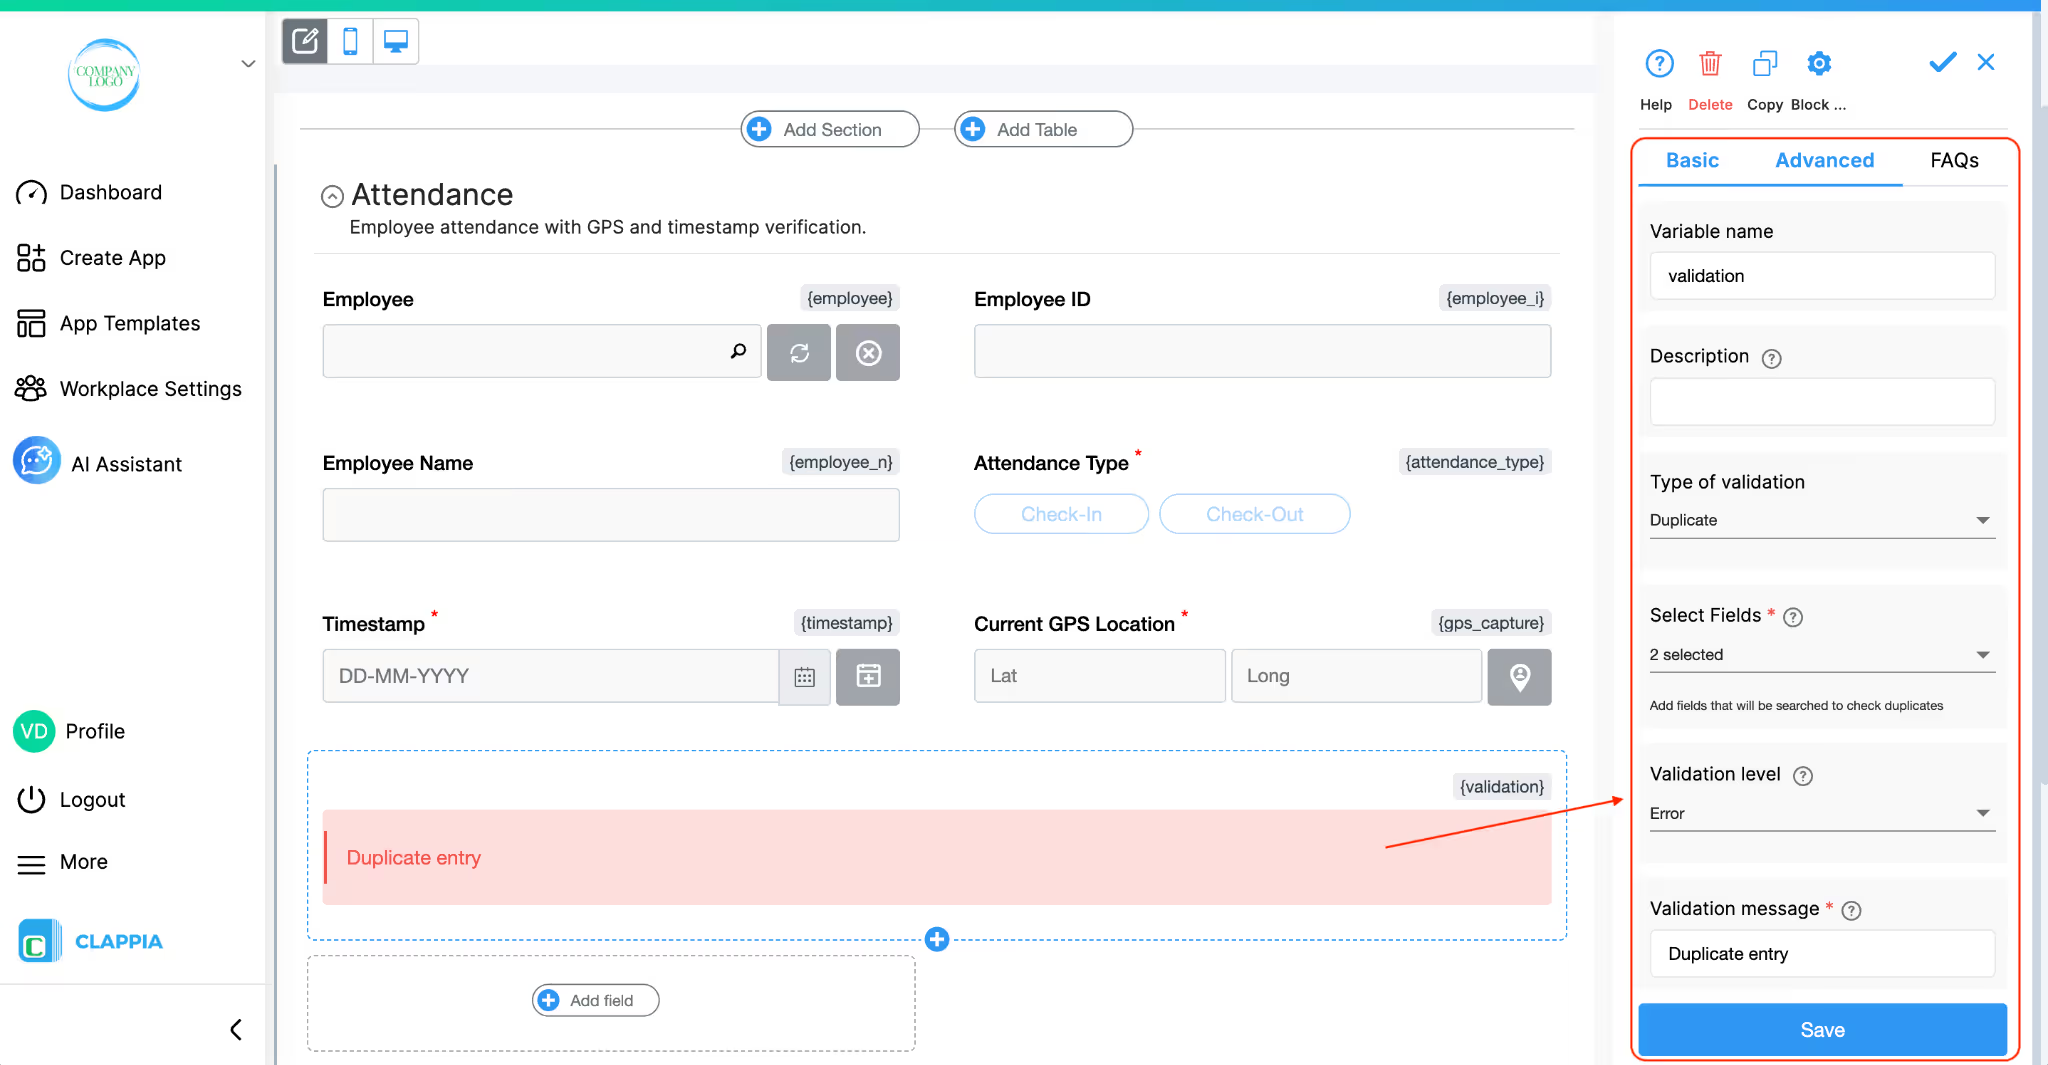
You can also add Validation checks to avoid duplicate entries. For example, if someone tries to check in twice without checking out, the app can show a message and stop the submission. This keeps your data clean and prevents confusion later when you calculate working hours.
Over time, you might add more fields such as shift type, reason for late check-in or comments for special cases. The key idea is that the daily action for the employee remains simple: open the app, choose the attendance type, and submit. All the tracking, GPS and validation work quietly in the background.
Other Fields You Can Include
Depending on your process, you can add extra fields such as:
These fields stay optional but can be helpful for teams that work across multiple locations or tasks.

Once the basic apps are ready, workflows can help you automate what happens with this data.
Some examples of workflows you can add include:
Because all of this is workflow-driven, you can keep refining your rules as your attendance policy becomes clearer. You do not have to redesign the form each time. You only adjust what the workflow does when certain conditions are met.
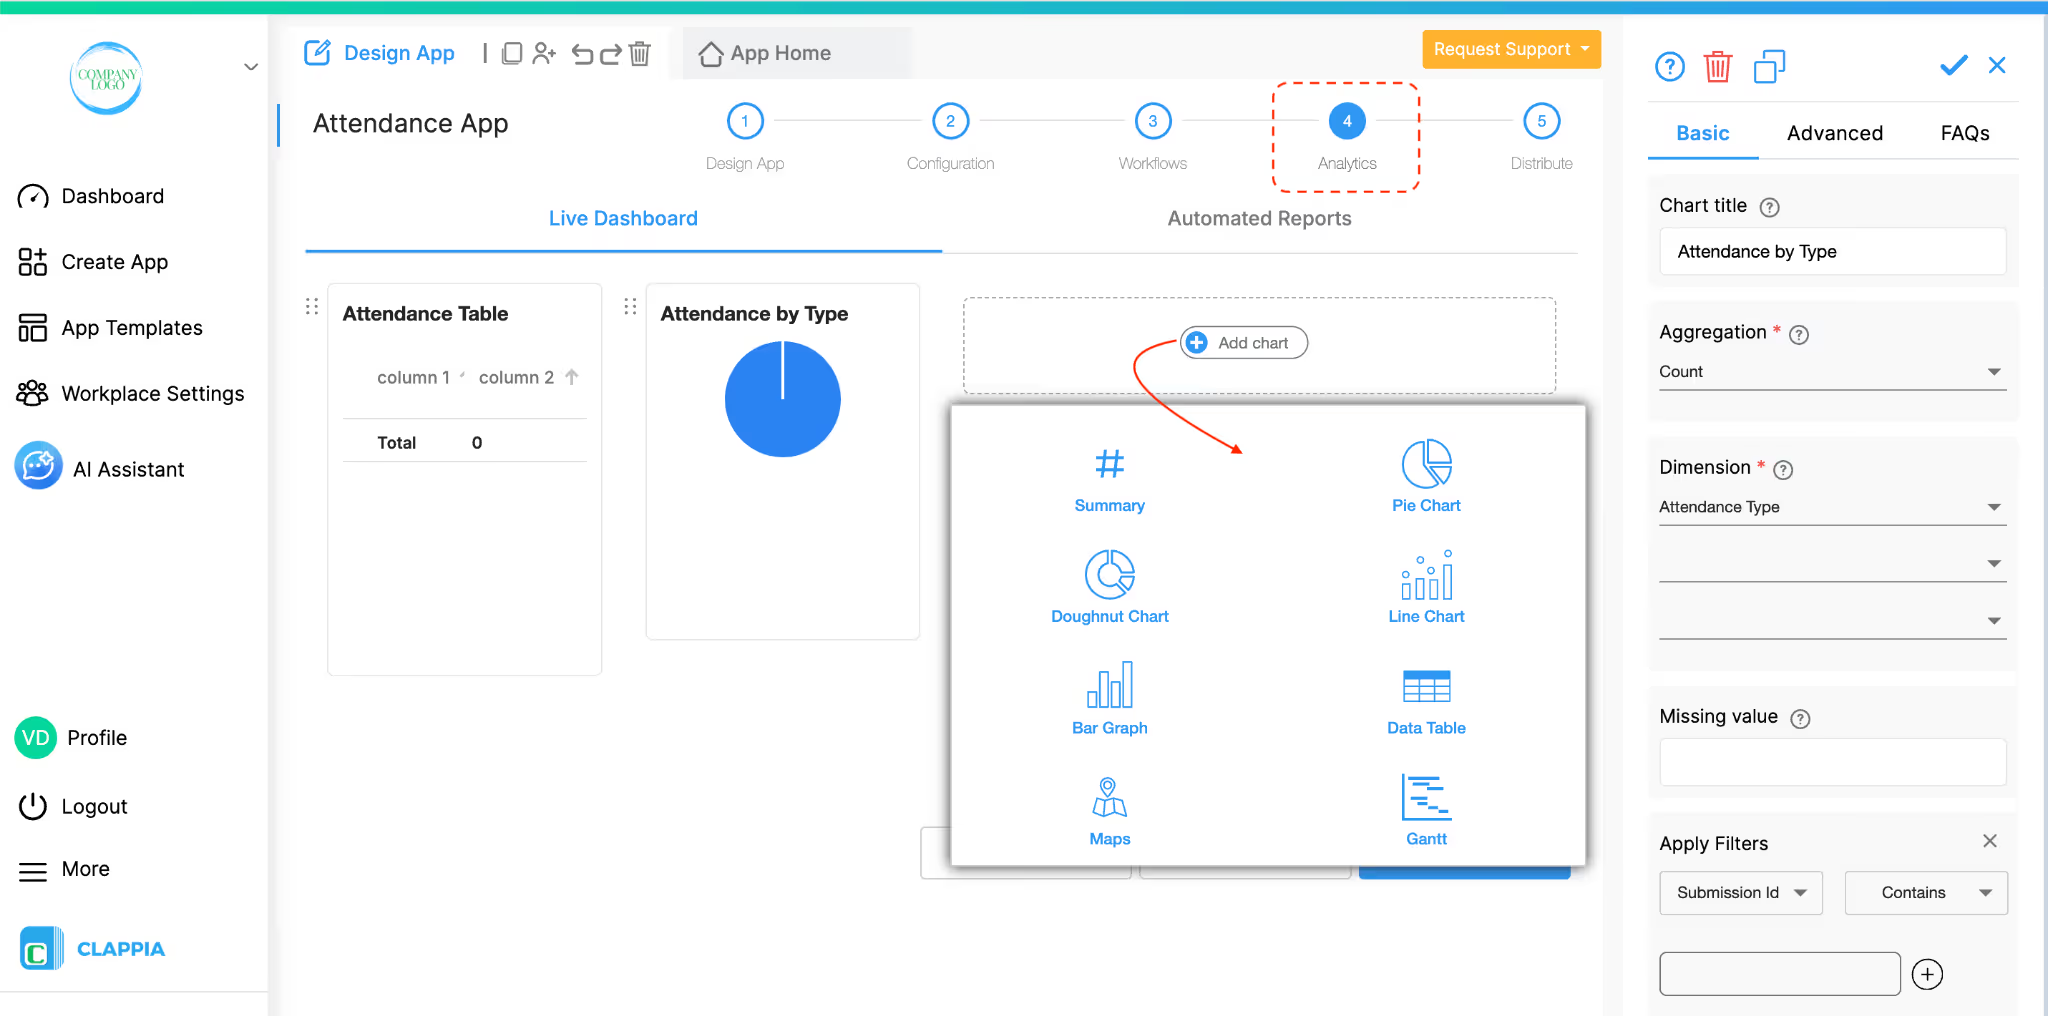
With data coming in every day, you can use the analytics section to see how attendance looks across your team.
Some useful analytics for the Attendance app include:
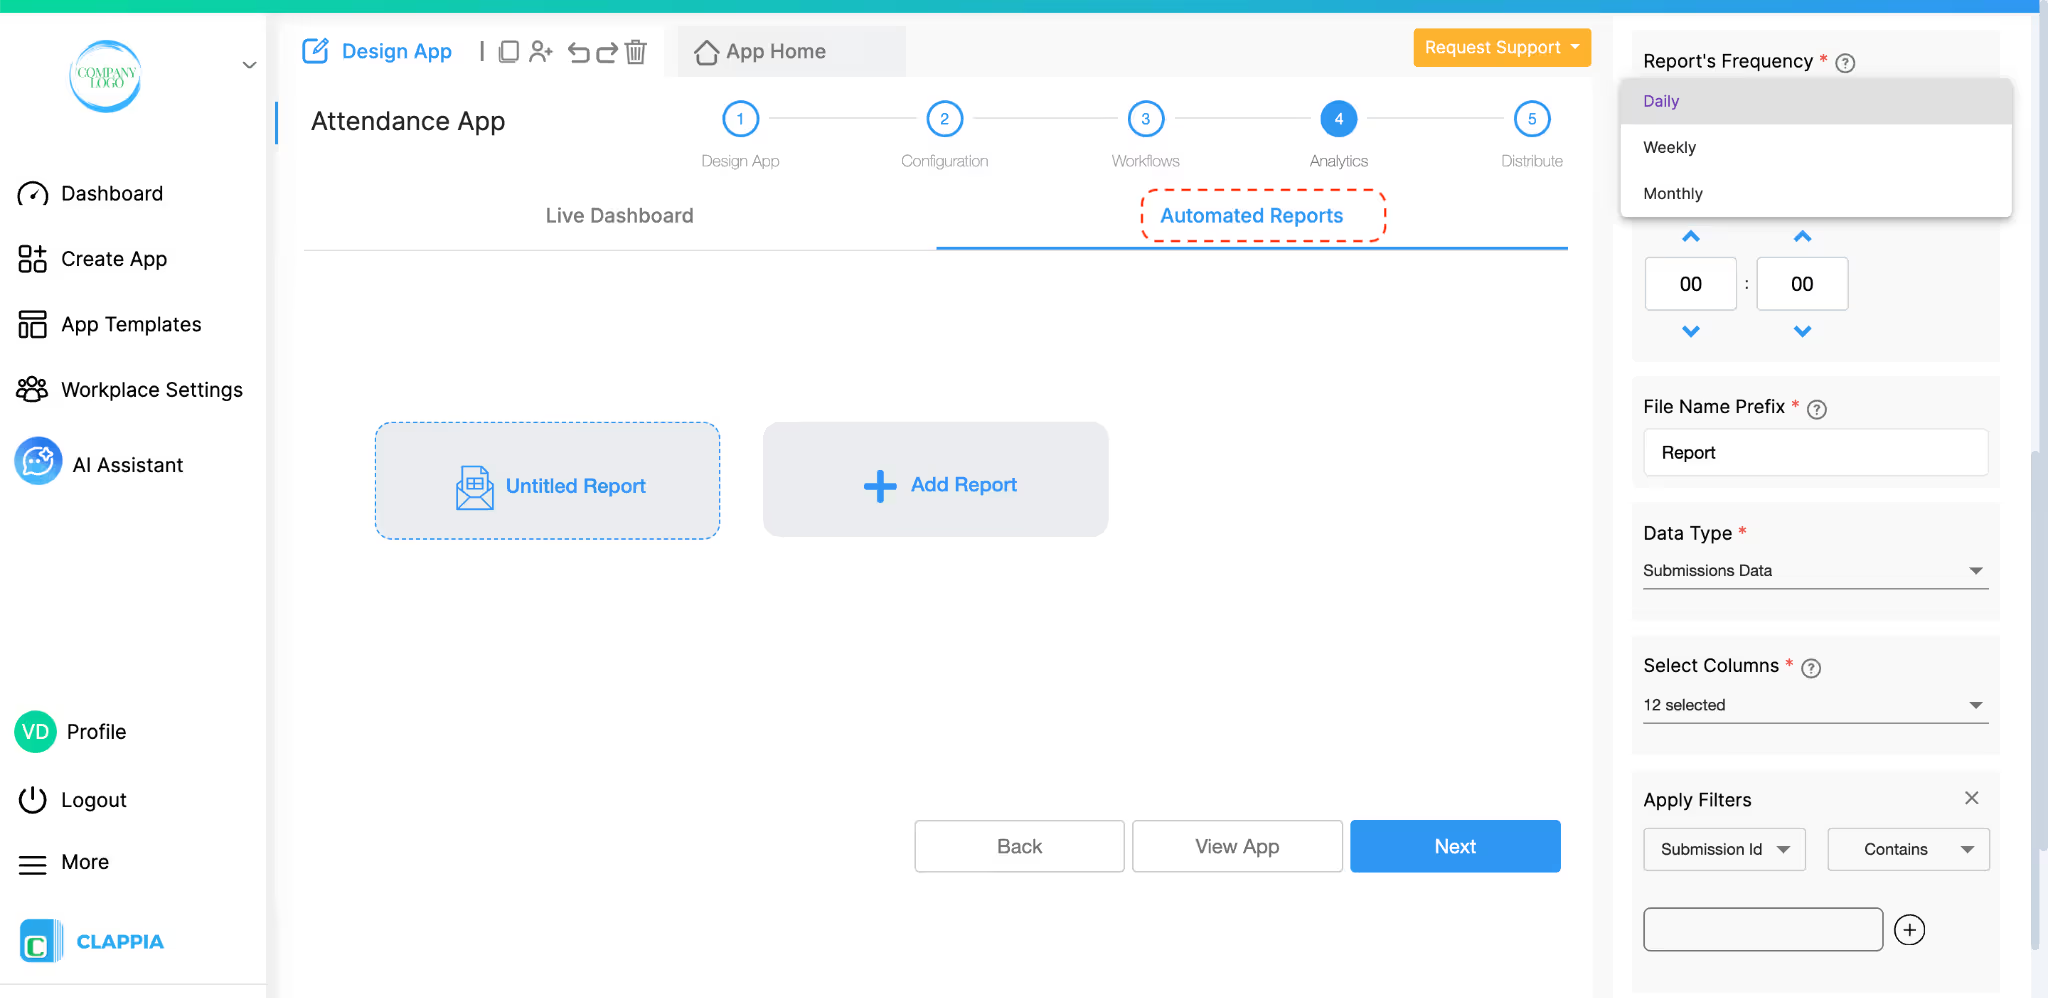
You can also schedule Automated Reports of the app’s submissions on a daily, weekly or monthly basis.
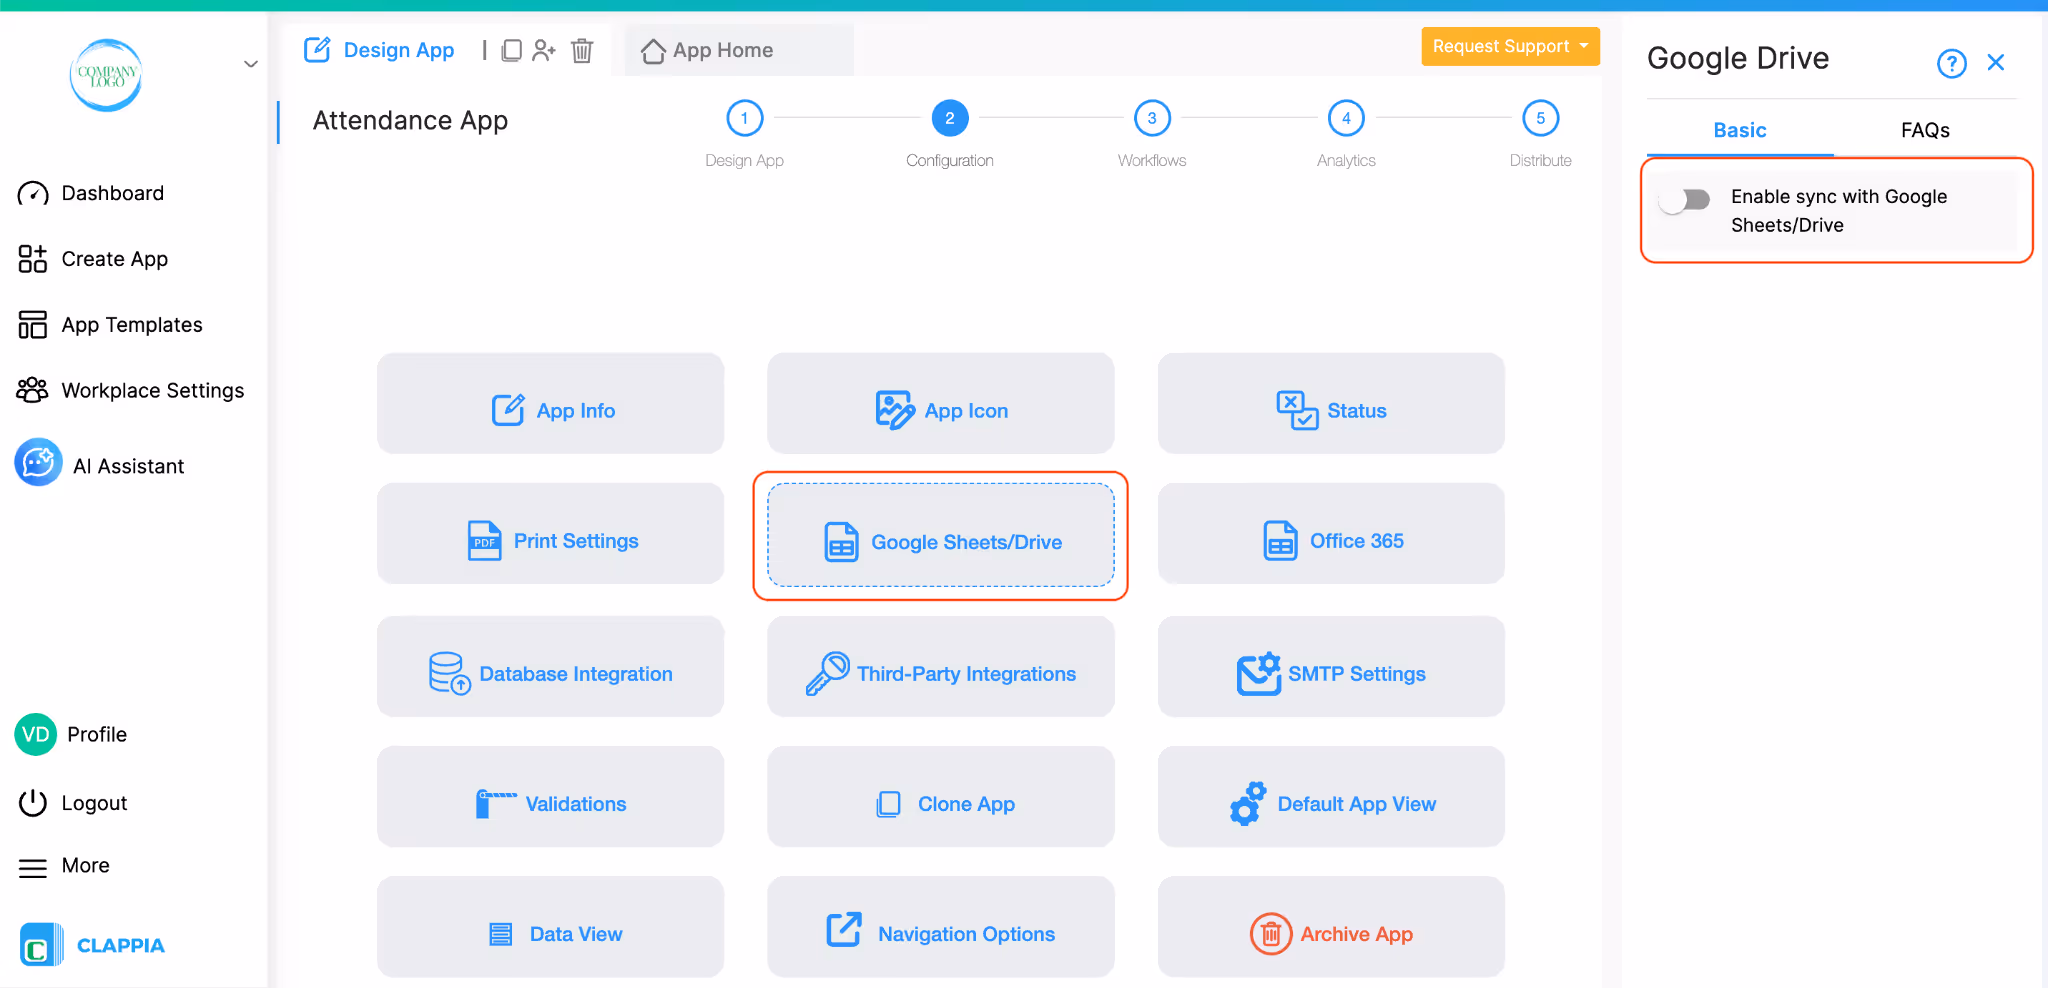
You can also integrate with other platforms, for example, you can push attendance data into Google Sheets and share a live dashboard with HR or management. Once it is set up, the data flows on its own whenever new submissions come in.
As you use the system, you might want deeper summaries instead of looking at every single check-in and check-out. You can create another app or section to hold calculated fields and higher-level analytics. Some useful fields include:
On top of these fields, you can build richer analytics such as:
All of this can be driven from the same attendance data you are already collecting. You only decide what extra summaries you want and configure the workflows and formulas once.
Starting with a master app and an attendance app gives you a clear base that you can keep extending. If you decide to add shift planning, leave approvals or payroll calculations later, you already have reliable employee data and daily records in place.
You can connect new apps to the same Employee Master, pull attendance summaries wherever needed, and keep adding rules on top without changing how employees mark their attendance every day. The front end stays simple for the user, while the logic and analytics can grow as much as you need in the background.
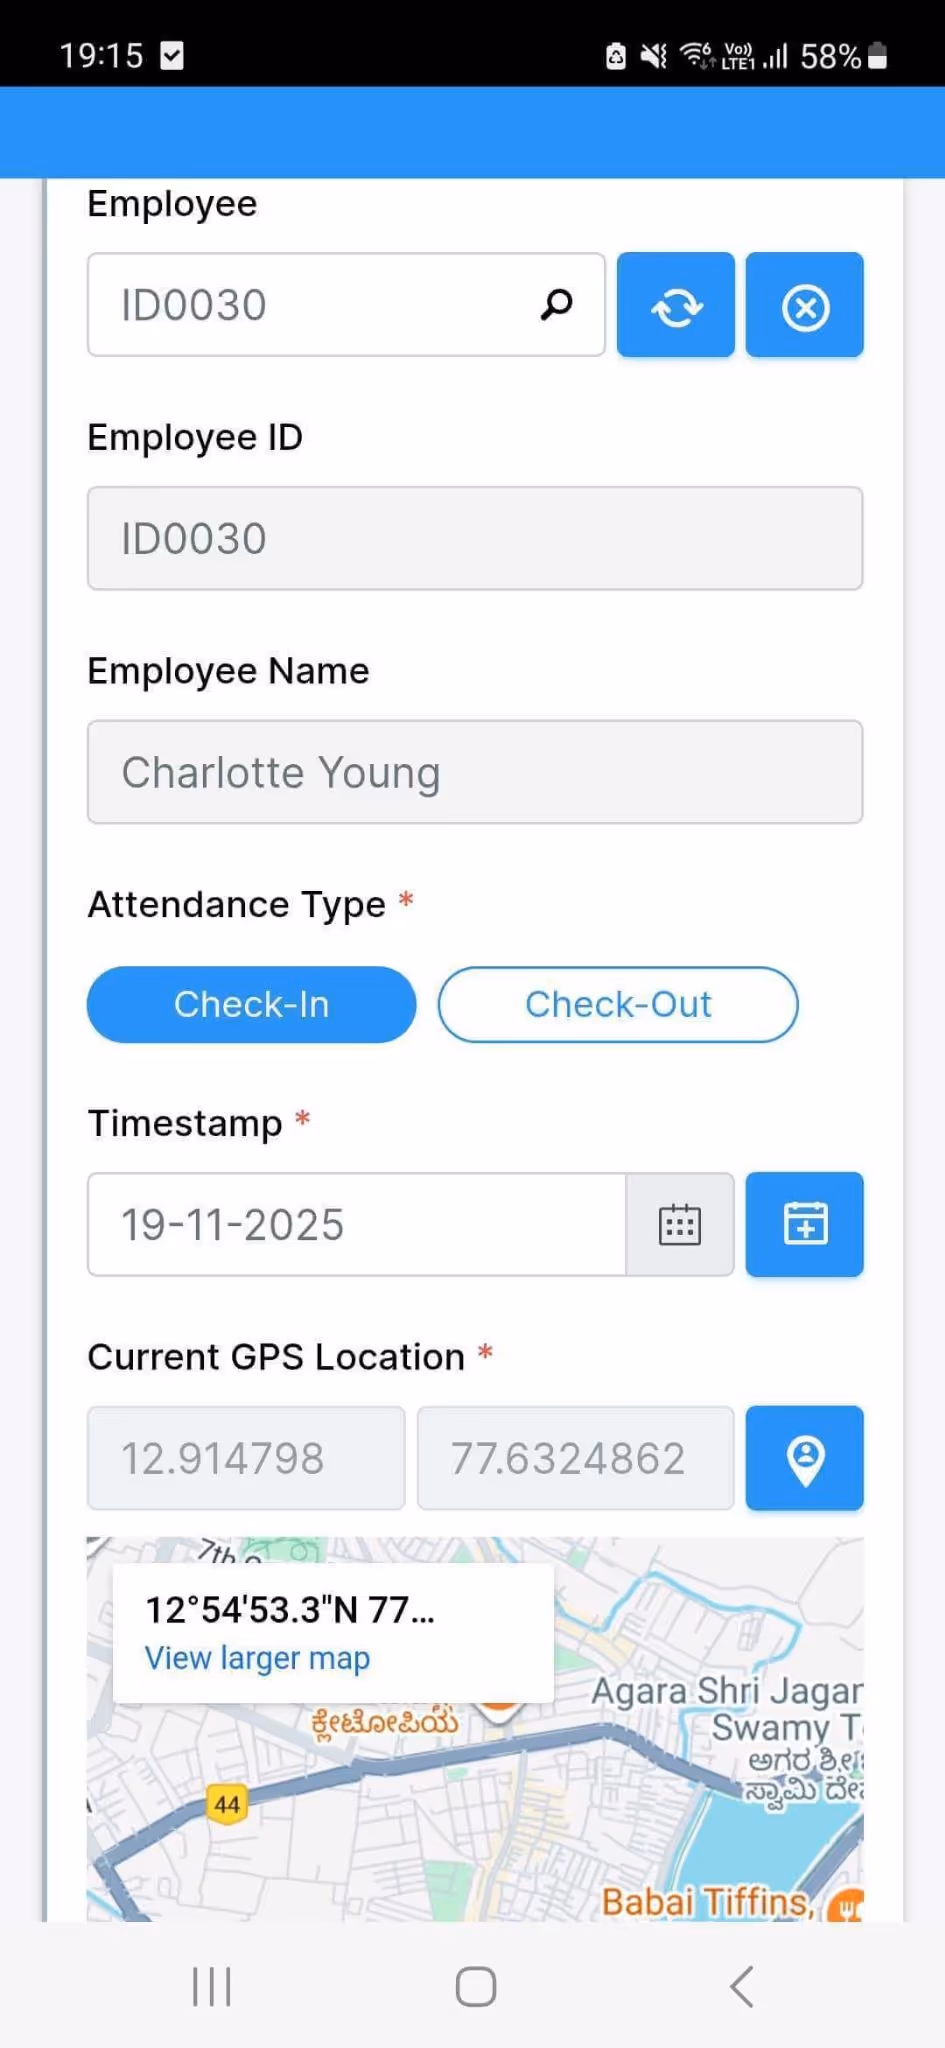
Once the app is published, employees simply open it on their phone and select what they’re doing - checking in or checking out. The GPS location gets captured instantly, the timestamp fills in automatically and the entry goes to the submissions tab.
For people working at multiple sites, this process makes their day simpler. They don’t have to scan any QR codes or walk to a kiosk. As long as they’re in the allowed radius, they can record attendance from wherever they are. If they are outside the permitted area, the app can show a prompt explaining that they need to move closer before submitting.
Supervisors don’t have to chase attendance or verify locations manually. Everything they need is already present: who checked in, when they did it and where they were standing. If you want, you can also add additional information like notes, photos or client names, depending on your process.
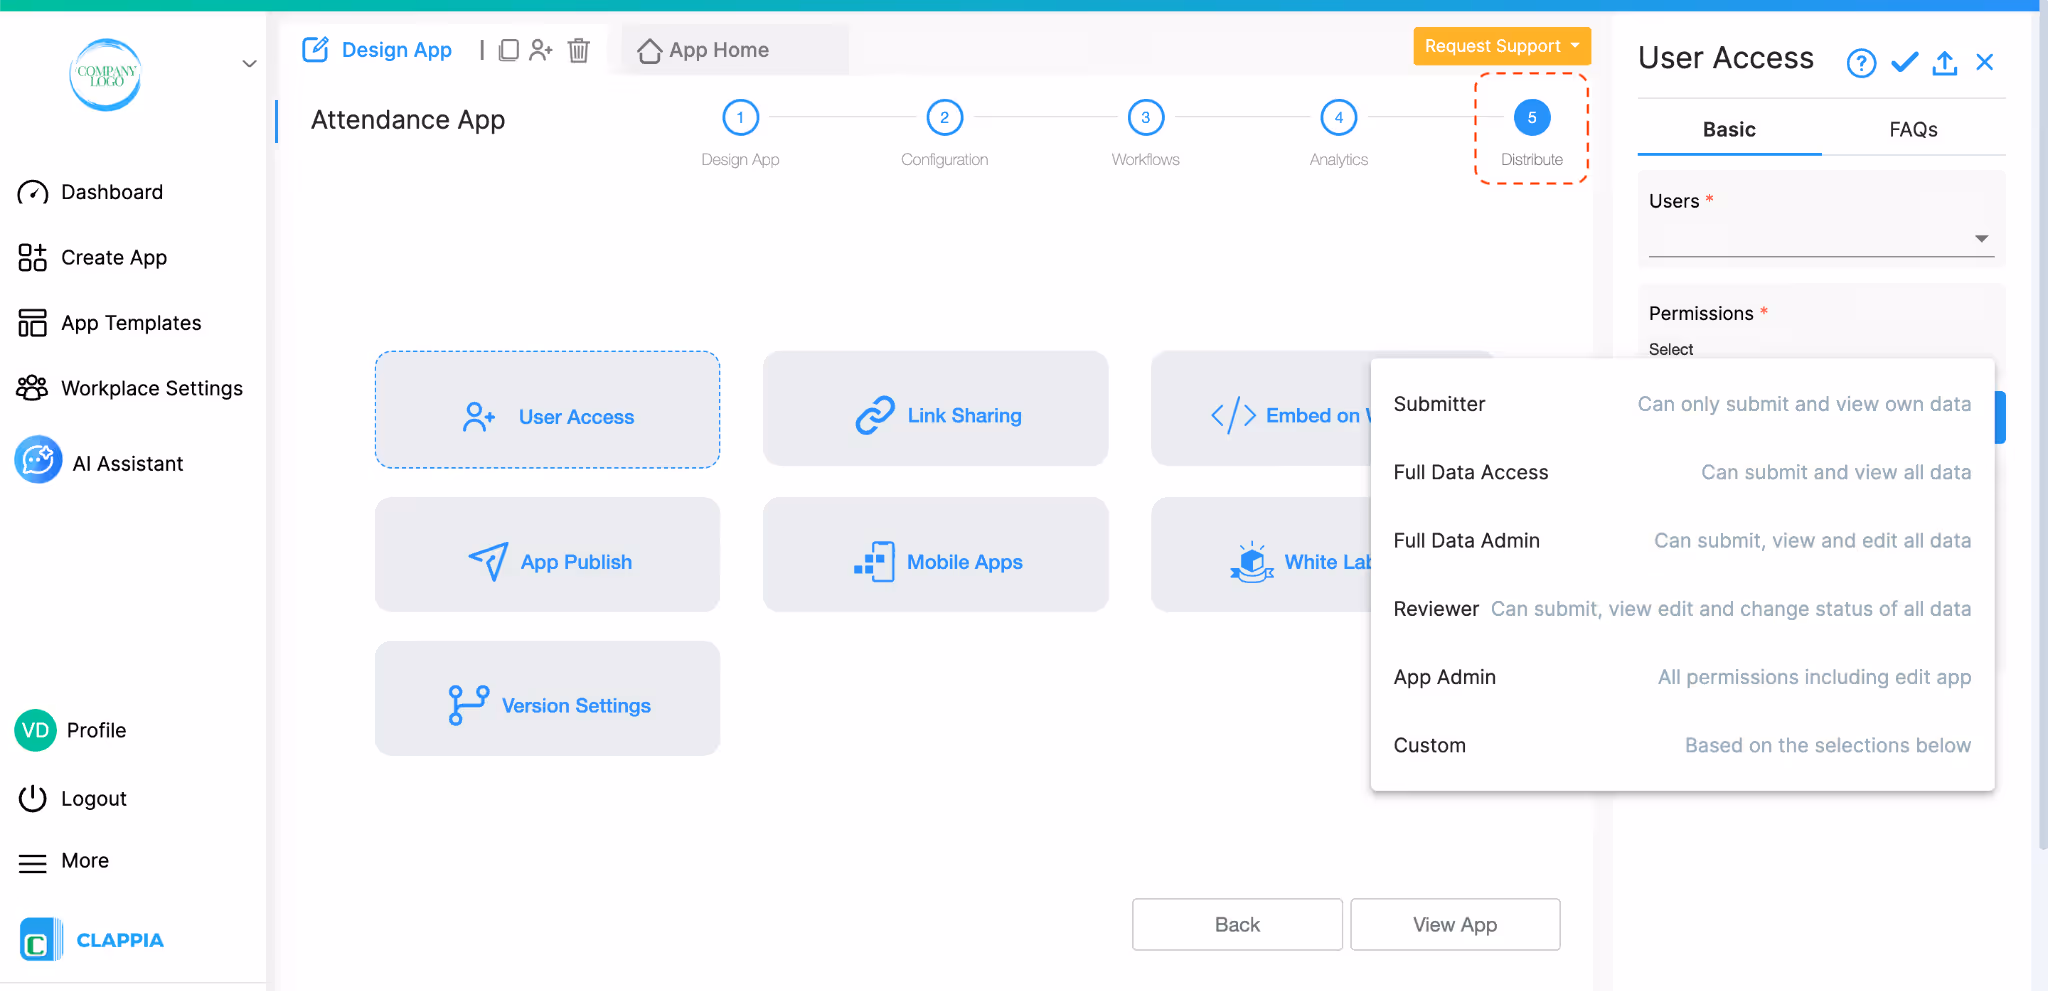
After your attendance app is ready, you can decide who should be able to use it by adding users to your app. Each employee gets their own login, and you can assign roles based on what they need to do.
These roles ensure that employees only access what they need.
For example, field staff may only submit attendance while managers can see the full list in the Submissions tab.
If you want to collect attendance from temporary workers or external staff, you can turn on Link Sharing. This lets people submit the attendance form without being added as workplace users. GPS validations will still apply, so location-based rules remain intact.
This setup keeps your attendance system organised and ensures that only the right people have access to the right information.
GPS attendance becomes far more useful when it is fully customisable. You are not restricted to a fixed workflow or predefined attendance rules. You decide what the app captures, how strict the GPS radius should be and what should happen after each check-in or check-out.
You can refine the app at any point without interrupting anyone. Employees only refresh the app and the changes appear instantly. If your process becomes more detailed over time, you can add more fields, new approval steps or additional validations without starting over.
You can also use this attendance data in other areas of your workplace. Some teams connect it to daily reports, payroll preparation, visit logs or safety checks. Others push the records into Google Sheets for consolidated reporting. Since the app captures location and time automatically, you end up with accurate data that is easy to analyse.
Clappia also keeps a detailed log of workflow runs, app changes and submission histories. This is helpful for audits or internal reviews, especially when you need to trace how attendance was recorded or whether someone tried checking in from the wrong place.
You can keep this attendance app simple or expand it into something broader. Some organisations add shift-based rules, automatic break tracking or alerts when someone forgets to check out. Others turn it into a complete field-operations tool with routes, visits and task completion workflows.
Once the basic setup is in place, you can keep shaping it to match the way your team works. It becomes a foundation that you can grow over time, without coding or large changes. If you need help building a starting version, the AI assistant can do it in a few minutes and you can refine it as your needs evolve.
L374, 1st Floor, 5th Main Rd, Sector 6, HSR Layout, Bengaluru, Karnataka 560102, India
3500 S DuPont Hwy, Dover,
Kent 19901, Delaware, USA


3500 S DuPont Hwy, Dover,
Kent 19901, Delaware, USA
L374, 1st Floor, 5th Main Rd, Sector 6, HSR Layout, Bengaluru, Karnataka 560102, India
.svg)


.avif)