
Still need help?

Users often ask:
"I want my form to log the exact coordinates along with a timestamp when the user hits submit and capture photos with this data stamped on them. How do I automatically add GPS coordinates, date, and time stamps directly on photos when someone submits my form? How accurate is this across devices, and how can I set it up?"
The answer: Configure Clappia's blocks to automatically capture location and timestamp data, then stamp this information directly onto images using the Camera block's Image Text feature.
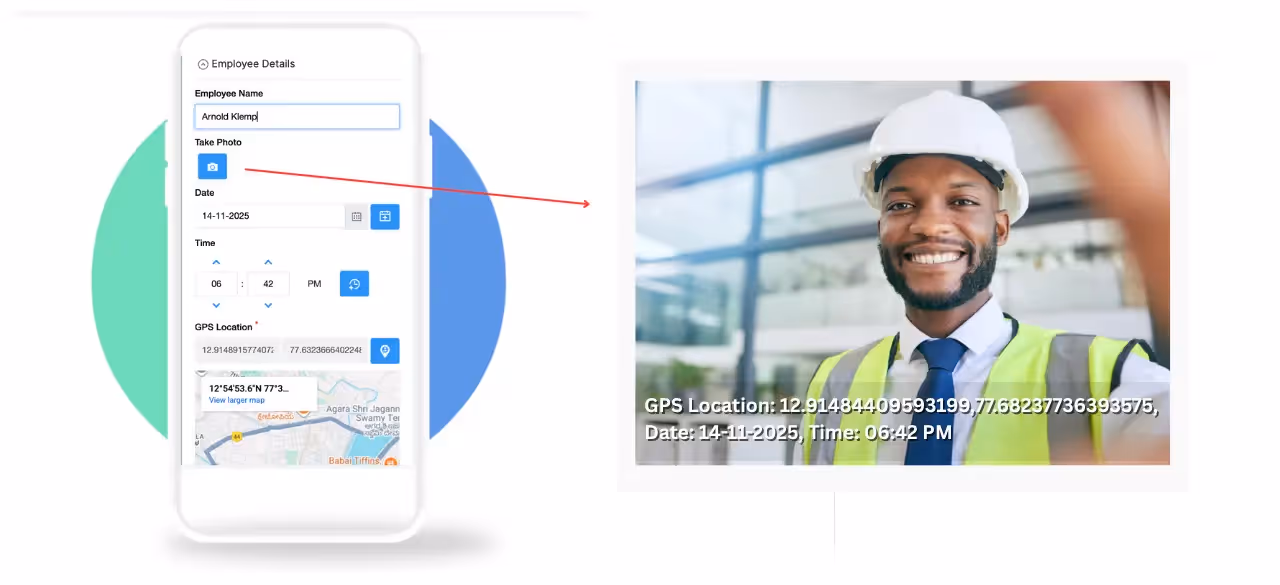
Logging exact user coordinates with a submission timestamp helps track field operations, validates location-based service deliveries, ensures compliance, and enhances accountability. It enables automated real-time location capture without manual input, reducing errors and improving process transparency. Stamping location and time directly on images prevents disputes and provides instant verification of when and where photos were taken.
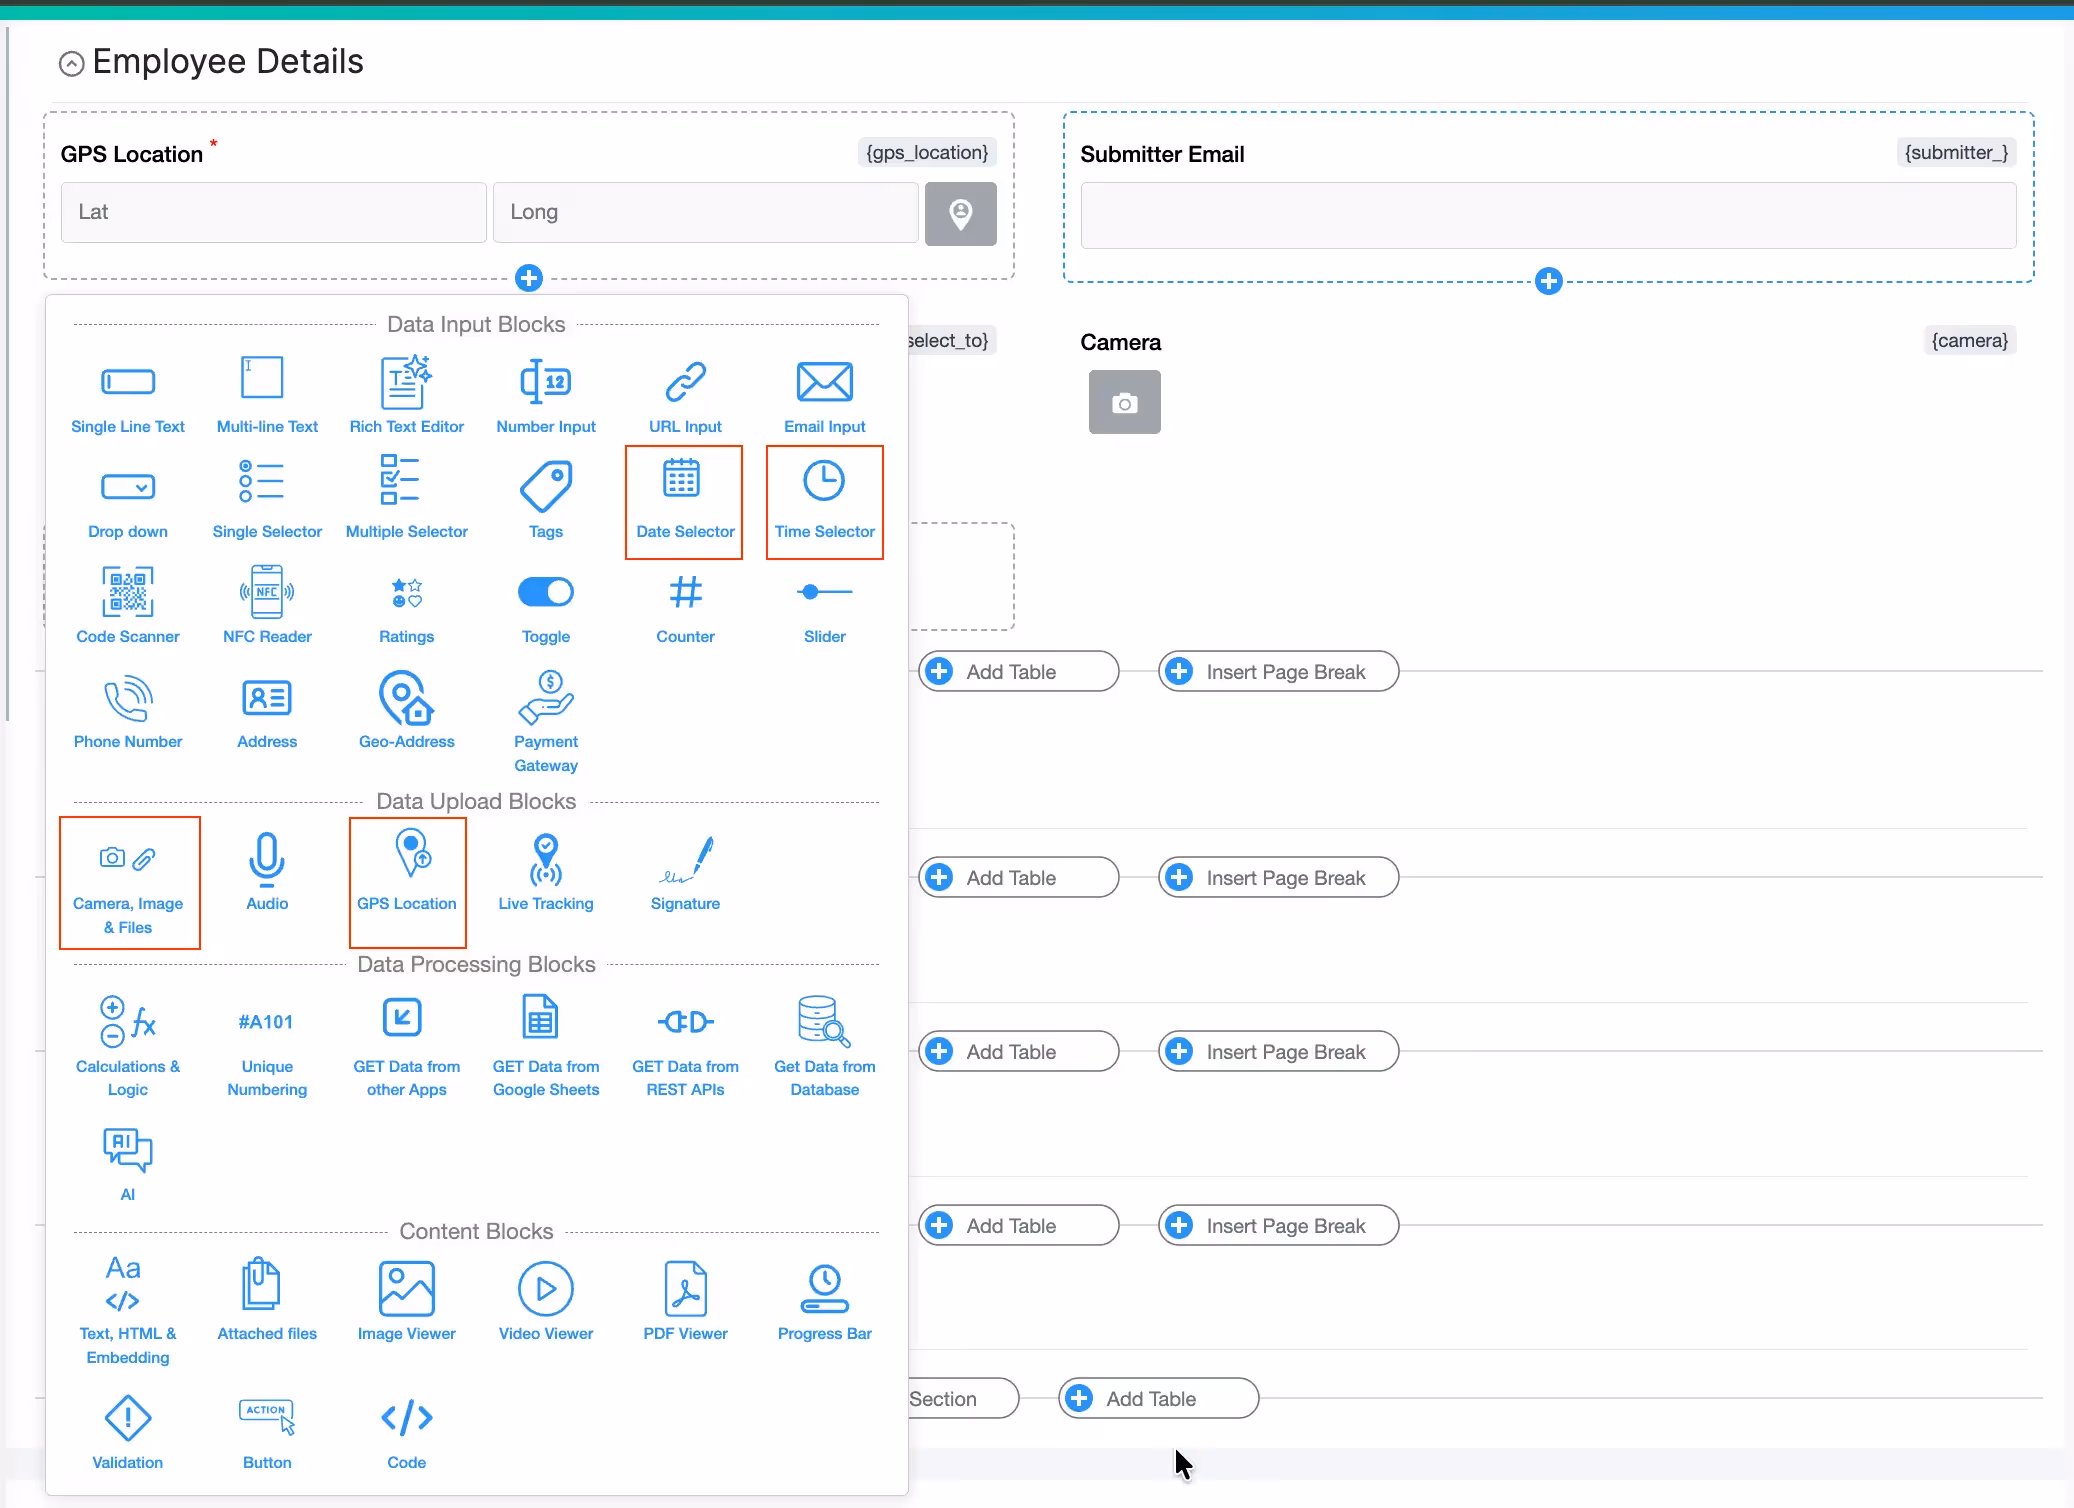
add gps location, time, date blocks
In your app designer, add these blocks based on your use case:
Configure each block to automatically capture current data:
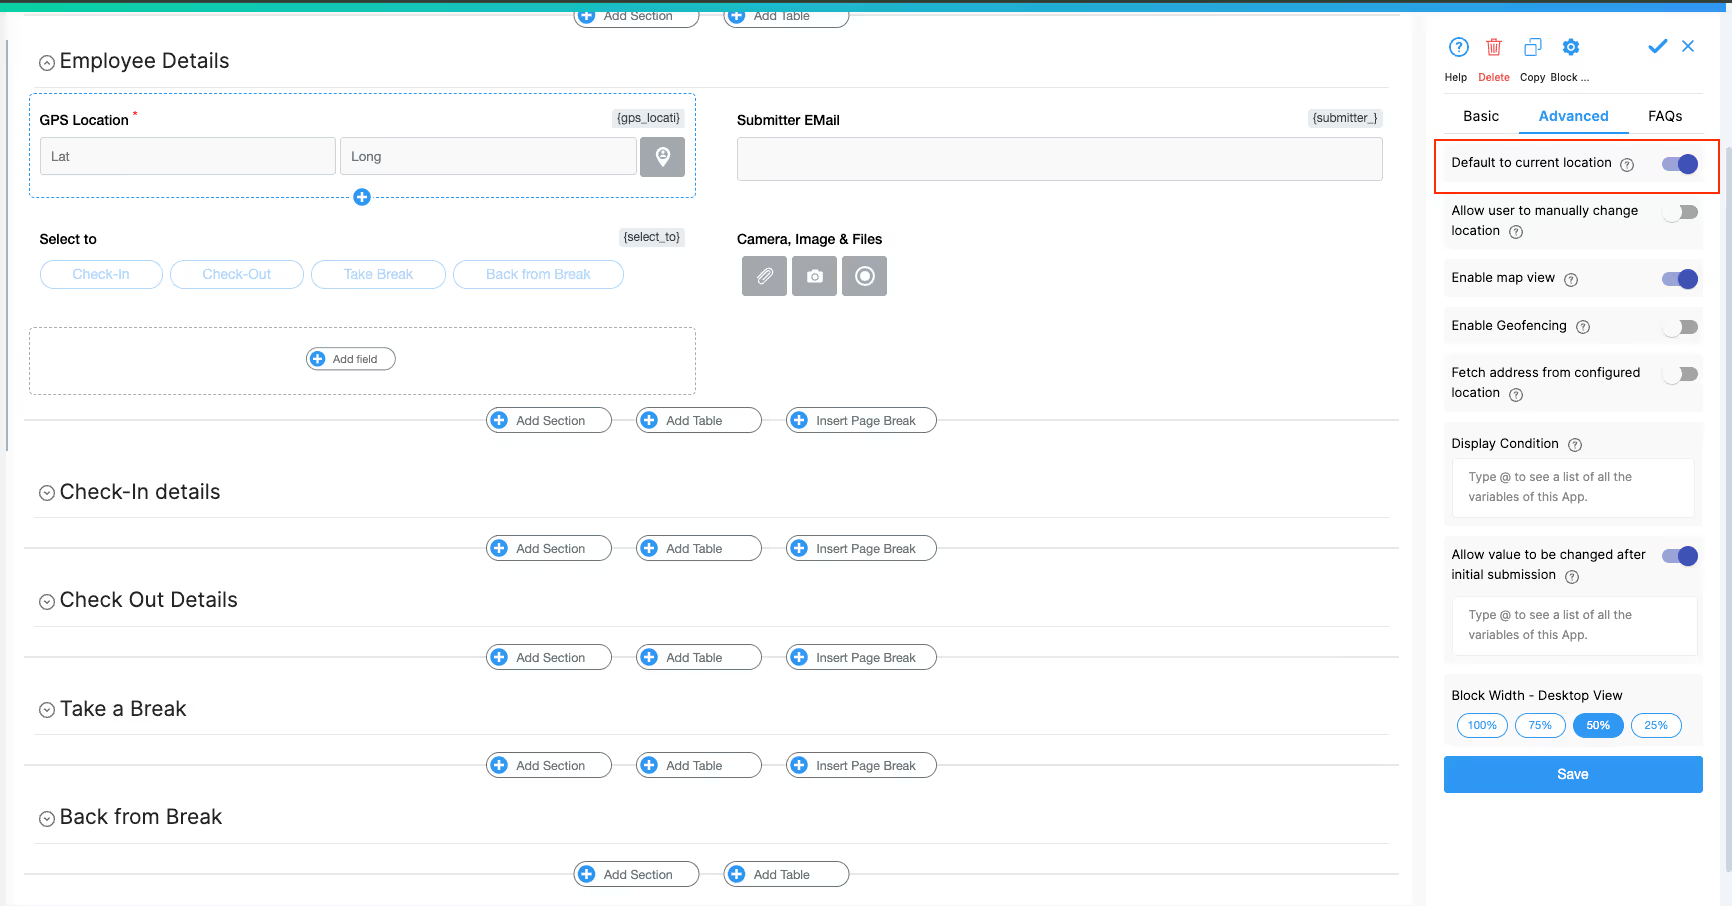
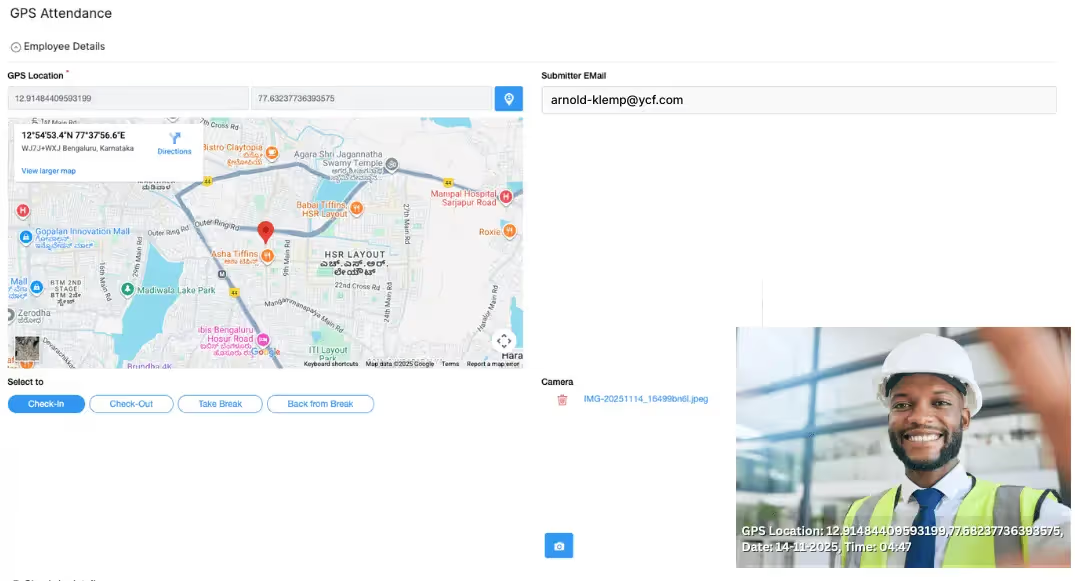
GPS Location Block - Click the block, go to Advanced tab, enable the "Default to current location" toggle. This automatically captures user's coordinates when they open the form.
Date Selector and Time Selector Blocks - Similarly, go to their Advanced tabs and enable "Default to current date" and "Default to current time" toggles respectively.

Click the Camera, Images & Files block and configure:
In Basic Tab:

Set "Allowed file types" to "Images (Camera Uploads)"
This forces users to capture images from their phone camera or web camera (not upload old photos from galleries). For this option to work, ensure only "Images (Camera Uploads)" is selected in File Types.
In Advanced Tab:
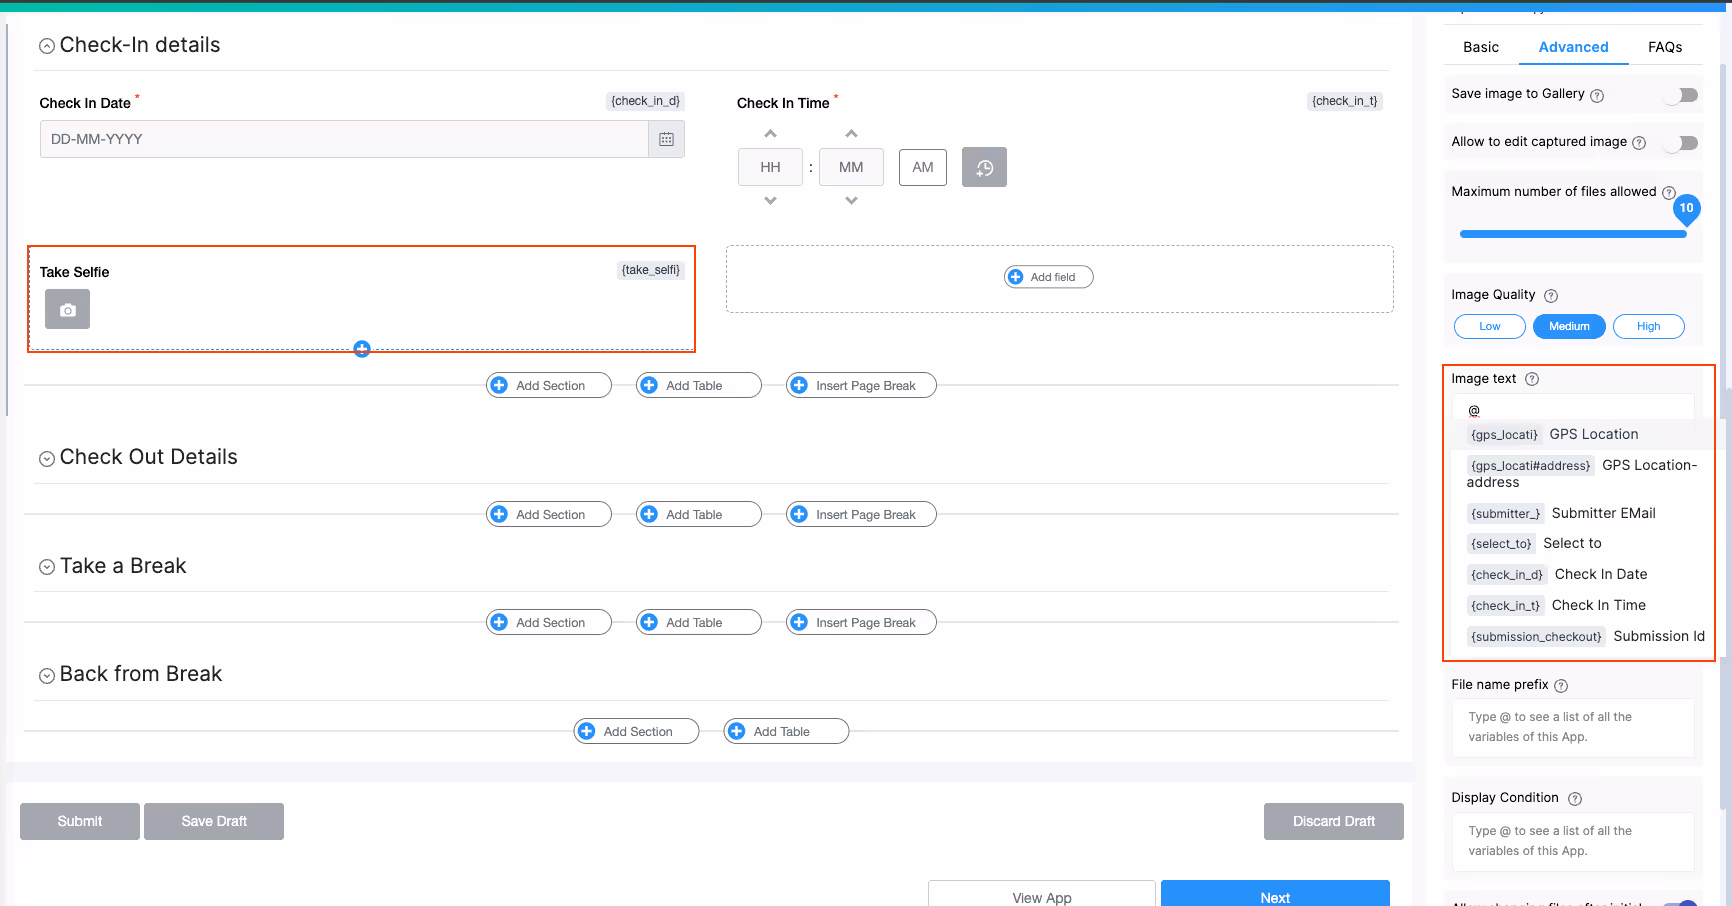
@ to see the list of available variables from your app'&' operator:'GPS Location: ' & {gps_location} & ', ' & 'Date: ' & TEXT({check_in_date}, "DD-MM-YYYY") & ", " & 'Time: ' & TEXT({check_in_time}, "hh:mm")
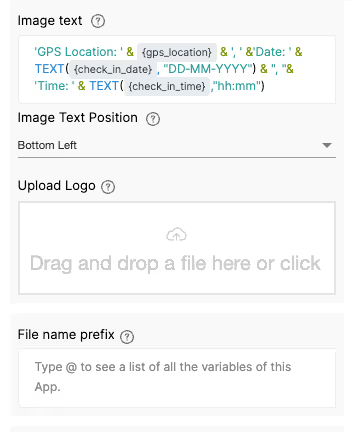
What this does:
{gps_location} - Adds GPS coordinatesTEXT({check_in_date}, "DD-MM-YYYY") - Formats date as DD-MM-YYYYTEXT({check_in_time}, "hh:mm") - Formats time as HH:MMImportant: Variable names depend on the labels you set for each block. In this example:
{gps_location} is the variable for a GPS Location block labeled "GPS Location"{check_in_date} is the variable for a Date Selector block labeled "Check In Date"{check_in_time} is the variable for a Time Selector block labeled "Check In Time"When you type @ in the Image text box, you'll see all your app's variables. Select the correct ones matching your block labels. Learn more about labels and variables.
What this does:
Optional: Add employee name by including: & ', Employee: ' & {submitter_}
Click Save.
Now every photo captured will automatically display GPS coordinates, date, and time stamps directly on the image.

Using on Mobile Devices:
Field Service Documentation - Technicians capture service completion photos with automatic location and time proof. See Field Service Reporting.
Delivery Proof - Drivers photograph package deliveries with GPS and timestamp verification stamped directly on images.
Construction Progress - Document site conditions with verifiable location and date stamps. Read about Construction Safety.
Safety Inspections - Capture compliance photos with automatic location and time verification for audit trails.
Asset Tracking - Record equipment location and timestamp when assets move between sites. Explore Asset Tracking.
How to add GPS location to photos automatically?
Add the GPS Location block and enable "Default to current location" in Advanced settings. Then reference {gps_location} in the Camera block's Image text field to stamp it on photos.
What is the best GPS timestamp camera app?
Build a custom solution with Clappia that fits your exact workflow. Unlike rigid GPS camera apps, you control what data appears on photos, add custom fields, and integrate with your business systems—all without coding.
Can I capture photos with GPS coordinates offline?
Yes. Clappia's mobile app captures GPS coordinates and photos even without internet connectivity. Data automatically syncs when connection returns, ensuring no documentation gaps.
How to create verifiable photo evidence?
Use the Camera block's Image text feature to stamp GPS coordinates, date, and time directly onto photos at capture. This creates visible, tamper-evident documentation that can't be altered after the fact.
Why do businesses need GPS-timestamped photos?
GPS-timestamped photos provide verifiable proof of when and where documentation occurred. This protects businesses in disputes, validates service delivery, ensures compliance, and builds customer trust with transparent documentation.
How accurate is GPS location in photos?
GPS accuracy depends on device quality and environment. Modern smartphones typically provide 5-10 meter accuracy outdoors. Urban areas or indoors may reduce precision. For best results, capture photos in open areas with clear sky visibility.
Custom Date/Time Formats
Change the format in the TEXT() function:
TEXT({check_in_date}, "DD/MM/YYYY") - Shows 14/11/2025TEXT({check_in_date}, "MMMM DD, YYYY") - Shows November 14, 2025TEXT({check_in_time}, "HH:mm:ss") - Shows 24-hour format with secondsAdd Multiple Data Points
Include additional fields like project name, notes, or custom identifiers:
'Project: ' & {project_name} & ', GPS: ' & {gps_location} & ', Date: ' & TEXT({check_in_date}, "DD-MM-YYYY") & ', Time: ' & TEXT({check_in_time}, "hh:mm")
Geofencing
Enable geofencing in GPS Location block settings to restrict photo capture to specific geographic boundaries. This ensures documentation only occurs at valid locations.
Workflow Automation
Set up automated workflows to send photo reports via email or integrate with Google Sheets for centralized storage.
GPS coordinates not appearing on photo?
{gps_location} variable is included in Image text fieldDate or time not stamping correctly?
Image text not visible on photo?
& operatorsUsers can upload old photos instead of taking new ones?
Always inform users when capturing location data. For GDPR compliance guidance, see GDPR Compliance in GPS Tracking.
Need help with advanced configurations? The GPS Location block with Camera Image text stamping provides powerful, verifiable photo documentation for field operations. Visit Clappia Features to explore more capabilities or start building your custom solution today.
L374, 1st Floor, 5th Main Rd, Sector 6, HSR Layout, Bengaluru, Karnataka 560102, India
3500 S DuPont Hwy, Dover,
Kent 19901, Delaware, USA


3500 S DuPont Hwy, Dover,
Kent 19901, Delaware, USA
L374, 1st Floor, 5th Main Rd, Sector 6, HSR Layout, Bengaluru, Karnataka 560102, India
.svg)
