
Still need help?

This article explains the setup for real-time integration of Clappia Submissions data with your own Database. In this article we have taken a sample use case of maintaining an Employee Master App on Clappia. The app has basic fields like Employee ID, name and other employee details. All submissions made into this App on Clappia will be synchronised to a MySql Database. Other databases that are supported via this integration are Azure SQL and Postgres.
Following topics are covered in this article:
An app with the same fields - Employee ID, name etc is created on Clappia using the simple data input blocks.

A. Go to the App in Edit Mode -> Configuration -> Database Integration.

B. Switch on the Enable data push to your Database option and enter the database connection details. Please note that integrations are supported only with MySql, Postgres and Azure SQL databases as of now.
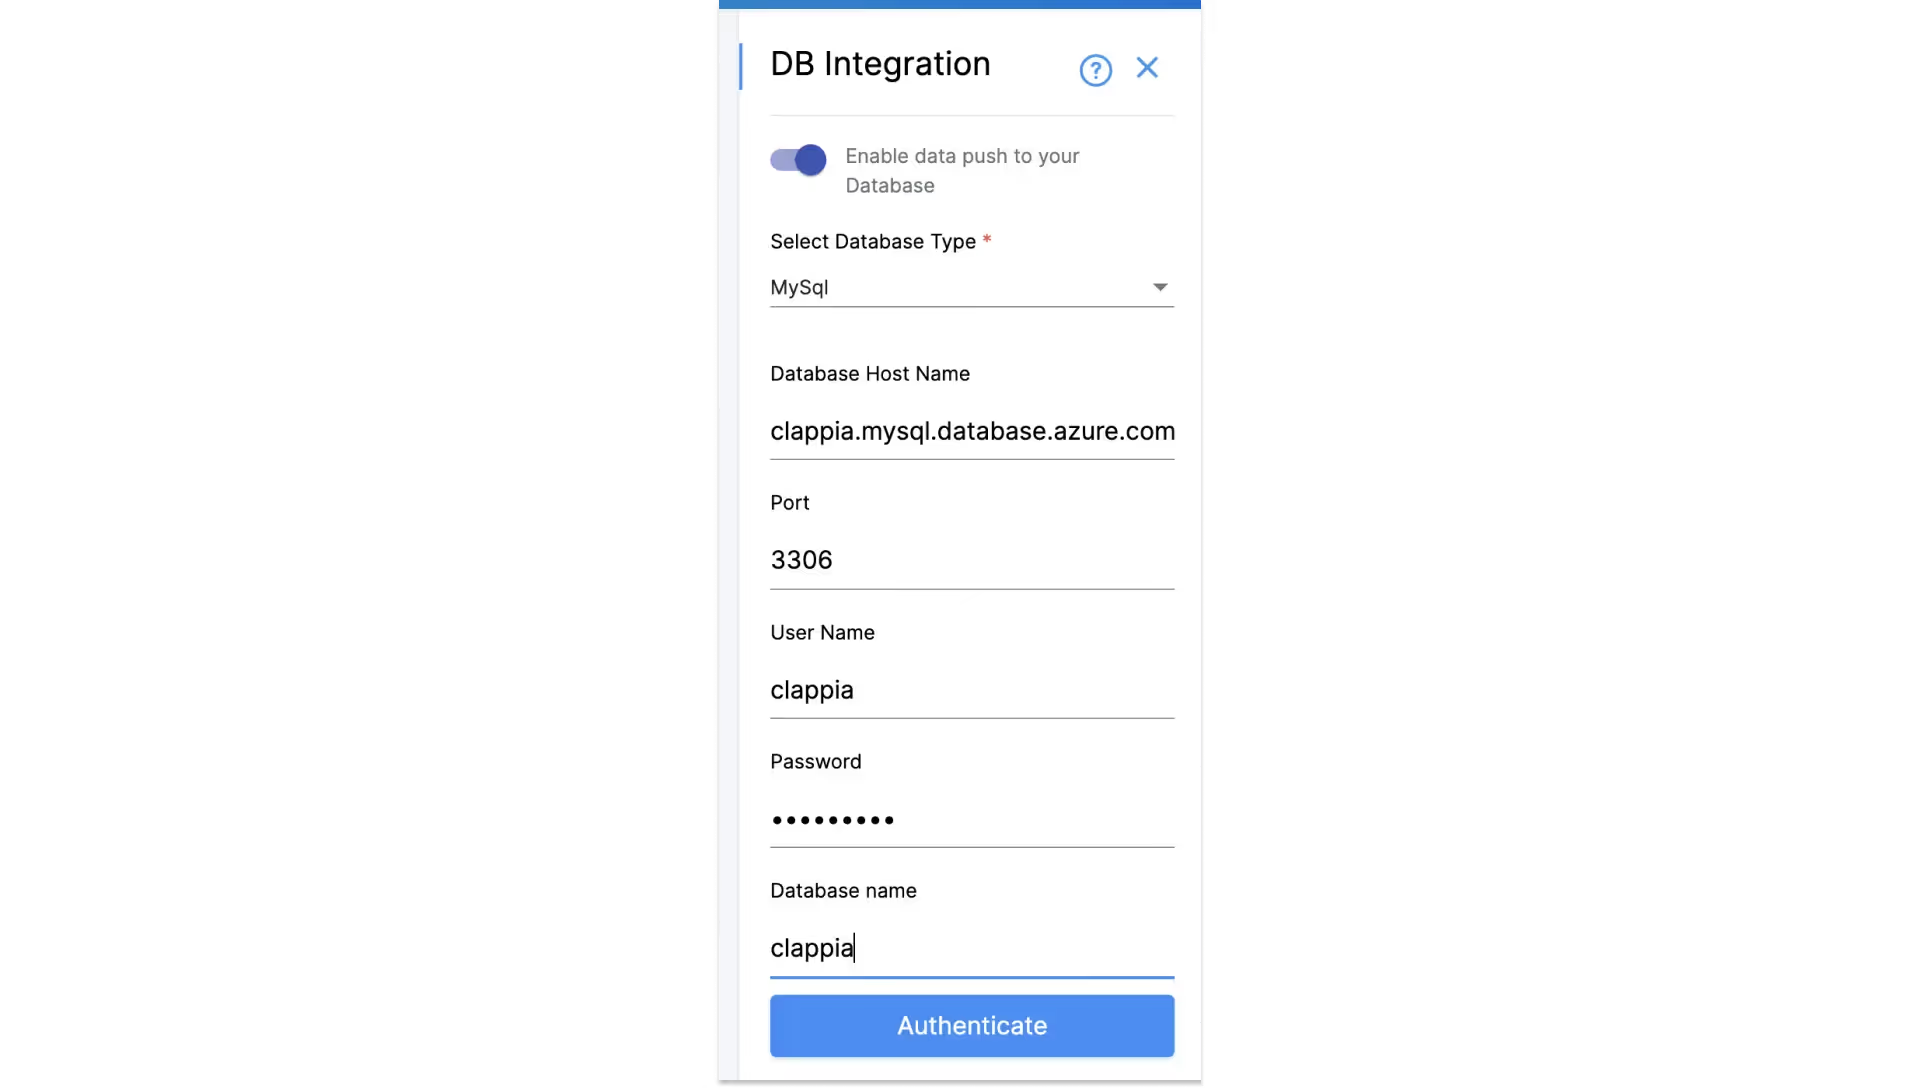
C. Once all the connection details are entered, click on Authenticate. If all the details are correct and the database is accessible, the Authentication will succeed and you will find a list of tables available in the database.
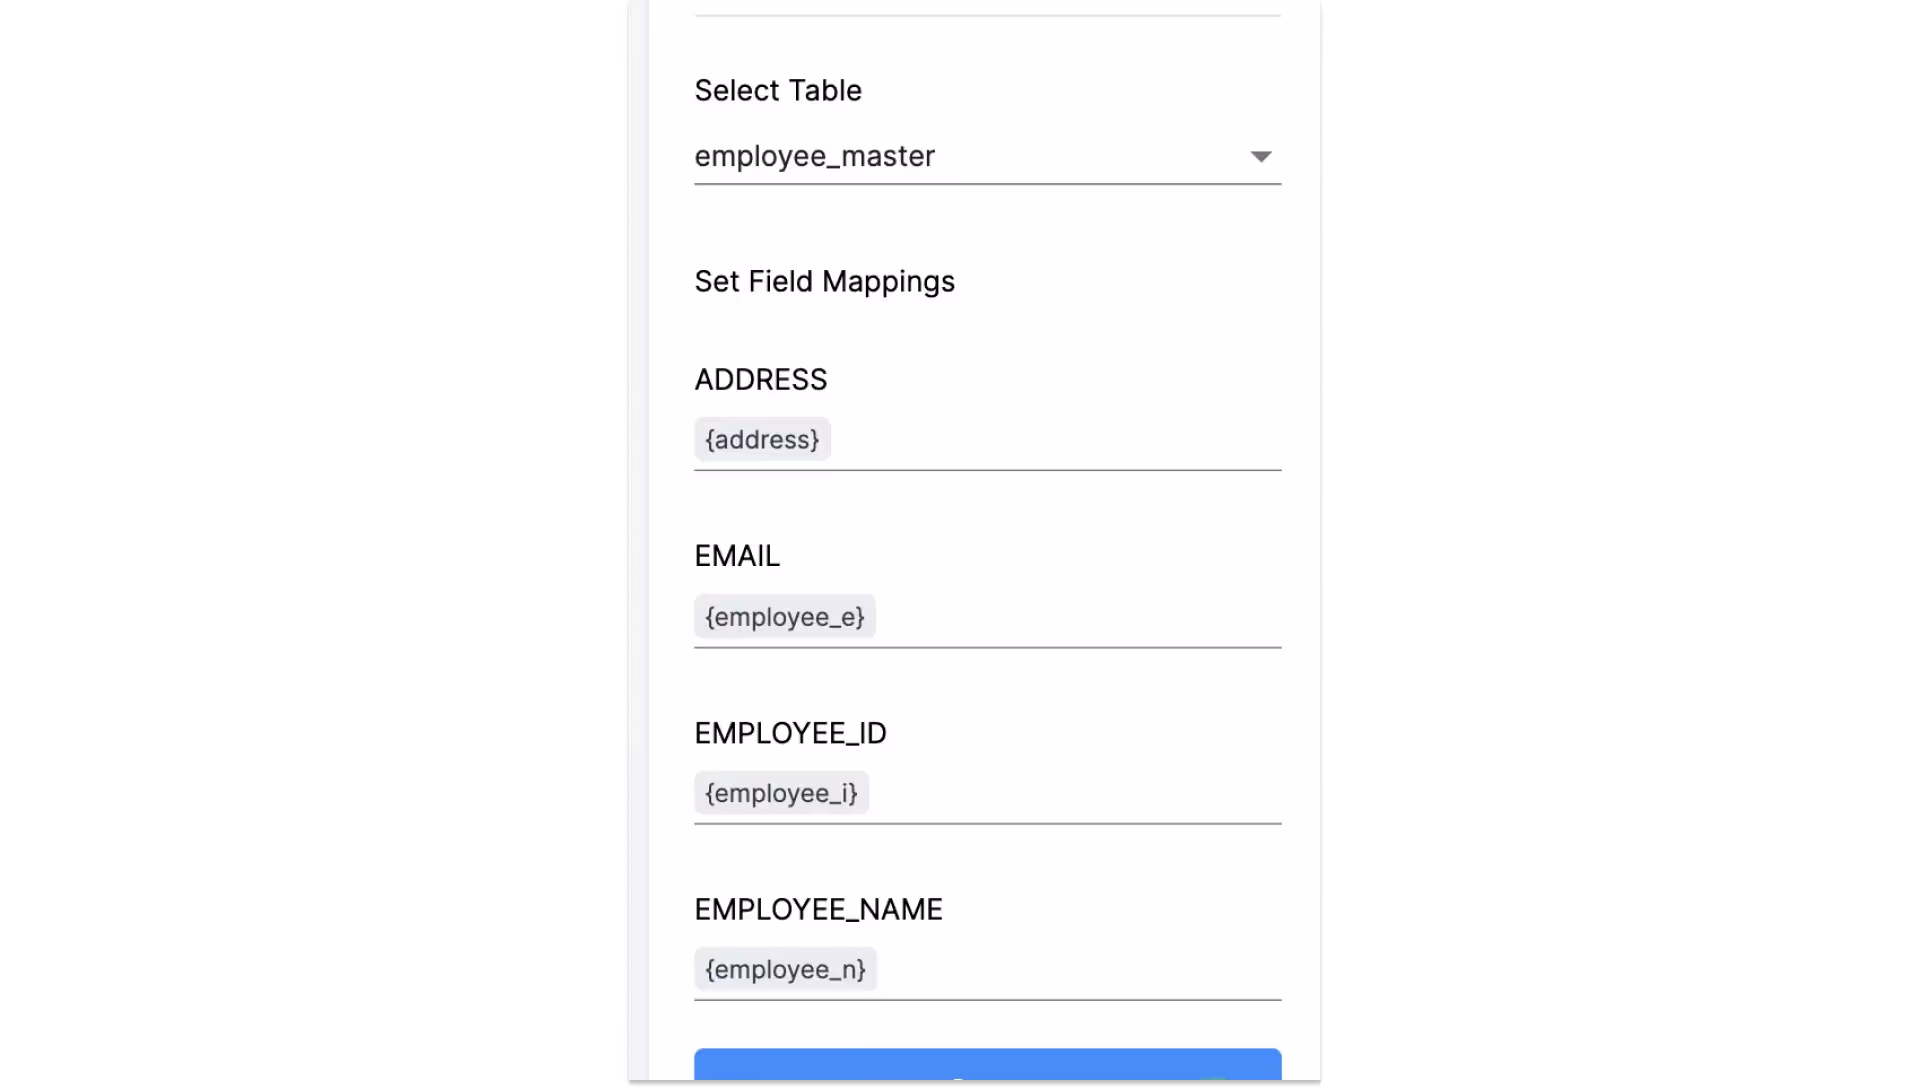
D. Select the table that we created in the first step. You will see a list of all the columns of the table. You can map the fields from the Clappia App to the Table columns in this step. Once you are done, save the details.
Using Submission Date and Time in Database Field Mapping
You can use the {$submissionDate} and {$submissionTime} variables while mapping fields in Database Integration. These variables capture the date and time of the submission and can be directly stored in the connected database.
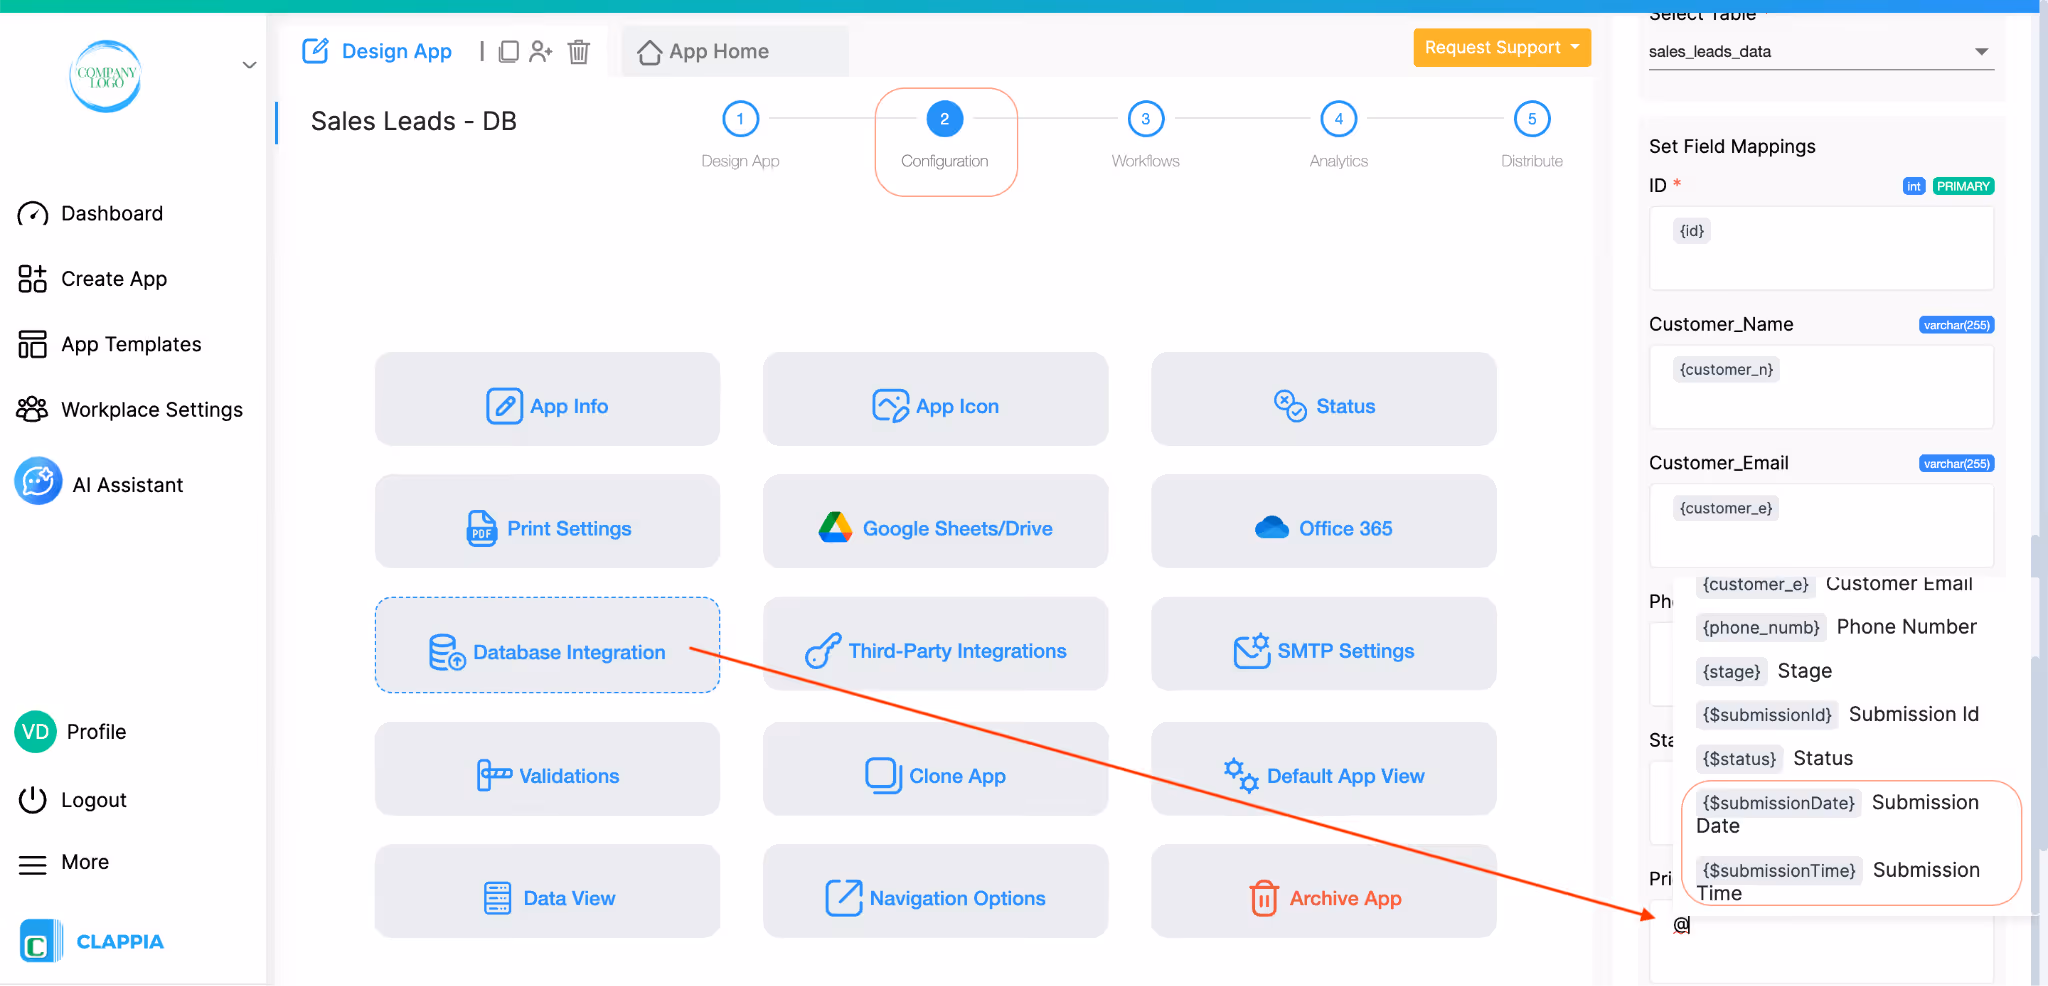
By default, the values follow the date and time format configured in the workplace. If a specific format is required, they can be wrapped inside a TEXT() formula to customise how the value is stored.
For example, while mapping a column in your database, you can directly use {$submissionDate} to store the submission date.
If you need a custom format, you can use TEXT({$submissionDate}, "dd-mm-yyyy") to store it in the required format.
Once the integration setup is done, create some new submissions in the Clappia App. You will be able to see the same employee records in the MySql database as well.
Submissions made through the Clappia mobile app will also sync to the database in real-time, just like in the web version.
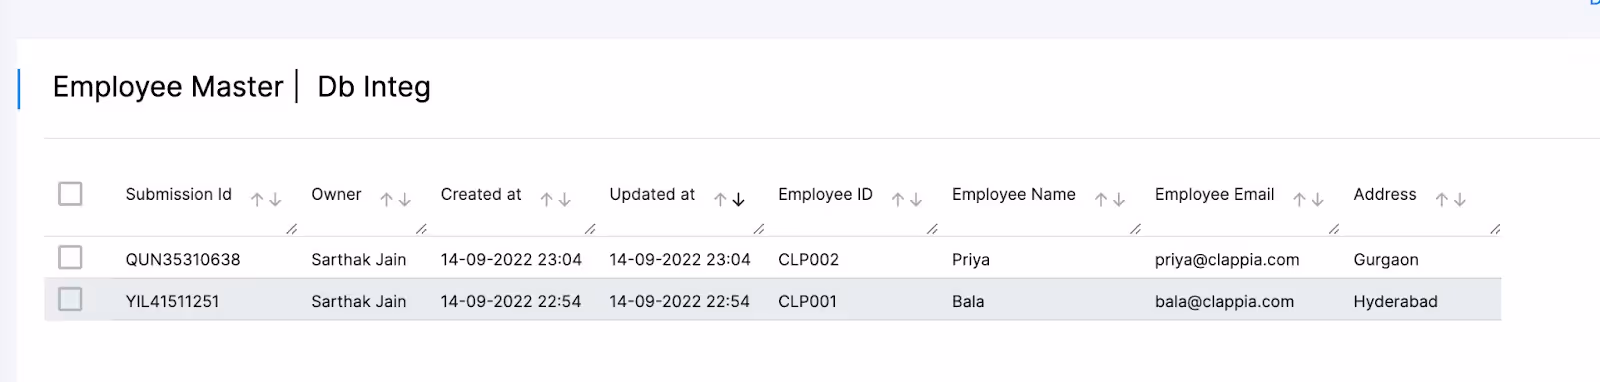

Now try editing some fields of both these submissions (In the example, we have changed the Address field value). The same changes will reflect in the MySql table also.
If a submission is edited in Clappia, the changes will reflect in the database only if the table has a primary key set. The primary key helps match the correct record and update only the modified fields. Without it, updates will not sync, and the original data in the database will remain unchanged.


A. Login to your MySql Database with the following command:
> mysql -h clappia.mysql.database.azure.com -u clappia -p

NOTE: The database should be publicly accessible and should not be a localhost address.
B. Create a table named EMPLOYEE_MASTER using the following query. EMPLOYEE_ID is marked as the primary key in this table.
mysql> CREATE TABLE EMPLOYEE_MASTER (EMPLOYEE_ID varchar(255), EMPLOYEE_NAME varchar(255), EMAIL varchar(255), ADDRESS varchar(255), PRIMARY KEY (EMPLOYEE_ID));

Ensure that the data types of fields in Clappia match the corresponding fields in your database. For example, if a field is set as an integer in the database, it should not contain text in Clappia. Mismatched data types can cause submission failures, preventing records from syncing properly.
When your Clappia app is connected to an external database, the primary key in your database table plays an important role in how submissions are handled.
A primary key helps the database uniquely identify each record.
For example, this could be an “ID” column where every record has a different value (such as 1, 2, 3, and so on). No two rows have the same value in the database table.
Depending on the database you are using, the requirement for a primary key differs slightly when you create, edit, delete, or resync submissions.
The sections below explain this behavior clearly for each supported database.
When a new submission is created in Clappia, a new record is created in your database table.
For both MySQL and PostgreSQL, a primary key is not required when creating a new submission. The record will be inserted successfully even if a primary key is not mapped for create operations.
When you edit or delete a submission in Clappia, the database must know exactly which record to update or remove.
For this reason, a primary key is required for Edit and Delete operations.
Without a primary key in the table, Clappia cannot identify the correct row in the database, and the changes will not reflect properly.
When you use the Resync option, Clappia attempts to match existing submissions with existing database records.
To do this accurately, a primary key is required.
Without a primary key, the system cannot determine which database record corresponds to which submission, which may result in duplicate entries instead of updates.
If a new submission tries to insert a primary key value that already exists in the MySQL table, the database will reject it.
For example, if the table name is EMPLOYEE_MASTER and there is already an entry where the column EMPLOYEE_ID has the value 10, and a new submission is made in Clappia with EMPLOYEE_ID = 10, then the following error will appear in App logs:
Failure Reason: Duplicate entry '10' for key 'EMPLOYEE_MASTER.PRIMARY'
This means the primary key value already exists in the table, and MySQL does not allow duplicate primary key values.
To avoid this error, ensure that primary key values remain unique.
If the table name is EMPLOYEE_MASTER and the primary key column is EMPLOYEE_ID, and a new submission is created in Clappia without providing a value for EMPLOYEE_ID, then the following error will appear in the logs:
Failure Reason: null value in column "EMPLOYEE_ID" of relation "EMPLOYEE_MASTER" violates not-null constraint
This means that the EMPLOYEE_ID column does not allow empty values, and a value was not provided when the submission was inserted.
To resolve this, ensure that a valid value is provided for the primary key column when creating the submission.
In Azure SQL, if your table contains an identity column and IDENTITY_INSERT is set to OFF, record creation will fail when Clappia attempts to insert data.
To allow records to be inserted successfully, you must run:
SET IDENTITY_INSERT <tableName> ON
After enabling IDENTITY_INSERT, the record will be created successfully in the database.
If you disable the Database Integration, any new submissions made in Clappia will not be pushed to the database. If you re-enable the integration, you must authenticate it again. However, any submissions made while the integration was disabled will not be retroactively synced to the database.
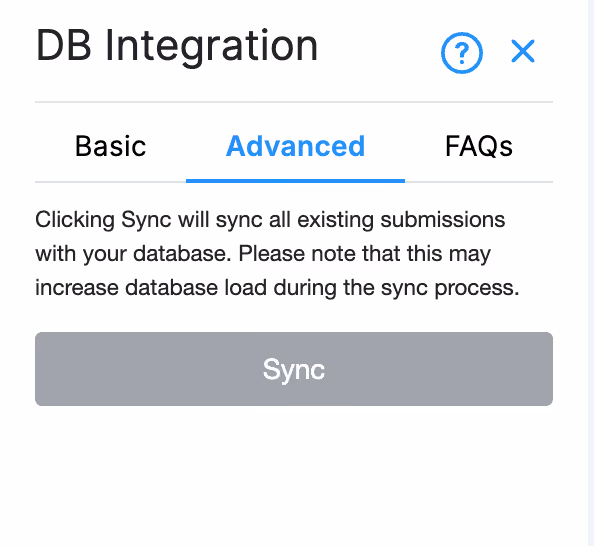
To push submissions that were made to Clappia while the Database integration was disabled to the database, use the Sync option available under the Advanced tab in Database Integration.
When Sync is clicked, Clappia will attempt to push all existing submissions in the app to the connected database table, including those created while the integration was disabled.
Important Note:
For the Sync process to work correctly, the database table must have a primary key. If a primary key is not defined, the system will not be able to correctly identify existing records, and duplicate entries may be created instead of updates.
If you need to bulk upload data into Clappia, you can use the bulk upload feature in the Submissions tab to upload data into clappia which will be pushed into the database automatically.
If a submission is archived in Clappia, it will also be removed from the database. Restoring an archived submission will add it back to the database. However, if a submission is permanently deleted, it will not sync again unless a new submission is created.
When enabling database integration from Clappia, users may encounter connection issues due to their database restricting external IPs or blocking certain IP addresses by default. To successfully connect to Clappia, you must whitelist the following IP addresses in your database firewall settings:
Reattempt the integration from Clappia after making these changes.
Note:
In this article, we saw how to sync submissions in a Clappia App to a MySql database in real-time. Steps are similar for other databases like Postgres and Azure SQL.
Going forward, we will be supporting other databases like Oracle,, SQL Server etc as well.
New submissions created during that time will not be sent to the external database.
If the integration is enabled again later, the submissions that were created while the integration was disabled will not automatically be pushed to the database.
To send those missed submissions, the Sync option in the Advanced tab must be used and the database table must have a primary key.
Sync failures can happen for several reasons:
Data type mismatch, for example a column defined as integer receiving text values
Required columns not receiving a value
Duplicate primary key values
Missing primary key for edit or delete operations
Database-level constraints or identity column restrictions
If a submission is not syncing, you can check the App Logs to see the exact database error returned.
Many databases restrict external connections through firewall rules. If the database does not allow Clappia’s IP addresses, authentication will fail even if the username, password, and host details are correct.
To resolve this, whitelist the required Clappia IP addresses in your database firewall settings. After updating the firewall rules, attempt authentication again.
Enable the option Enable data push to your Database. Select the type of database and enter the connection details.
<iframe width=\"200\" height=\"100\" src=\"https://www.youtube.com/embed/e7yJsxI4i-I\" title=\"Integrate Databases with Clappia ● Clappia App Building ● No-Code Low-Code Platform\" frameborder=\"0\" allow=\"accelerometer; autoplay; clipboard-write; encrypted-media; gyroscope; picture-in-picture; web-share\" allowfullscreen></iframe>
L374, 1st Floor, 5th Main Rd, Sector 6, HSR Layout, Bengaluru, Karnataka 560102, India
3500 S DuPont Hwy, Dover,
Kent 19901, Delaware, USA


3500 S DuPont Hwy, Dover,
Kent 19901, Delaware, USA
L374, 1st Floor, 5th Main Rd, Sector 6, HSR Layout, Bengaluru, Karnataka 560102, India
.svg)
