This article explains the functioning of Repeat nodes that can be configured as a part of workflows. The function of a 'Repeat Node' is also referred to as a 'loop'.
Note:
Only 1 Repeat Node can be used per flow in an app. This means you can use 1 Repeat node each in the following:
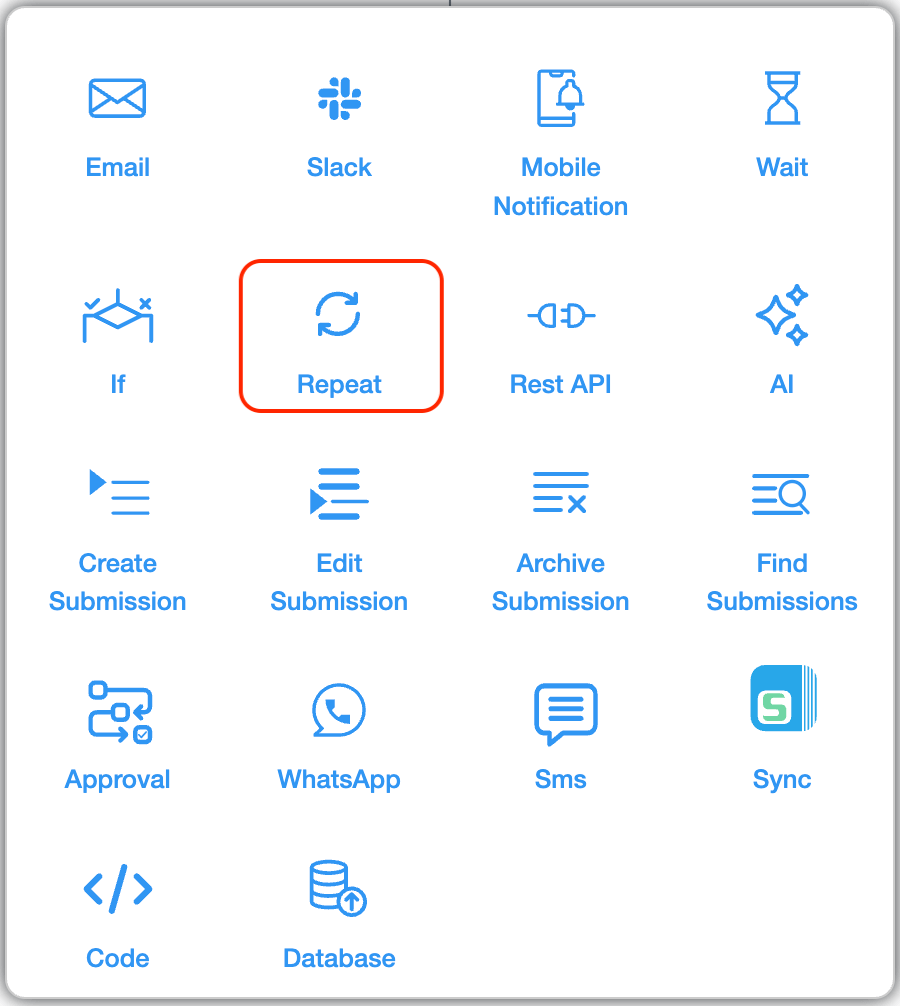
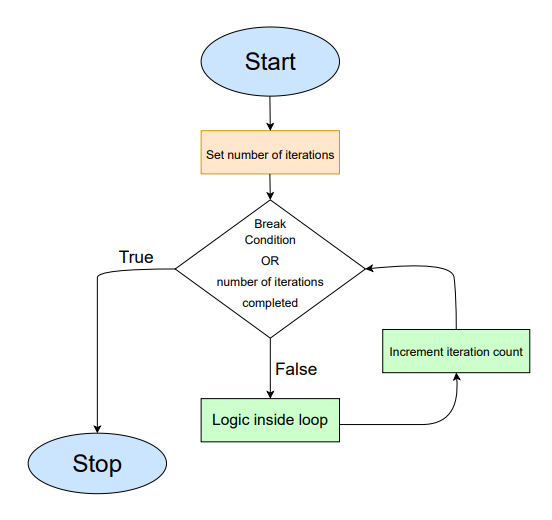
The Repeat node allows you to run/automate a sequence of steps multiple times. This is helpful when you want the same workflow steps to be repeated—either for a fixed number of times or until a certain condition is met.
When a Repeat node is added to a workflow, it will:
→ Push notification for customers on payment dues.
→ SMS notification for customers to remind about expiration date of service
→ Email Notification for vendors about renewals, contracts or approvals.
→ Slack Notification for employees reminding about pending tasks.
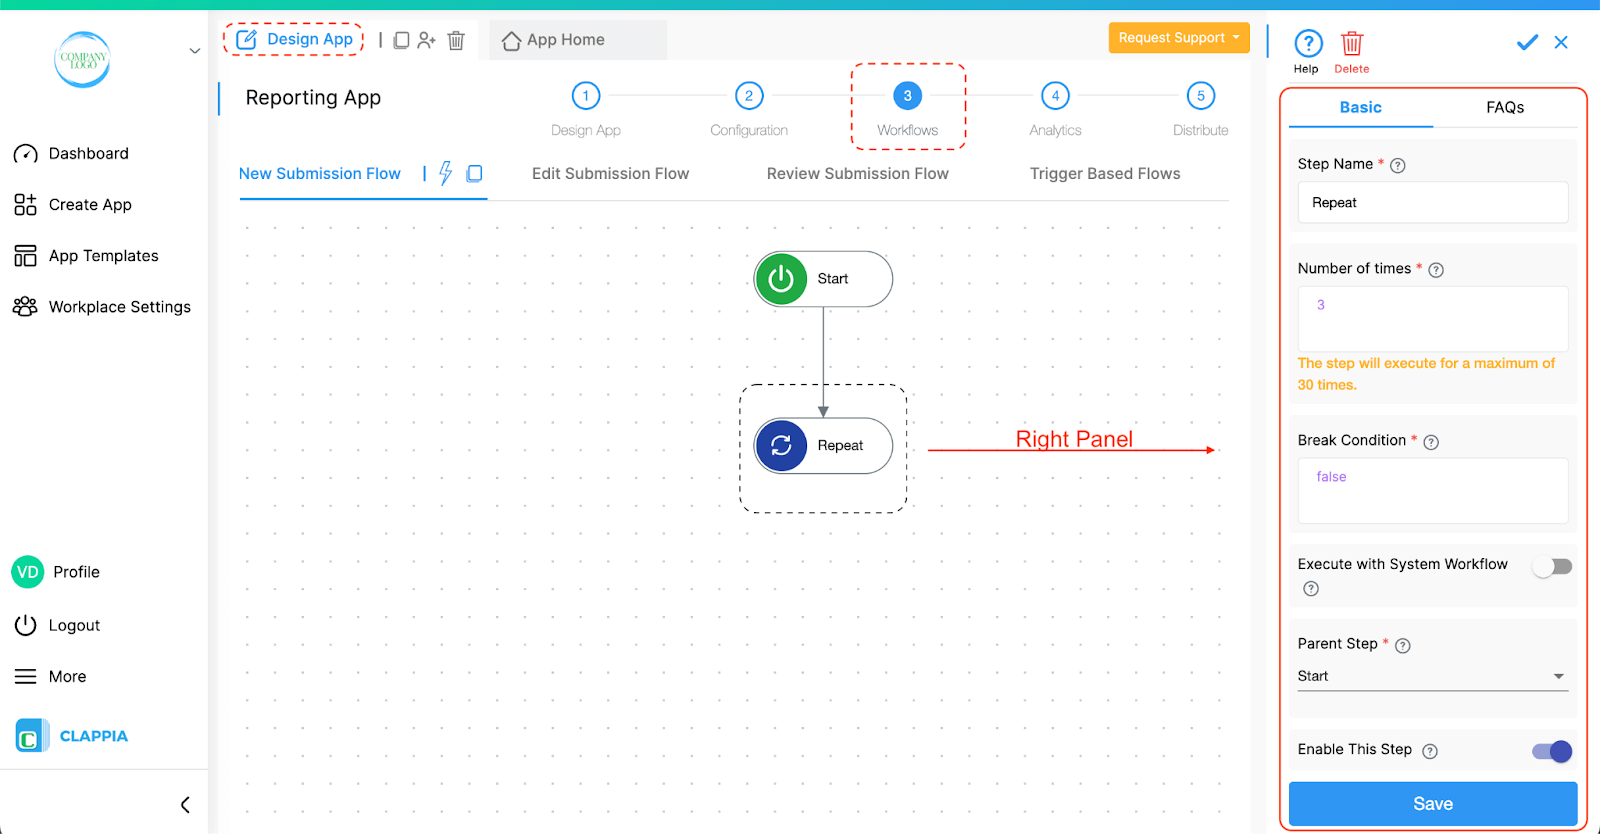
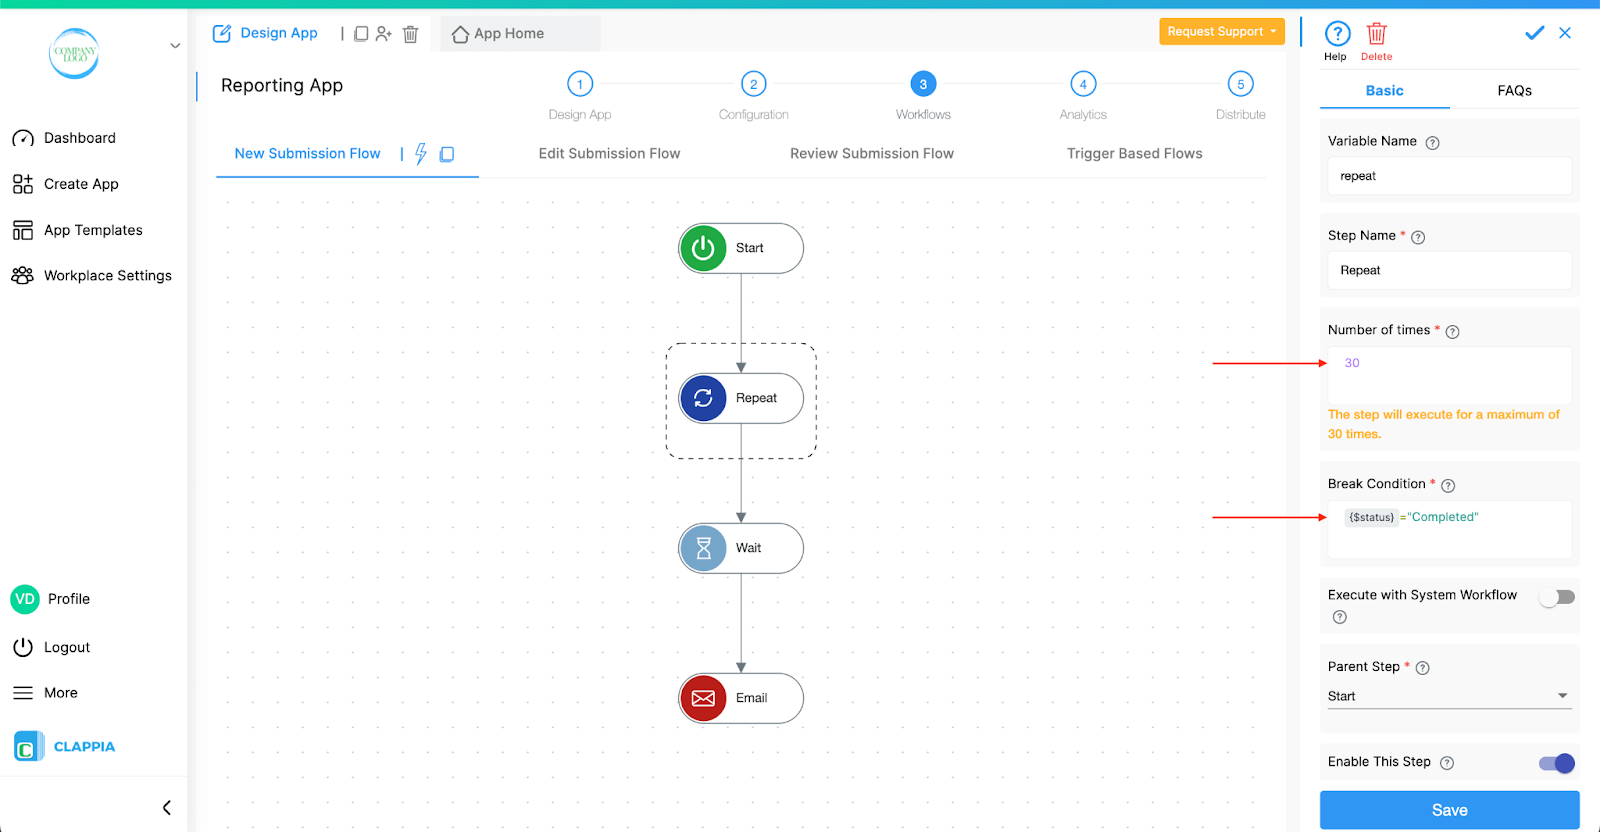
To configure a Repeat node, go to Design App > Workflows.
Click on ‘start’ or the ‘+’ symbol after a workflow node and select the Repeat node. A right hand panel will appear to configure it.
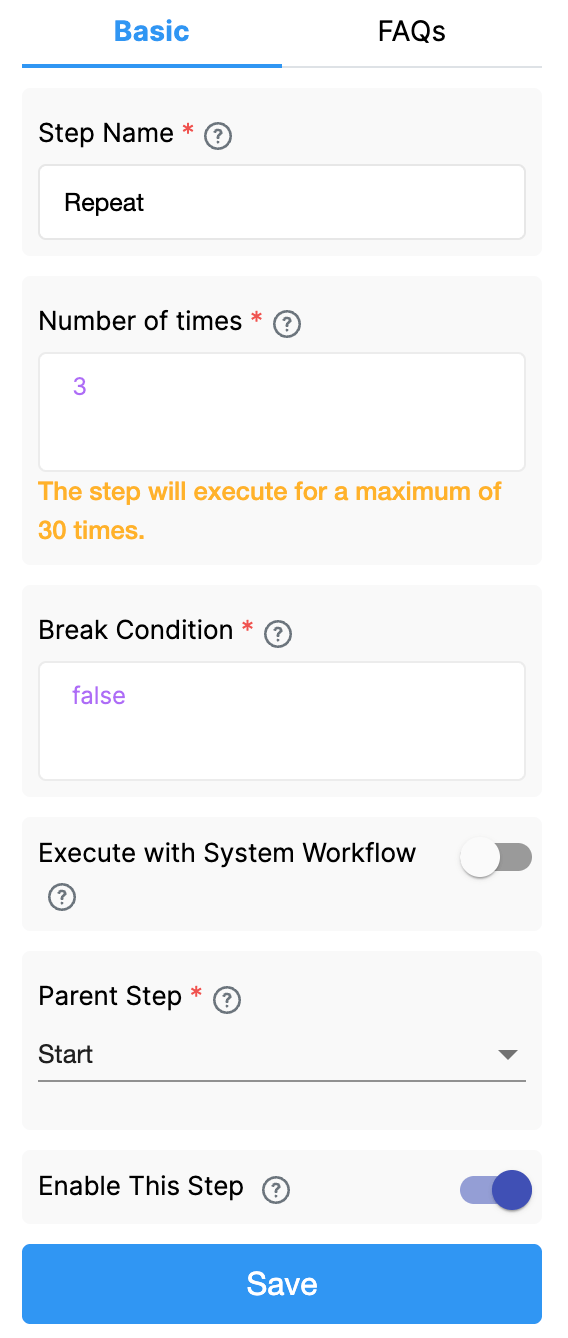
This is the name of the workflow step.
Number of times is the count of executions for the repeat function to run. It can also be explained as the number of loops that should run.
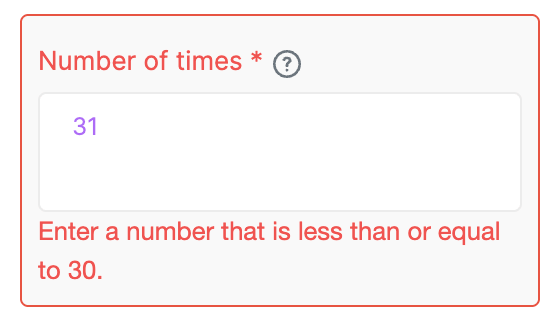
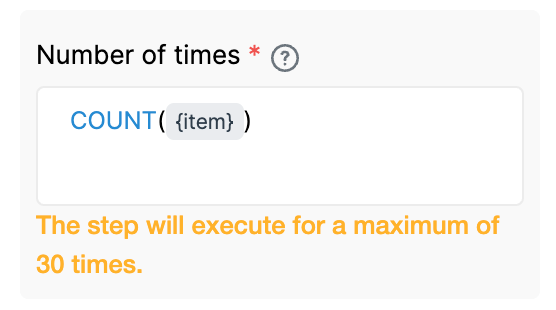
Spreadsheet-like functions like COUNT(), LEN(), etc., can be used here, just like in other formula fields across Clappia.
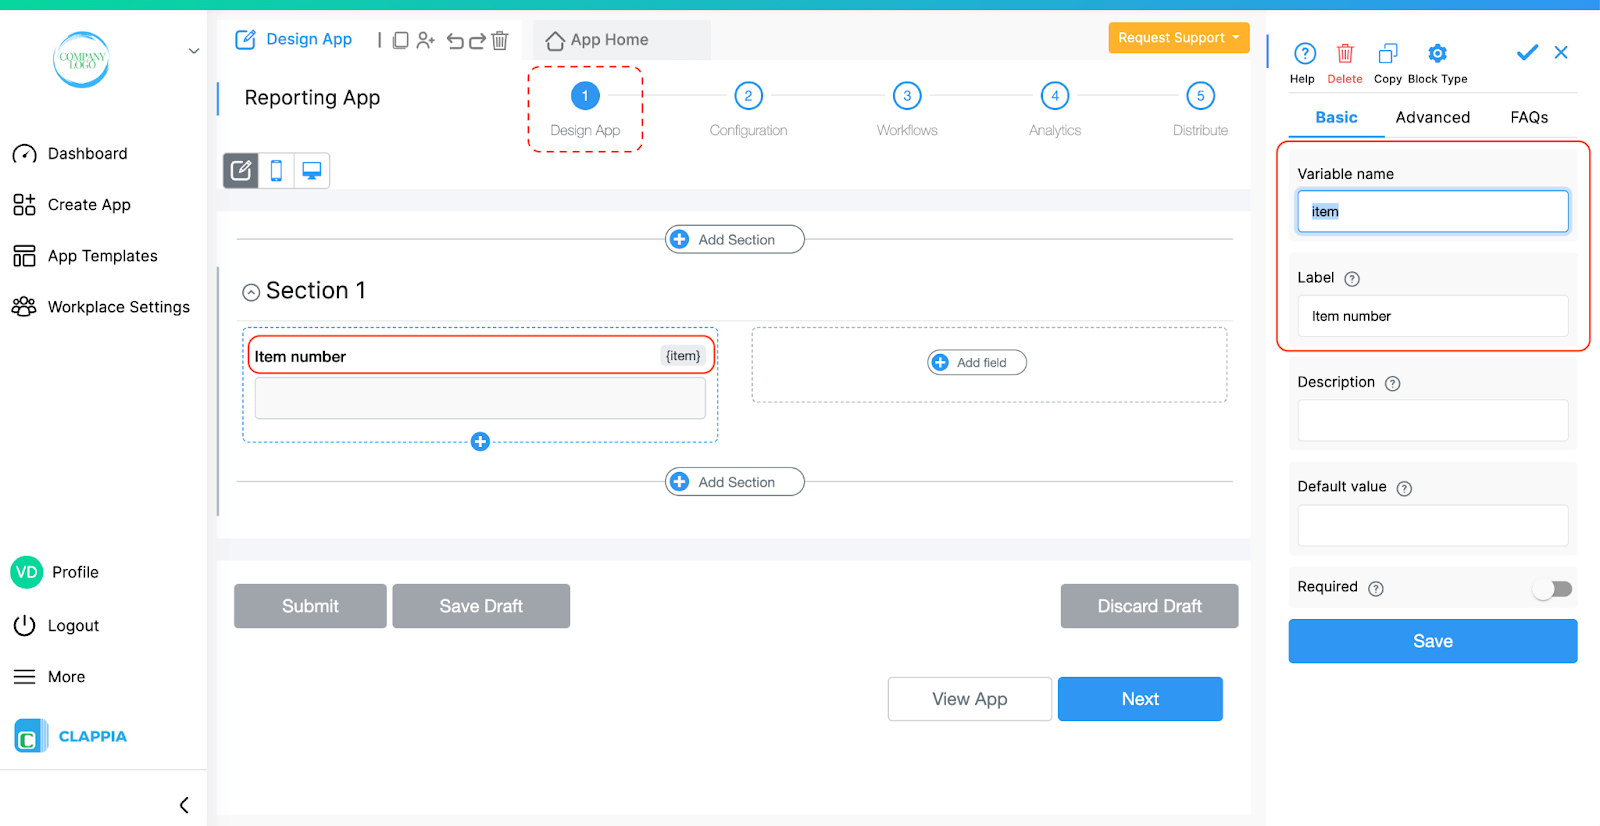
Note: You can pull field values dynamically for count or for break condition by typing ‘@’ followed by the field name in the app. Select the field and it will appear as {item}.
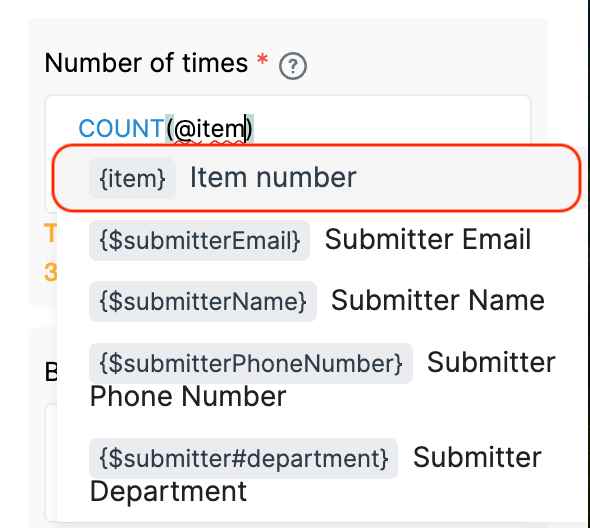
Break condition is used to stop the repeat function prematurely by evaluating a formula. This means that the loop will stop if the given condition is true, even if the total count of 'number of times' has not been completed.
For example, suppose the loop is set to run 10 times and you enter a condition like {status}="Completed" in the Break Condition. If, during the third loop, the submission’s status changes to “Completed”, then the loop will immediately stop at that point. The remaining loops (4th to 10th) will not be executed.
This helps avoid unnecessary workflows running in the background once the required outcome is already achieved.
If you leave this field as false (by default), the loop will complete all the iterations specified regardless of any conditions being met in the workflow nodes in the loop.
The parent step refers to the node which is just above the repeat node. Usually, it is the Start node, unless you’re connecting it after a different workflow step.
This is enabled by default. Disable this step for the node and the workflow below the node to stop from executing.
1. How to use Repeat nodes to iterate on data from Copyable Sections?
Use Case: A customer orders a list of items with their respective quantities. A shop owner has to receive that order as separate items. This helps the shop owners to easily determine and track their stock.
For example:
Customer orders: A-2 kg, B-3 kg, C-4 kg. This is one submission.
The shop owner has to receive it in the form of: A-2kg. B-3kg. C-4 kg. These are 3 different submissions.
There are two apps:
Customer Order App - for customers.
Shop Owner Order - for business owners.
Both the apps have the same layout and contain the same fields: Item and Quantity. Item is a dropdown field containing the list of items.
The list of items in both the apps is also the same.
List of items: item 1, item 2, item 3, item 4, item5.
Customer orders: item 1-4kg, item 2-3kg, item 5-2kg. This is a single submission.
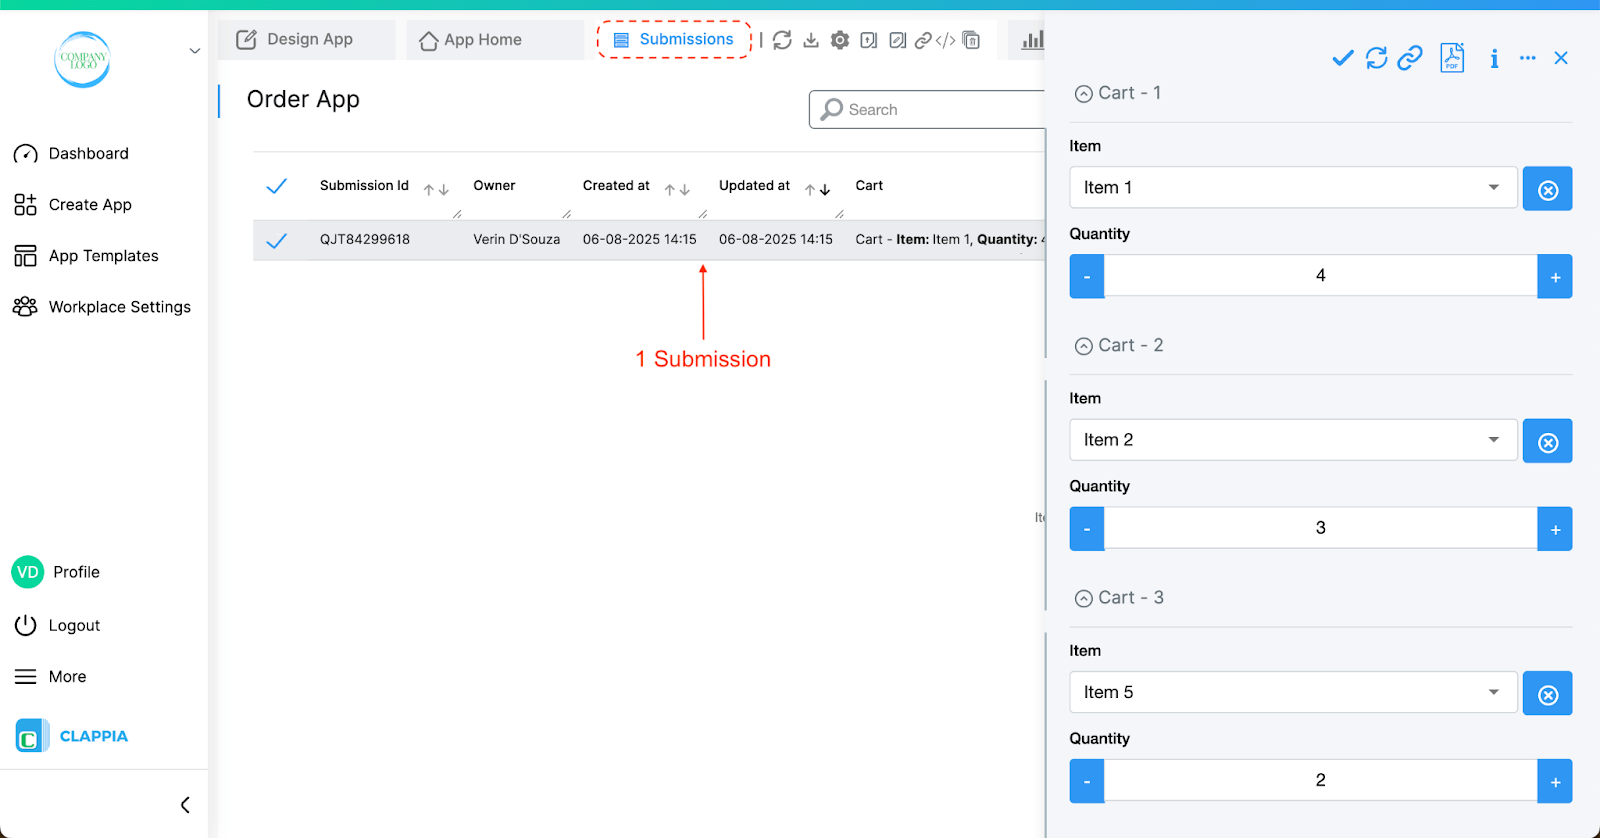
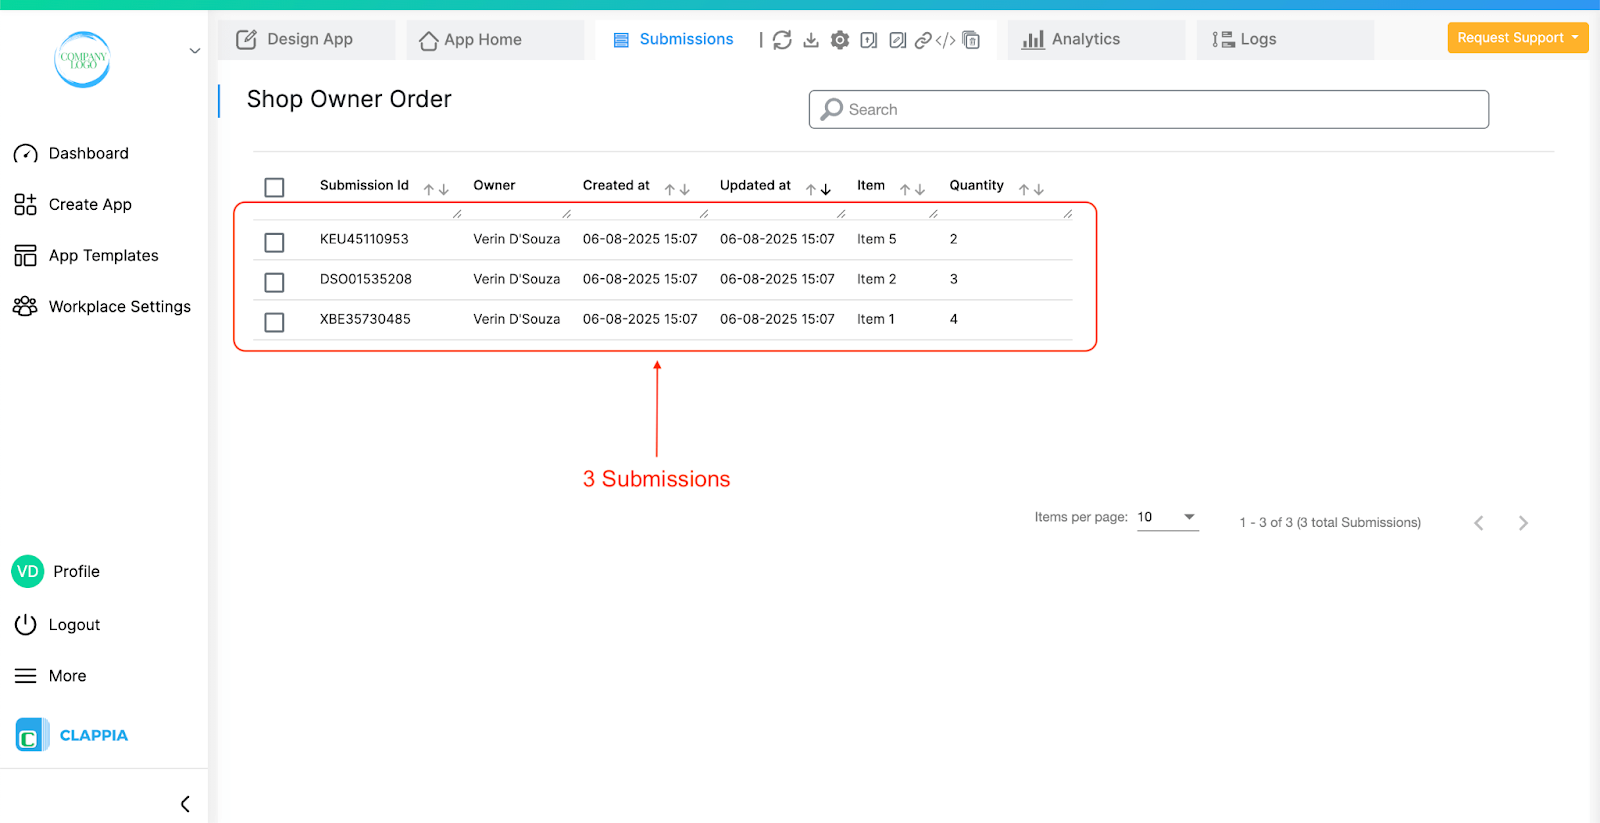
Shop owner receives: Three separate submissions.
item 1-4kg - 1st submission
item 2-3kg - 2nd submission
item 5-2kg - 3rd submission
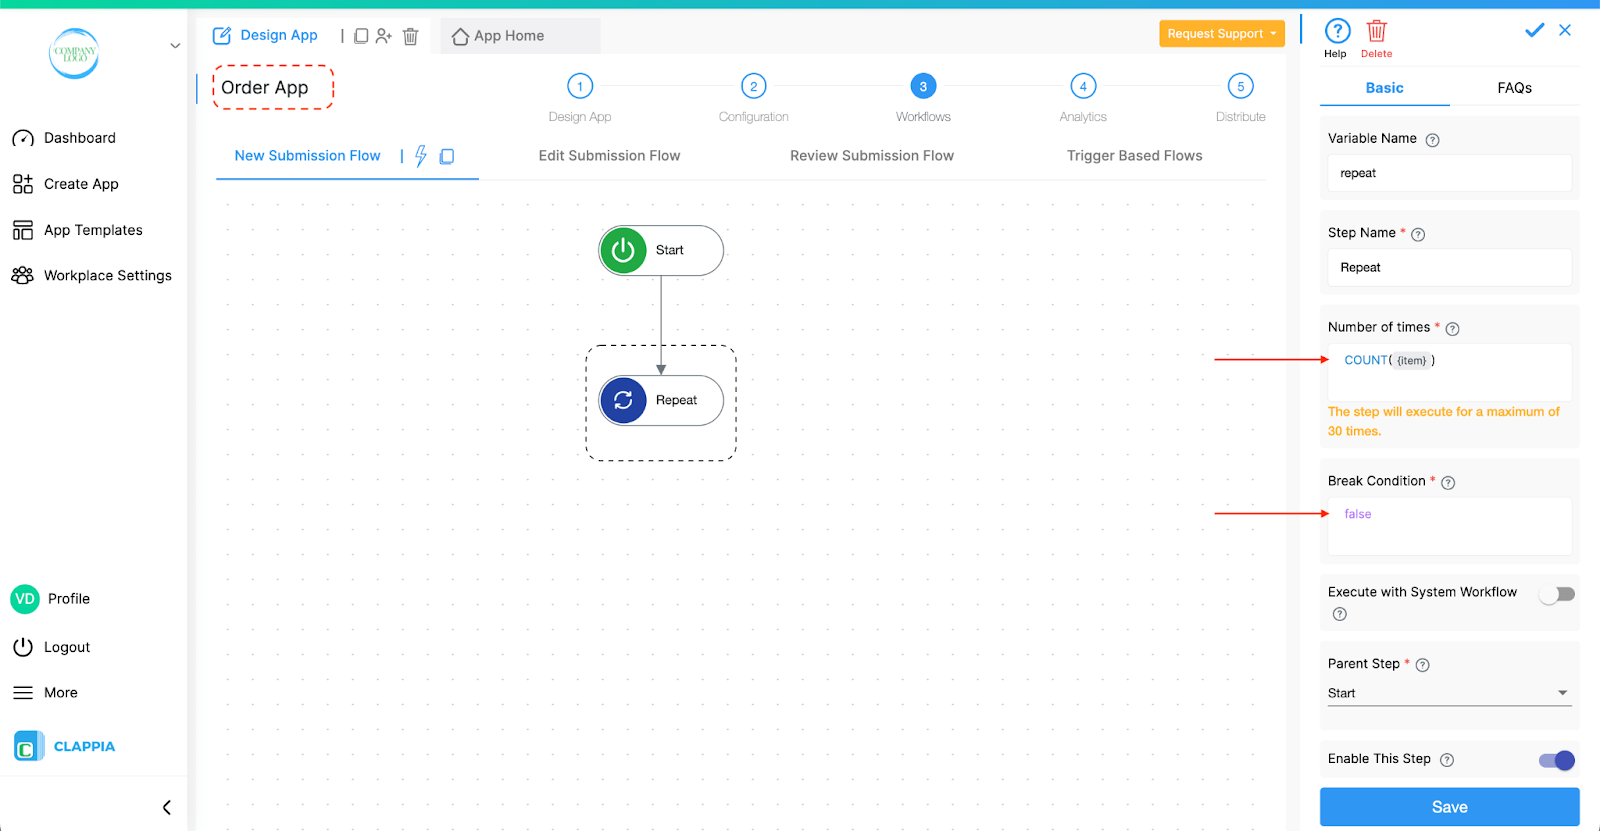
Workflow setup in Customer Order App for customer
Repeat:
Number of times - COUNT ({item})
*type @ to select item field
The number of times this process should run is the number of items the customer orders. So instead of giving a number to run the loop, we define it by the number of items so that the loop runs only for the number of items ordered, and doesn’t continue beyond what’s required.
Break Condition - false
When the number of items counted by the repeat node is over, the repeat function will stop.
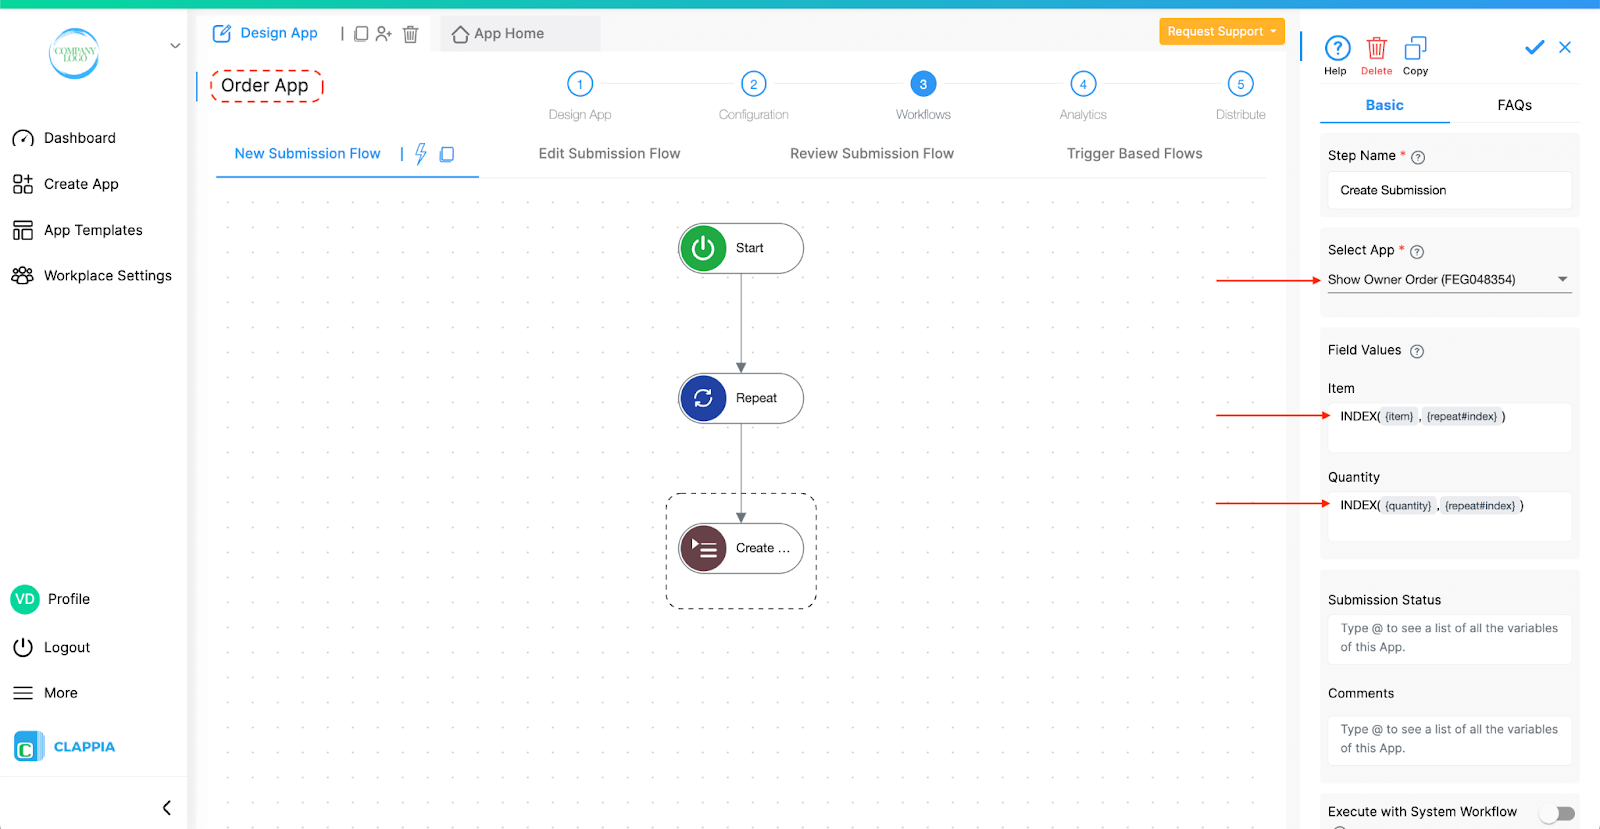
Create submission:
Select App - Shop Owner Order (the Shop owners app)
Submissions will be created in the Shop Owner Order app.
Field Values:
Item - INDEX({item},{repeat#index})
Quantity - INDEX({quantity},{repeat#index})
*type @ to select the fields for item, quantity and index.
The above functions imply that the 1st item is assigned the 1st index (serial number) and correspondingly the 1st quantity is assigned the 1st index (serial number.) Similar logic applies to further items too.
The logic of this repeat workflow:
Step 1: The repeat node will assign item 1 as index 1 and corresponding quantity index 1. The first submission is created.
Step 2: Repeat node goes back and assigns item 2 as index 2 and corresponding quantity index 2. The second submission is created.
Step 3: Repeat node goes back and assigns item 3 as index 3 and corresponding quantity index 3. The third submission is created.
Step 4: Repeat node stops as the items are over.
2. How to use Repeat nodes to check for status updates at regular intervals?
Use Case: Send reminder emails to employees for any pending work.
The repeat node runs in regular intervals of the specified time and checks for the status of the work. If the status reads 'work in progress' then it sends a reminder email to the employee, stops for the specified time, checks again and if the work is still not completed, it again sends an email reminder. This goes on for a maximum of 30 times. The repeat node will stop anywhere in the middle of 30 times if the status of the work is completed.
Workflow setup for repeat node
Repeat node:
Number of times - 30
The number of times this loop should run, which means the number of times an email is sent to the employee until the status of the work is ‘Work in progress’.
Break Condition - {$status}=”Completed”
*type @ to select the status field. The $status appears by default and can be used if there are statuses configured in the app.
Stop the repeat node if the employee finishes the pending work and the status of the work is changed to ‘Completed’.
This toggle determines whether the Repeat node should execute when the submission that triggered the workflow was created/edited automatically by the system (i.e., not directly by a user).
To explain this better, let’s consider the following example:
Suppose there are two apps – App 1 and App 2.
App 1 has a workflow: Start > Create Submission node that creates a new submission in App 2.
App 2 has a workflow: Start > Repeat node > Wait node > Email node. This sends reminder emails based on the status of the submission.
Now, when a user makes a submission in App 1:
This is because the submission created in App 2 was created by the system (via the create submission workflow), not by a user. And by default, Clappia only triggers workflows when a user makes or edits a submission, not when the system does it.
To ensure that the Repeat node in App 2 runs even for system-created/edited submissions (like the one created by App 1), you need to enable the “Execute with System Workflow” option in the Repeat node of App 2.
In simple terms:
Note on Cascading System Workflows
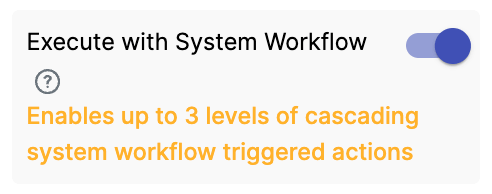
When the ‘Execute with System Workflow’ toggle is enabled, you will see a message that appears at the bottom of this option:
Enables up to 3 levels of cascading system workflow triggered actions.
If the Repeat node is being triggered by a submission that was itself created/edited through another workflow, then this chain of system-generated executions can only go up to three levels.
For example:
In this chain, the Repeat node in App 2 will run and the submission in App 3 will be created, and the workflow in App 3 can create a submission in App 4. However, if App 4 also needs to trigger another workflow (e.g., to create a submission in App 5), it will not work. That would be the 4th level of system-triggered workflow execution, which is beyond the allowed limit.
This limit is in place to avoid infinite or excessive workflow chains. The 3-level cap ensures performance and stability when workflows automatically trigger each other.
This restriction only applies to system-created/edited submissions. If the submission was created/edited manually by a user, the depth limit does not apply (for example, if a Repeat node is used after a manual submission or user edit).
Workflows in Clappia run on individual submissions, such as when a user submits or manually edits a record. However, when using Bulk Upload or Bulk Edit from the Submissions tab, workflows are not triggered, even though new submissions may be added or existing ones updated.
This is because workflows are designed to process one submission at a time. Triggering them for bulk operations can lead to incomplete or inconsistent results, especially for complex workflows.
If you need workflows to run after a bulk operation, currently you will need to open each submission manually and save it. This will count as an edit and trigger the workflow normally.

L374, 1st Floor, 5th Main Rd, Sector 6, HSR Layout, Bengaluru, Karnataka 560102, India

3500 S DuPont Hwy, Dover,
Kent 19901, Delaware, USA


3500 S DuPont Hwy, Dover,
Kent 19901, Delaware, USA

L374, 1st Floor, 5th Main Rd, Sector 6, HSR Layout, Bengaluru, Karnataka 560102, India

