
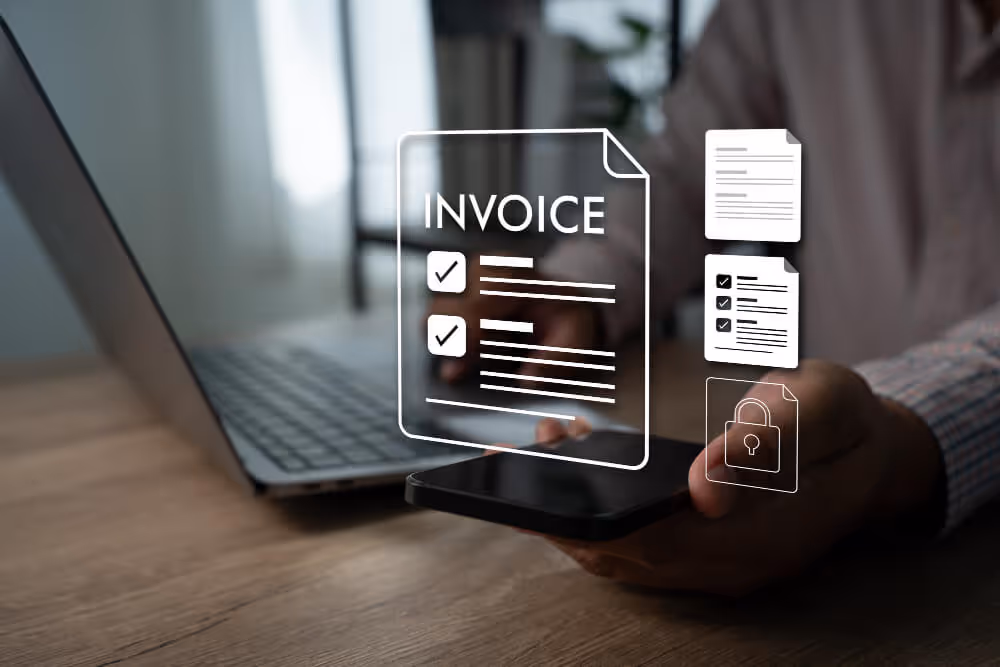
Your accounting team did not sign up to spend half their week squinting at PDFs and typing numbers into a spreadsheet. Yet that is exactly what happens when vendor invoices pile up and someone has to manually pull out the biller name, invoice date, total amount, and due date from each one before anything else can happen.
The tedious part is not reviewing invoices. It is the data entry before any review even begins. That is a problem Clappia's AI Workflow Node solves cleanly. Your team uploads the invoice, submits, and the extraction runs automatically in the background. By the time they come back to check, the fields are populated, the data is structured, and it is ready to push wherever your business needs it: your accounting software, a Google Sheet, an email summary, or a WhatsApp alert for invoices approaching their due date.
This guide walks through the complete build, step by step.
Finance teams handle invoices from tens, sometimes hundreds, of different vendors. Each one has a slightly different layout. One vendor puts the total amount at the bottom right. Another puts it in the header. A third uses different terminology altogether. Traditional OCR tools fail the moment a document deviates from an expected template, which happens constantly in real-world AP operations.
AI language models read invoices the way a trained accountant would: by understanding what is written, not by matching fixed positions on a page. Field names like "Amount Due," "Net Payable," and "Total" are all recognised as the same thing. The AI pulls the right values regardless of layout, language, or document quality, and returns them in a clean, consistent JSON format that your workflow can parse and act on immediately.
The real value is not just getting the data out. It is getting structured, verified data into the right downstream system with no human effort in between.
A team member uploads a vendor invoice (PDF or image) and submits the form. Immediately after submission, three workflow nodes run in the background. The AI Workflow Node reads the document and returns a JSON object with all extracted fields. A Code Workflow Node parses that JSON cleanly and splits it into individual output variables. An Edit Submission Node writes each variable back into its corresponding form field on the submission. About a minute after the original upload, the submission record shows all extracted data: biller name, invoice number, dates, amounts, line-item description, and payment terms, fully populated and ready to review.
The reviewer checks the values against the original invoice (which remains attached to the submission), corrects anything if needed, and changes the status to Verified. That status change triggers the next phase: the extracted data is pushed to your accounting system via REST API, a summary goes to the finance lead by email, and a WhatsApp alert fires for any invoice where the due date is close.
Sign up for a free Clappia account to get started. The free plan lets you build unlimited apps and explore most of Clappia's features. For a full breakdown of what is included at each level, visit the pricing page.
Create a new app from your dashboard and name it "Invoice Data Extraction" or "AP Invoice Capture."

Click "Add Section" and name it "Invoice Upload." Inside it, drag a Camera, Images and Files block onto the canvas.
Label: Attach Invoice
In the right panel, update the auto-generated variable name to attach_inv. Clappia auto-generates variable names by truncating the label and joining words with underscores, so "Attach Invoice" might become attach_inv by default. You can also set it to attach_invoice if you prefer a longer name. This is the variable you will reference inside the AI prompt later.
Under Allowed File Types, enable Documents for PDF invoices, and Images (Gallery Uploads) and Images (Camera Uploads) for teams that also process photographed paper invoices. The Labels and Variables guide explains how variable names work across Clappia.
Click "Add Section" and name it "Extracted Invoice Data." Turn on the Display this section if option and set the condition to:
{invoice_num}<>""
The Invoice Number field inside this section only gets its value after the form is submitted and the workflow runs. So while someone is filling the form, this section stays completely hidden and they never see empty boxes. Once they open the submission after the workflow completes, the section appears with all fields populated. This keeps the form experience clean and the submission record informative.
Add the following fields inside this section:
The invoice_num variable name is what you set in the Display condition {invoice_num}<>"".
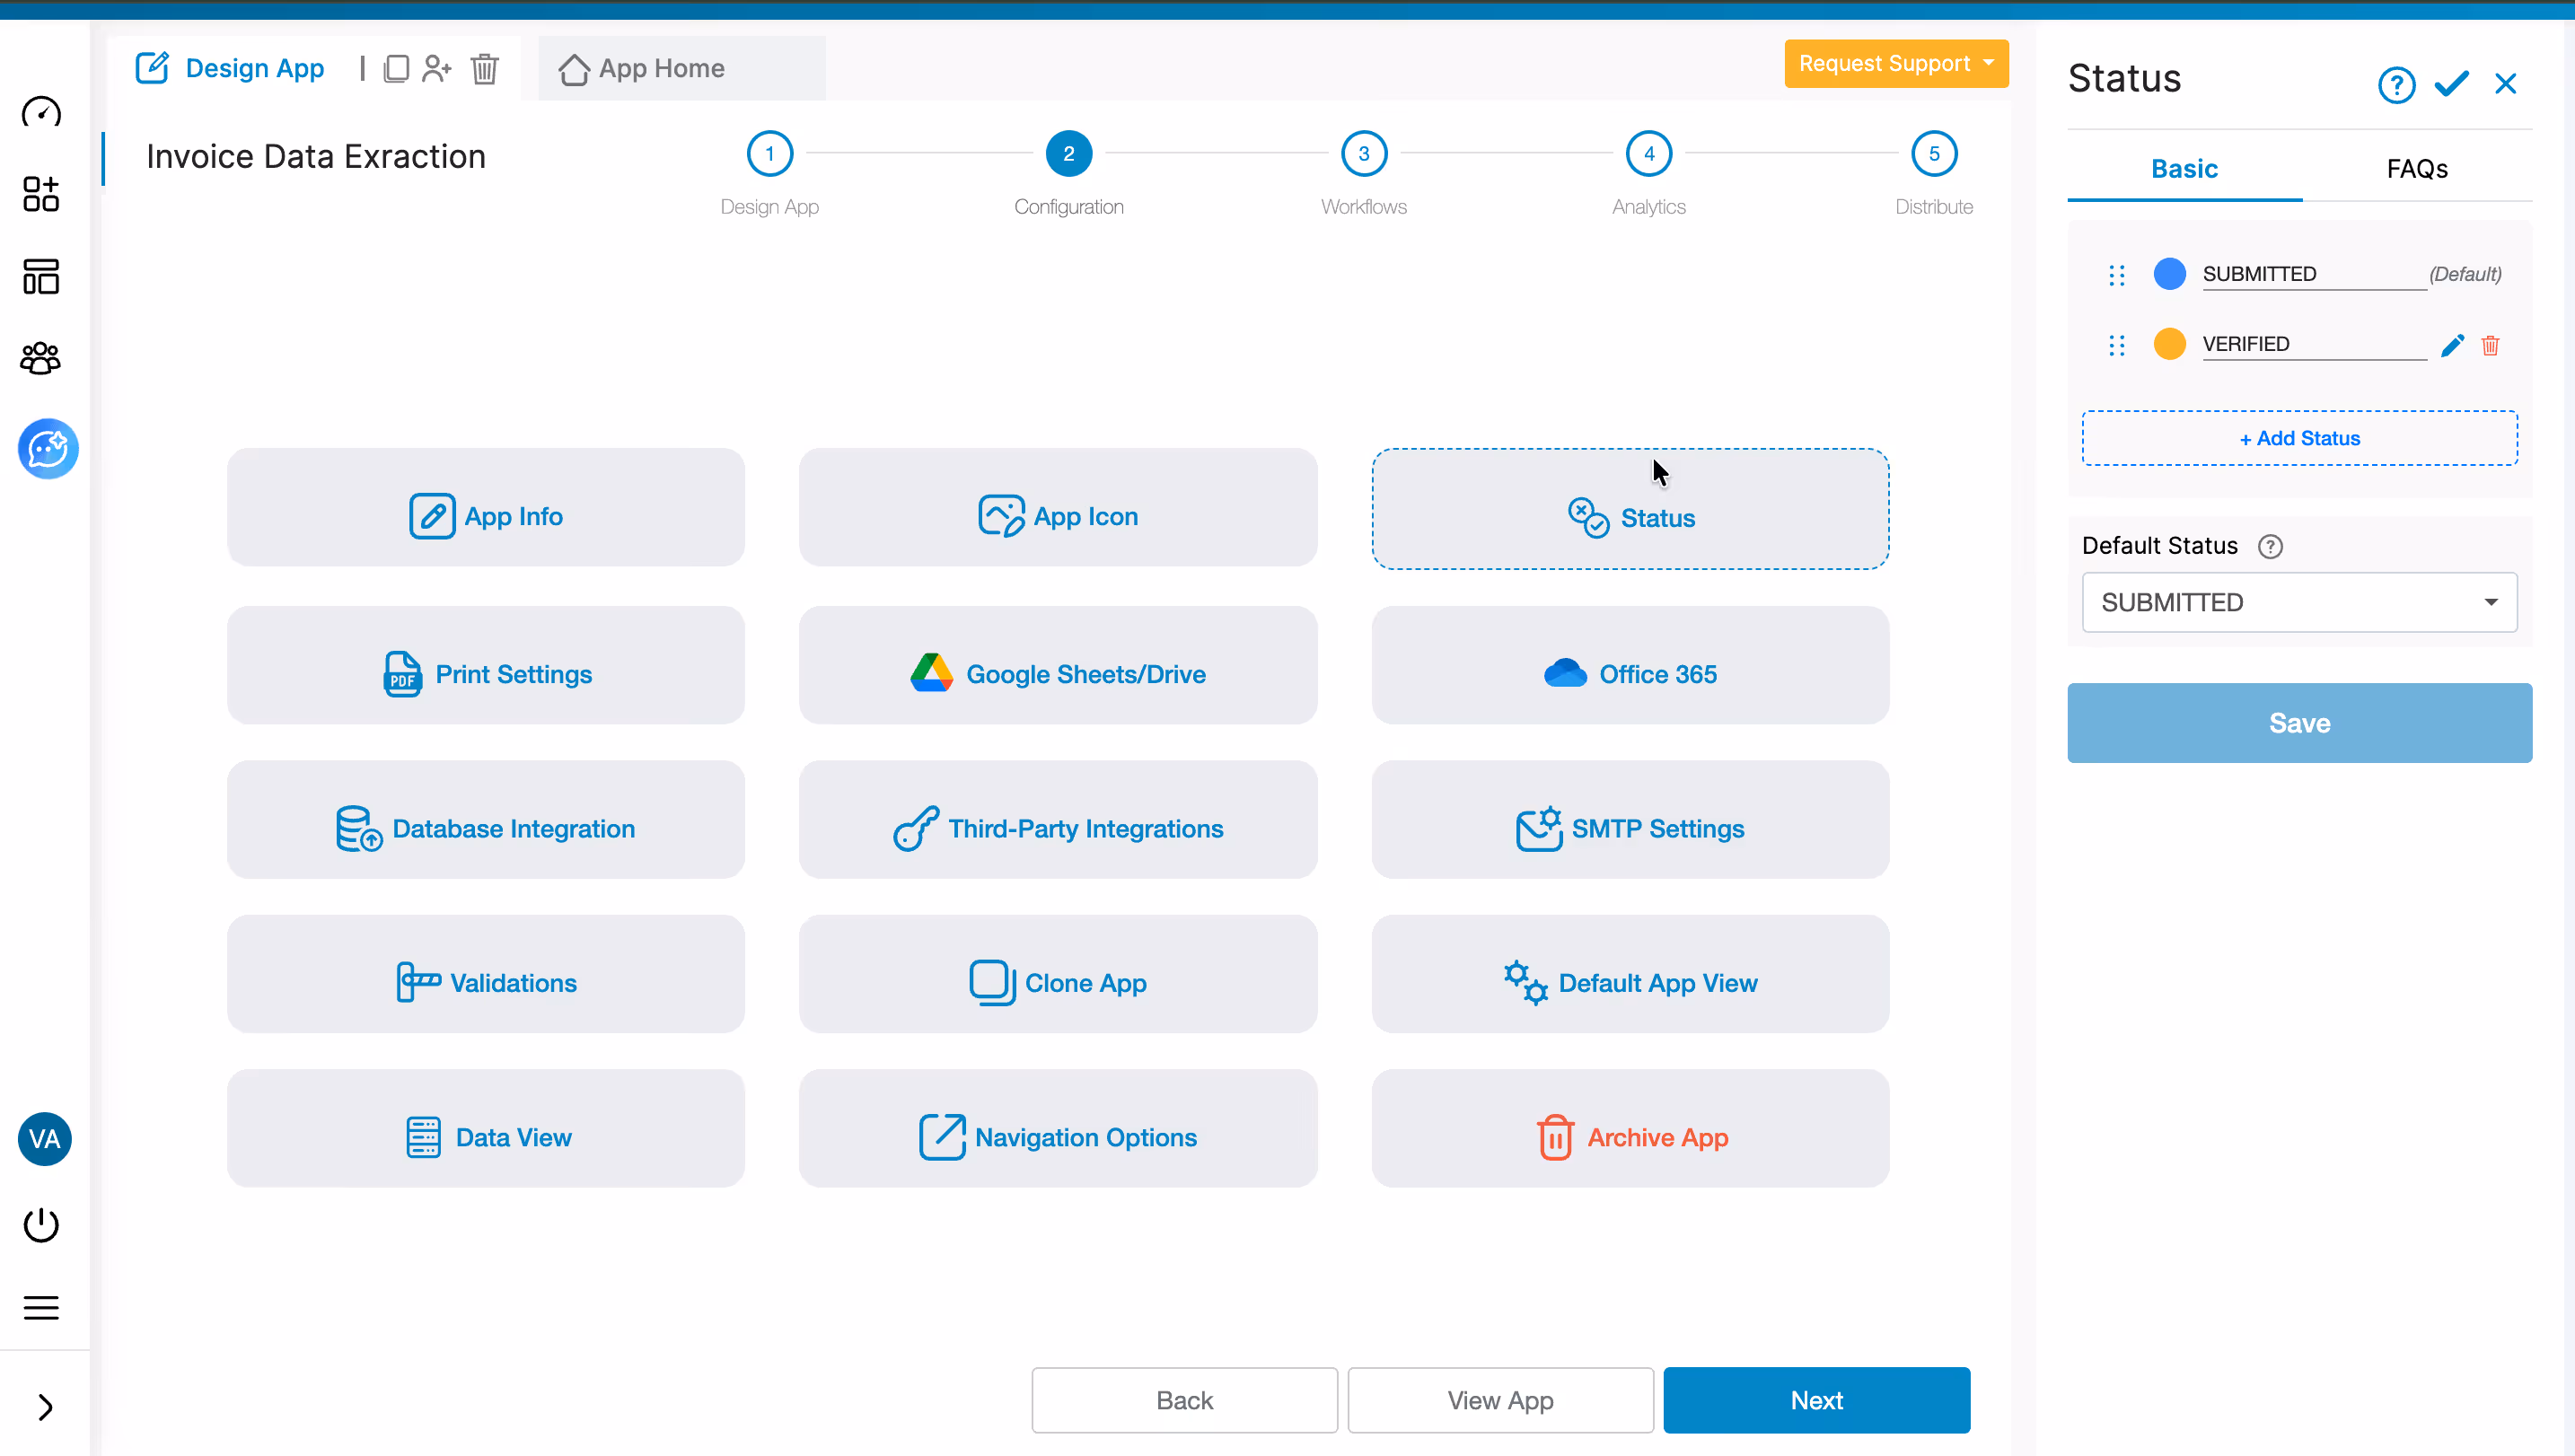
Go to Design App > Configurations > Status and add one custom status: "Verified". This is the only custom status needed here. The default "Submitted" status is assigned automatically when a user submits the form. Once the accounts team reviews the extracted data and confirms it is correct, they change the status to Verified. That change triggers the Review Submission workflow where all the downstream actions happen.
For full setup instructions, see the submission status guide.
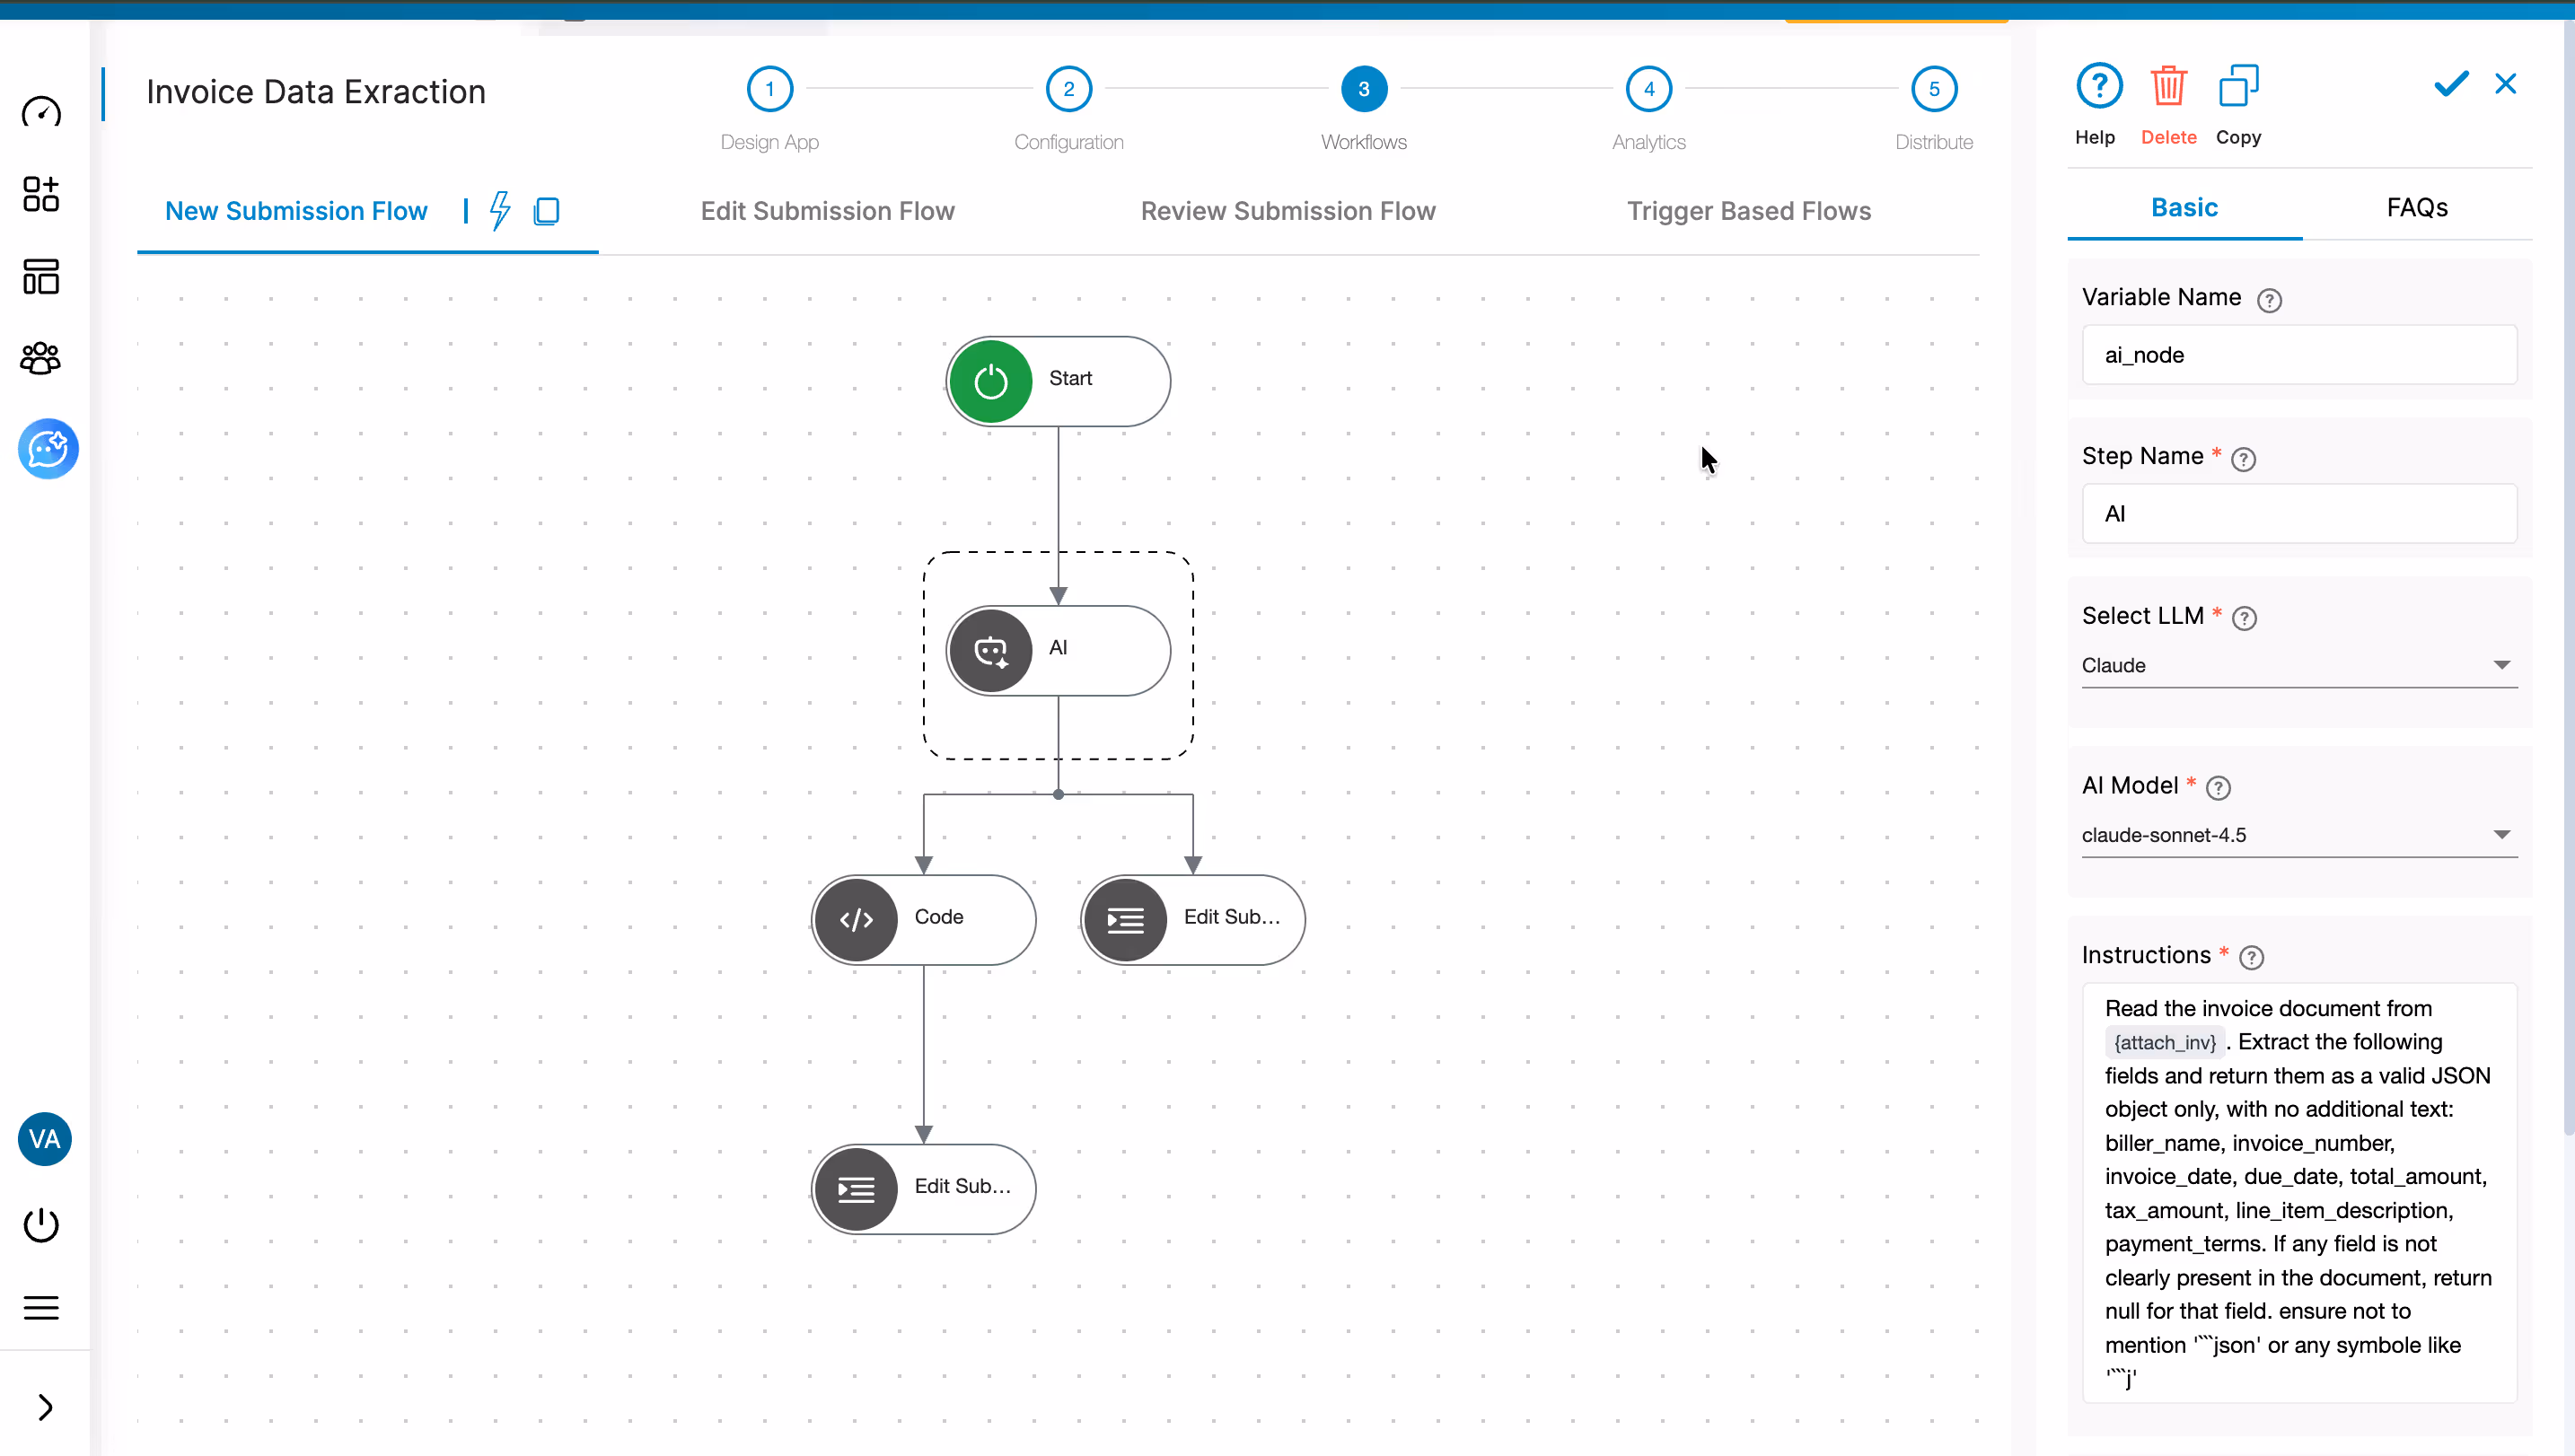
Open the Workflows tab and go to New Submission Flow. Build three nodes in sequence.
Add the AI Workflow Node and name it "Extract Invoice Data." Choose your preferred LLM. OpenAI GPT-4o, Anthropic Claude, and Google Gemini are all available. Clappia provides built-in AI usage credits so you can start without your own API key. If you process high volumes, connect your own key through Design App > Configurations > Third Party Integrations.
In the Instructions field, type @ and select attach_inv (or your upload field's variable name) from the dropdown. After selecting, it appears as {attach_inv} in curly braces inside your prompt. Use this exact prompt:
"Read the invoice document from {attach_inv}. Extract the following fields and return them as a valid JSON object only, with no additional text: biller_name, invoice_number, invoice_date, due_date, total_amount, tax_amount, line_item_description, payment_terms. If any field is not clearly present in the document, return null for that field. Ensure not to mention json or any symbols like "
After saving, the node generates its own variable name (for example ai_node). Use this exact name in the code below.
Add the Code Workflow Node immediately after. Name it "Parse Invoice JSON." This node handles any edge-case formatting the AI might add to its response and outputs each field as a clean, separate variable.
Paste this code into the editor. Replace {ai_node} in the template literal with your actual AI Workflow Node variable name:
javascript
function main() {
    let output = {};

    // Replace this with your AI field later
    let jsonStringRaw = `{ai_node}`.trim();

    let jsonString = jsonStringRaw;

    //  Step 1: Remove ```json ``` or ``` wrappers
    jsonString = jsonString
        .replace(/```json/gi, "")
        .replace(/```/g, "")
        .trim();

    //  Step 2: Remove wrapping quotes if AI returns string
    if (
        (jsonString.startsWith("'") && jsonString.endsWith("'")) ||
        (jsonString.startsWith('"') && jsonString.endsWith('"'))
    ) {
        jsonString = jsonString.substring(1, jsonString.length - 1);
    }

    let data = {};

    //  Step 3: Safe JSON parse
    try {
        data = JSON.parse(jsonString);
    } catch (e) {
        output["error"] = "Invalid JSON";
        return output;
    }

    //  Step 4: Helper to clean currency like "$2,510.00"
    function cleanAmount(val) {
        if (!val) return "";
        return val.toString().replace(/[^0-9.]/g, "");
    }

    //  Step 5: Map fields correctly
    output["biller_name"] = data["biller_name"] || "";
    output["invoice_number"] = data["invoice_number"] || "";
    output["invoice_date"] = data["invoice_date"] || "";
    output["due_date"] = data["due_date"] || "";
    output["total_amount"] = cleanAmount(data["total_amount"]);
    output["tax_amount"] = cleanAmount(data["tax_amount"]);

    // handle both possible keys
    output["description"] =
        data["line_item_description"] ||
        data["description"] ||
        "";

    return output;
}
In the Output Fields section, add each of the following field names one per row using the "+ Add another field" button, exactly as shown in the screenshot:
Once saved, the Code Node generates its own variable name (for example code). Each output field is then referenced downstream as {code#biller_name}, {code#invoice_number}, {code#total_amount}, and so on.
Add the Edit Submission Node. Select your current app. Under Filters, set Submission Id to {$submission_id} to ensure the node always updates the correct submission. Under Set Field Values, map each code output to its form field by typing @ in the value box and selecting the right variable:
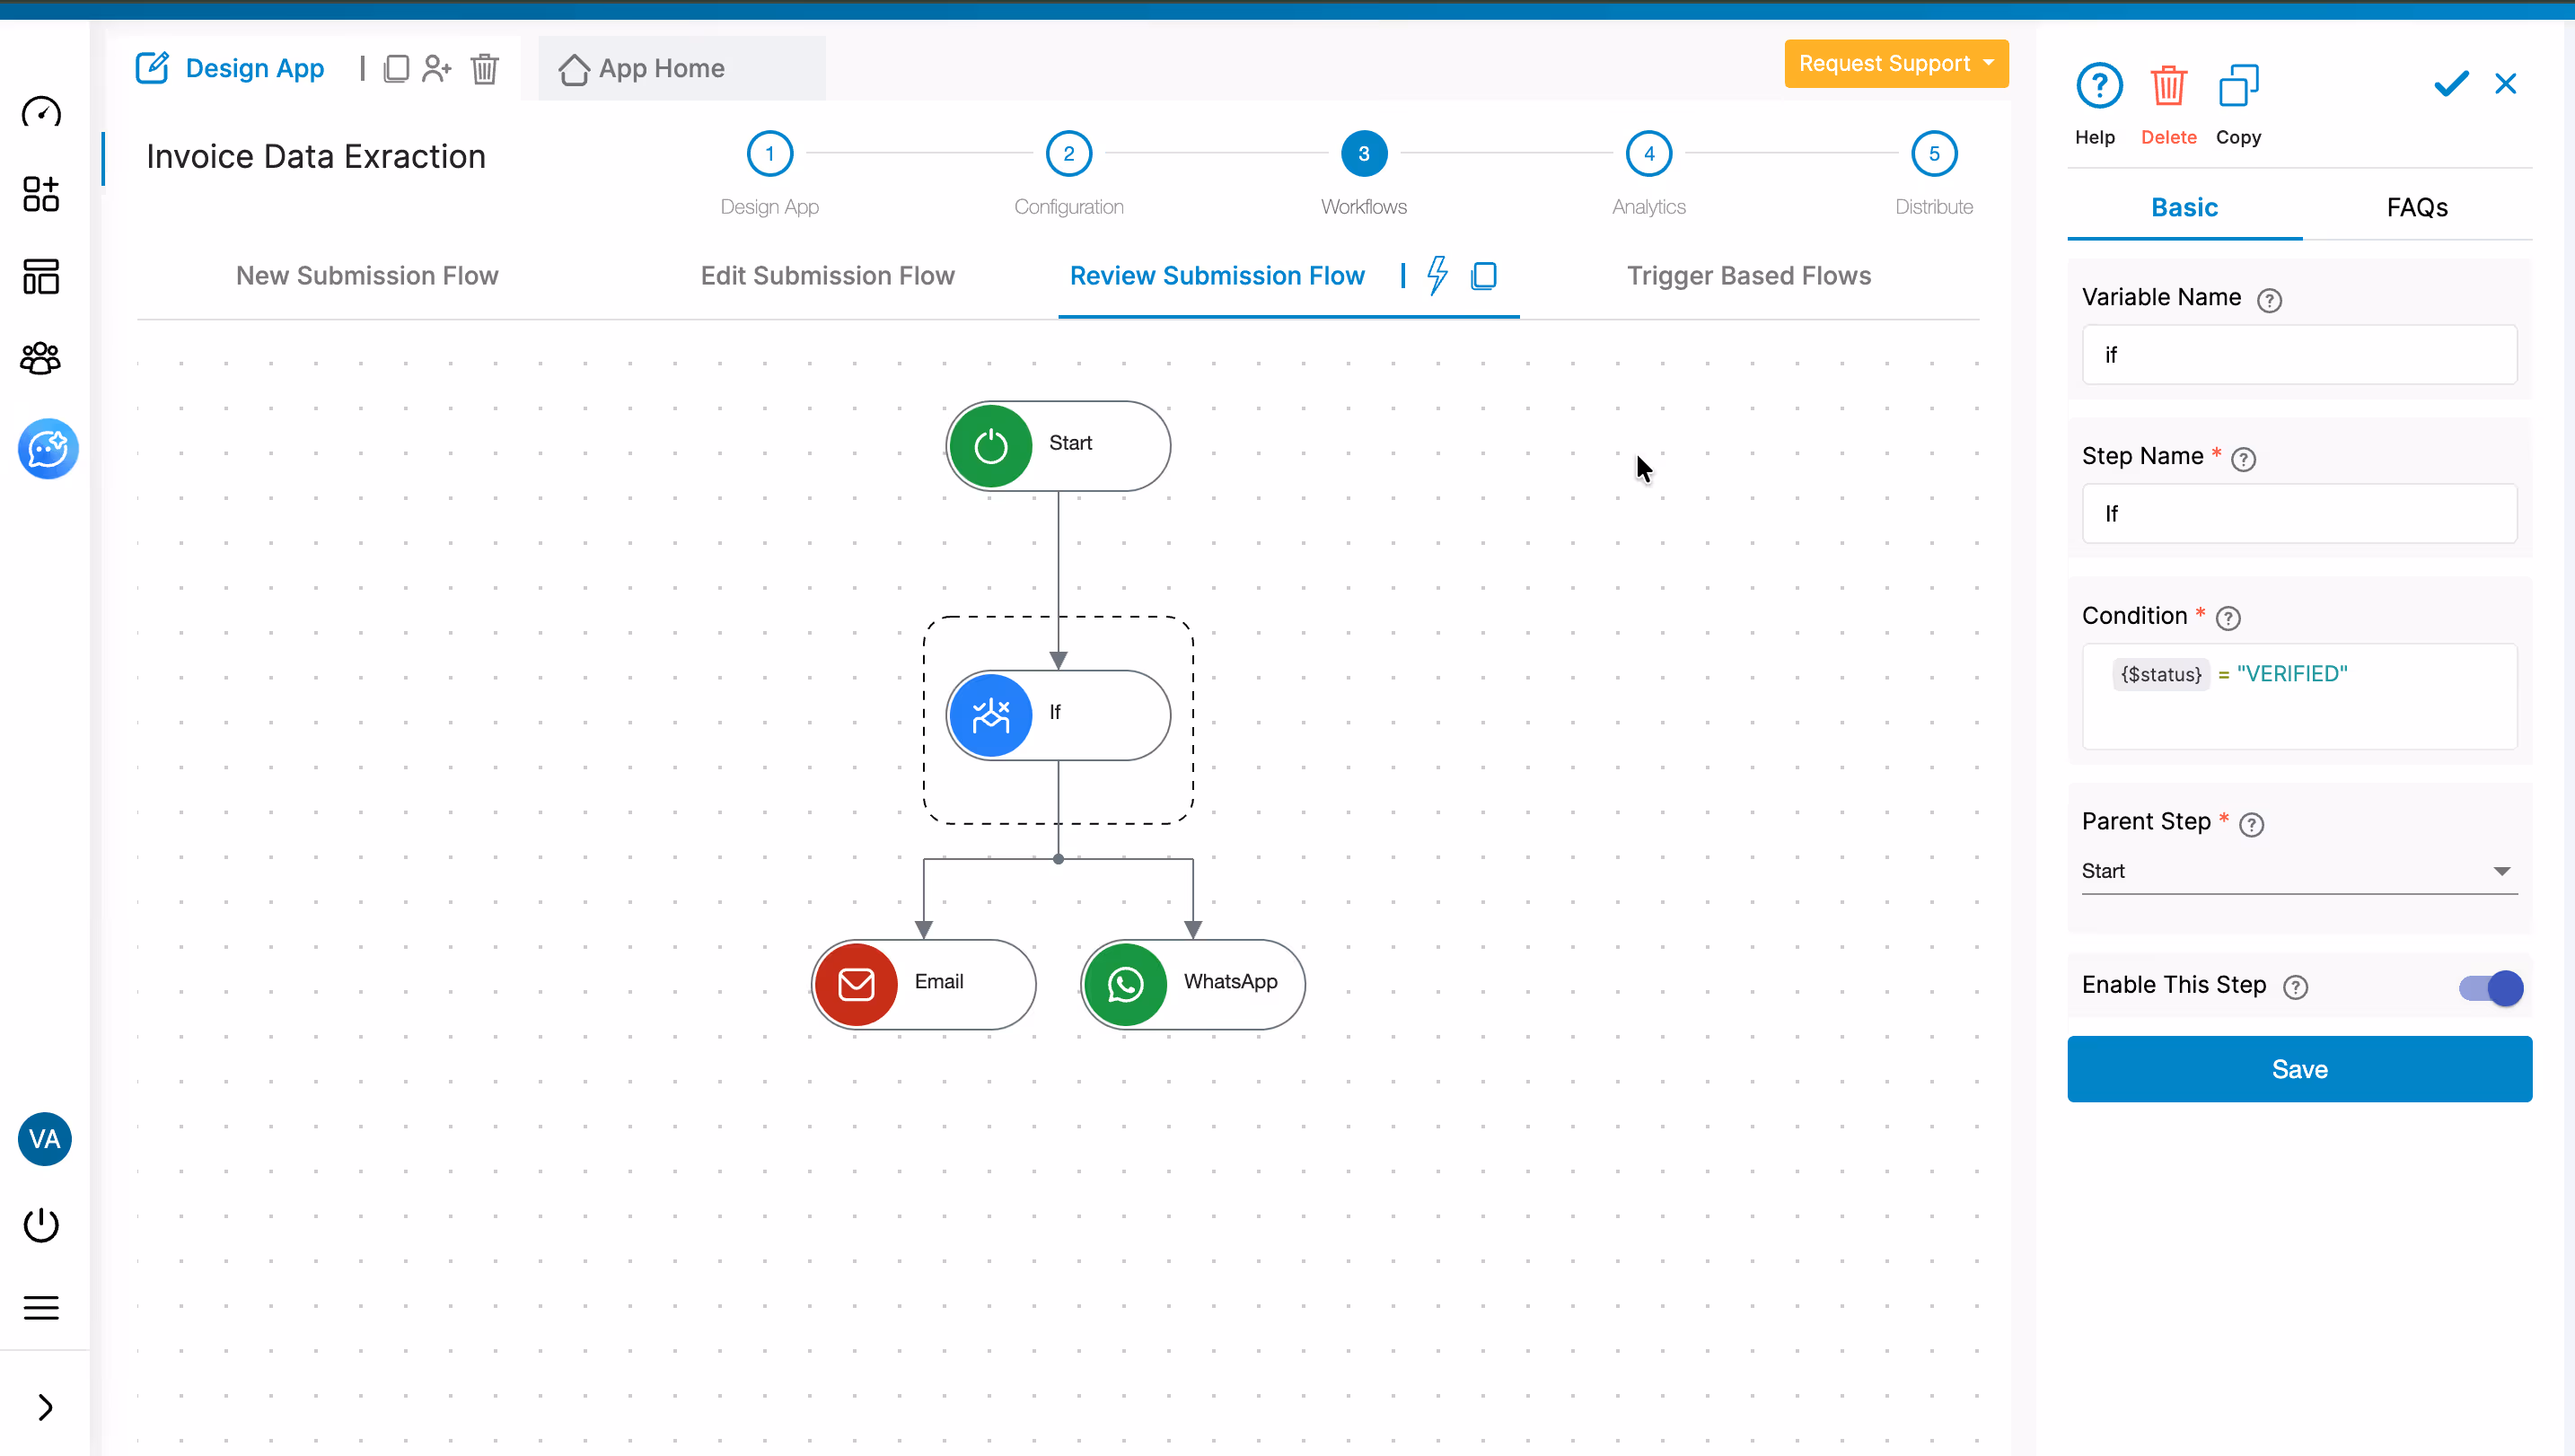
Go to Review Submission Flow in the Workflows tab. Add an If node checking whether the status equals "Verified." When this condition is true, trigger the following actions based on your business setup.
Send a structured data push to your accounting system. The REST API Workflow Node sends the extracted invoice fields as a POST request to your ERP, accounting software, or any internal tool that accepts API input. Reference extracted variables directly in the request body: {biller_name}, {invoice_number}, {total_amount}, {due_date}. This is the cleanest way to get verified invoice data into QuickBooks, Zoho Books, SAP, or any custom system without anyone manually copying across.
Sync to Google Sheets/Drive. Use Clappia's Google Sheets/Drive integration to append each verified invoice as a new row in your AP tracker. Every field maps to a column automatically. Your finance team gets a live register of all processed invoices without anyone touching a spreadsheet.
Email the finance lead. Use the Email Workflow Node to send an instant notification to your accounts lead with all the extracted fields in the body. They see biller name, invoice number, total, due date, and payment terms directly in their inbox the moment an invoice is verified, without opening Clappia at all.
WhatsApp alert for urgent invoices. Add a nested If condition that checks whether the due date is within a critical window. If so, fire a WhatsApp notification directly to the finance manager's phone so nothing gets missed. You can also add SMS, Slack, or Mobile Notification nodes to route alerts to the right people through the right channels.
This workflow applies broadly across any business that receives vendor invoices and needs that data in a downstream system quickly and accurately.
Logistics companies processing freight bills from multiple carriers in different formats can eliminate manual AP data entry across the entire vendor base. Retail chains managing supplier invoices across multiple locations get a single, consistent capture flow regardless of which store or region the invoice came from. Healthcare providers handling medical supply invoices can push extracted data directly into their billing or inventory systems. Construction firms receiving subcontractor invoices in the field can use the Clappia mobile app to photograph and submit a paper invoice on site, with the extraction and routing happening automatically before the team member is back at their desk.
Clappia's broader platform handles the surrounding AP workflow too. Teams building out full procure-to-pay automation often pair this use case with custom invoice processing and approval workflows, vendor management apps, and field expense tracking, all built on the same no-code foundation.
How accurate is the AI extraction across different invoice formats?
Large language models read documents by understanding context, not by matching templates. A vendor invoice from a small supplier formatted in Word, a multi-page PDF from an enterprise vendor, and a photographed paper invoice taken on a phone in poor lighting are all processed using the same prompt. The AI identifies fields by what they mean, not where they appear. For invoices where a field is genuinely absent or ambiguous, the code node returns an empty string so the reviewer can fill it in manually before verifying.
Do both the total amount and tax amount get cleaned properly?
Yes. The cleanAmount function in the code strips all non-numeric characters including currency symbols, commas, and spaces, leaving a clean numeric string. So "$2,510.00," "₹2510.00," and "2,510" all return "2510.00" consistently, regardless of which currency or formatting style the vendor uses.
What happens to the original uploaded invoice document?
It remains attached to the submission permanently. The extracted data fields sit alongside it in the submission view. The reviewer can open the original invoice and check each extracted value directly against the source document before changing the status to Verified. There is no need to print anything, forward the file separately, or regenerate a new document.
Can this run on mobile for field teams handling paper invoices?
The Clappia mobile app on Android and iOS supports camera capture through the same file upload block. A team member photographs a paper invoice, submits, and the extraction workflow runs automatically. If connectivity is limited at the site, offline mode queues the submission and syncs it as soon as a connection is restored.
Can the extracted data feed into systems beyond Google Sheets?
Yes. The REST API Workflow Node connects to any system that accepts HTTP requests, which covers most modern accounting software, ERP platforms, and internal tools. If your system does not have an API, you can export from Google Sheets/Drive manually or use Zapier to connect to it via Clappia's integration.
Accounts payable teams should be reviewing and approving invoices, not transcribing them. The data entry step is mechanical work, and it belongs to an automated workflow, not a person.
With Clappia, this entire setup takes a single working session. The free plan lets you build and test the complete workflow. Once you are satisfied with the extraction accuracy against your real invoice formats, you can scale the team access and submission volume from there.
Start building for free on Clappia and get your first invoice extracted automatically today.
Looking to extend this into a full AP automation system? Read how teams build multi-level invoice approval workflows in Clappia, or explore what the AI Workflow Node can do across other document-heavy use cases in your business.
 Get Started – It’s Free
L374, 1st Floor, 5th Main Rd, Sector 6, HSR Layout, Bengaluru, Karnataka 560102, India
3500 S DuPont Hwy, Dover,
Kent 19901, Delaware, USA


3500 S DuPont Hwy, Dover,
Kent 19901, Delaware, USA
L374, 1st Floor, 5th Main Rd, Sector 6, HSR Layout, Bengaluru, Karnataka 560102, India
.svg)


.jpg)