
.avif)
Facial recognition is no longer limited to surveillance systems or high-end security devices. With AI-powered image analysis now available through cloud platforms, even business apps can use image-based comparisons to verify identity more easily.
This can be useful in several workflows, from confirming who is filling out a mobile form, to verifying access to equipment or logging site visits. With the right setup, Clappia apps can perform simple facial matching between a stored photo and a newly uploaded one using an AI block.
However, it’s important to note that this capability is enabled through general-purpose AI models (LLMs), not a dedicated facial recognition engine. Some models (like Gemini 1.5 Pro) work reliably for this use case, while others like OpenAI’s GPT or Claude may either refuse to process facial data or produce inconsistent results.
For business users looking for a practical, a no-code approach to identity verification without the complexity of integrating external biometric systems provides a useful and scalable workaround.

To understand how this applies in practice, let’s look at a scenario familiar to many operations teams where this capability becomes especially useful such as in attendance verification for field staff.
In industries such as construction, utilities, logistics, and services, field teams play a critical role in day-to-day operations. Businesses need reliable ways to log attendance, confirm on-site presence, and ensure that the right person is in the right place at the right time. This is important not only for HR purposes but also for operational accuracy, safety compliance, and quality assurance.
Traditionally, such verification depends on:

These methods either lack real-time proof, are prone to manipulation, or require expensive hardware infrastructure. So, how do you verify identity in a remote, scalable, mobile-friendly way especially when you’re working across dozens of locations and contractors?
That’s where facial recognition using AI comes in.
And thanks to the latest advancements in AI and image processing, this doesn’t require building a complex system from scratch anymore. You can set up a fully functional facial recognition app right inside a no-code platform like Clappia without needing a separate AI provider, biometric device, or coding knowledge.
Let’s take a common example: field staff attendance.
Let’s say a company manages solar plant installations or generator maintenance across the country. It employs both full-time technicians and on-ground contractors. Every day, employees visit different project sites. But how can the central admin team be sure that the person checking in is actually the one assigned, especially on restricted sites?
A simple facial recognition check within the attendance app helps.
Here’s the core idea:
This doesn’t eliminate the need for GPS or live tracking. It just adds an extra, AI-powered layer of verification that ensures the data being collected is tied to a real person in real time without needing biometric hardware or custom integrations.
Now let’s look at how you can build this exact workflow in Clappia, a no-code platform for creating apps for internal business processes. Apps built in Clappia are mobile-ready by default, meaning field staff can submit data directly from their phones without any additional setup. Access controls are also built in, so you can restrict app usage to specific users or teams.

To get started, all you need to do is sign up > click ‘New App’ from your dashboard and begin adding the necessary fields. Once your app is published, it can be accessed instantly on both desktop and mobile.

From here, we’ll walk through the steps to implement a simple facial recognition flow using Clappia’s built-in blocks.
Before building the attendance app, you’ll first need a central app to store employee records — essentially your Employee MIS.

Key Fields to Include in this app:

This app doesn’t need to be filled regularly. It serves as a read-only reference for the actual attendance app. Ensure that the uploaded photos are current, clear, and standardized (frontal view, no face coverings).
Set field validations to ensure that only one submission per employee ID is allowed, preventing duplicate records.
This is the app where employees will actually mark their attendance using AI facial recognition. You can add any field you need from the list of pre-coded blocks available in Clappia to build this app as per your workflow. For the AI-powered facial recognition to function, there are three essential blocks that must be included

This block allows you to fetch information from another Clappia app, in this case, the Employee MIS app where the official employee photos are stored.
In the block's set up panel:

Once configured, this block will automatically insert the fetched camera field (the stored employee image) into the form.

Since this photo is only used internally by the AI for comparison and doesn’t require any user interaction, you can mark this field as ‘Hidden’ using the Advanced tab of that field.
Label this block something like “Select Employee ID” so users clearly understand what it’s doing.

This block is where the employee will upload a live image, typically by taking a selfie at the time of check-in.
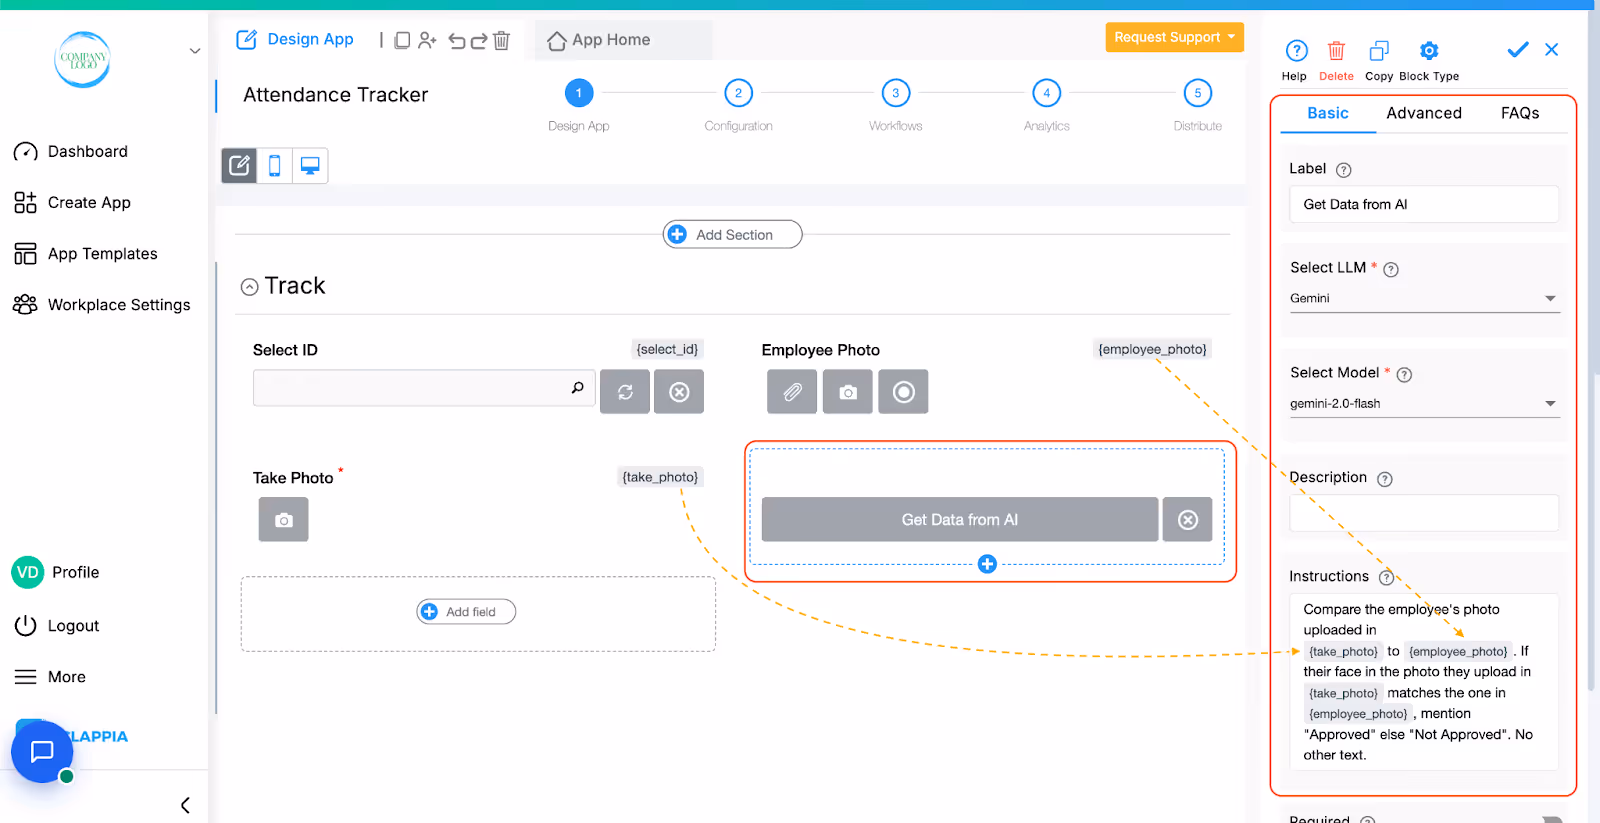
This block performs the face match between the two photos. Here we made use of field variable names to check data in other fields dynamically. To do that simply type @ to pull up a list of fields added to your app and select the right one. It will then be shown in {}.
After the previous two blocks are filled, the AI block processes both images and generates a response based on the prompt you’ve configured.
Ideally, set this block to display only after both camera fields are populated, using Display Conditions in the Advanced tab.
In the set up panel:
You’ll need to give clear instructions in the AI block, specifying how to compare the images and what kind of output to expect.
Not all AI models support facial recognition equally. Based on our internal testing:
We recommend using Gemini and testing with multiple model versions (if available) before finalising your AI Block.

In the right panel > Advanced > “Display this field if”, configure the AI Block to appear only when both camera fields are filled.
This helps prevent users from triggering the AI without first taking the photo or selecting the employee.

To stop users from submitting the form when the facial match fails, you can use a Validation Block.

Add a new Validation Block to your form and in the setup panel:
This is optional but useful when you want to strictly enforce identity verification before allowing submission.
No facial recognition system is perfect especially when using general-purpose AI models. Differences in lighting, facial angles, expression, or even hairstyle can cause a mismatch even if it’s the right person. So it’s important to design your Clappia app to gracefully handle these edge cases.
Rather than completely blocking submissions when a mismatch occurs, you can build a fallback mechanism using Clappia's workflow automation feature. Workflows allow you to automate actions like sending an email based on conditions defined in the submission.
You can use workflows available in Clappia to set it up using an ‘IF’ node (conditional check) followed by an ‘Email’ node to handle flagged submissions.
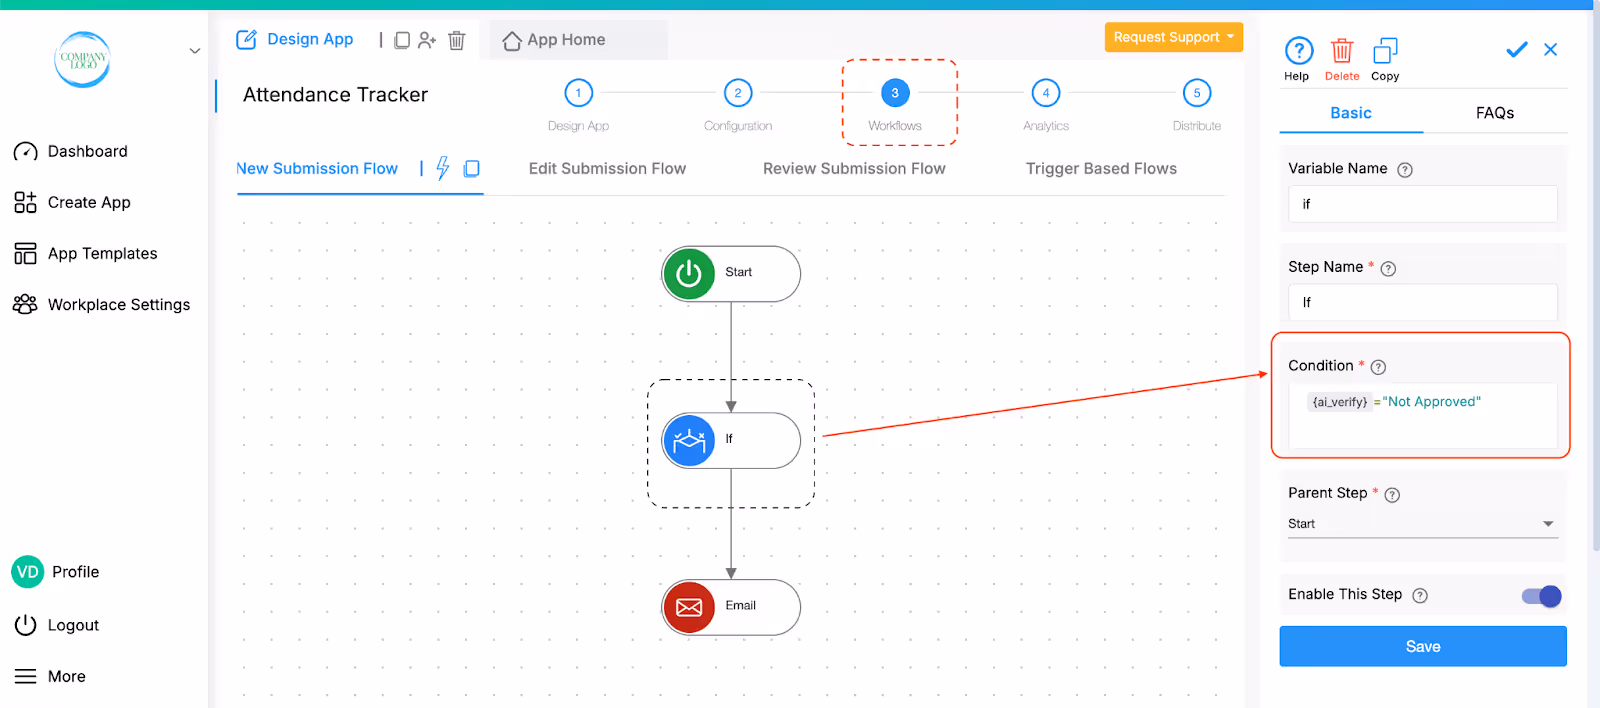
This allows your system to capture mismatches, alert the right people, and ensure follow-up happens without blocking submissions entirely.
Once you’ve built and published the facial recognition app in Clappia, using it is simple for your employees. Here's what the experience looks like from user’s perspective:


All of this happens without any manual intervention, giving users a smooth experience while ensuring that mismatches are still flagged and managed automatically.
Facial recognition in Clappia depends on third-party LLMs like Gemini, which operate via text + image prompts. While this is sufficient for general matching, it has some important limitations:
AI-powered face matching is not always 100% reliable especially in low-light conditions, motion blur, or when network latency causes delays in photo uploads. Instead of blocking the user entirely or routing everything to admin teams, you can build additional input fields into your form as a fallback option.
Here are some suggestions:

These additions won’t replace AI verification but will help the admin or HR team make informed decisions in edge cases
While this guide focused on attendance, facial recognition using AI in Clappia can support a wide range of scenarios:
Each of these use cases can be implemented by adjusting the source app (MIS) and AI prompt while following the same underlying logic.
Once the data is collected, Clappia allows you to visualise and track facial recognition results over time.
You can:
This gives teams not only real-time validation but also visibility into how effective the facial recognition is across locations.
Since facial data is involved, make sure to:
Clappia doesn’t store or train any AI models on the photos. All face matching is done via API calls to third-party models, and the photos are retained only in your own app records.
Facial recognition, once reserved for high-end systems, is now practical even in internal business workflows especially with tools like Clappia. You don’t need to invest in biometric hardware or hire developers. With just a few blocks and the right prompt, you can build a fully functioning identity verification system inside your business apps.
This approach is especially useful for field teams, contractors, or remote employees where trust, traceability, and accountability matter. Whether it’s for attendance, asset handovers, inspections, or restricted access, AI-based face matching adds a layer of assurance.
It’s not meant to replace biometric-grade systems but to give your team a simple, mobile-ready fallback that works with what you already have.
If you’re managing distributed teams or sensitive workflows, this might be the easiest way to introduce smart verification with an app, in just a few clicks.
1. How does Clappia do facial recognition without a biometric system?
Clappia uses general-purpose AI models (LLMs) to compare images, rather than a dedicated biometric engine. This allows you to set up facial recognition workflows without coding or external integrations.
2. How does the app work for end users?
Once the app is assigned to a user, they can log into the Clappia mobile app, open the app assigned to them and simply fill out required details and take a live photo (selfie) using the camera. All facial comparison and logic runs in the background.
3. How reliable is facial recognition using AI?
It depends on the AI model. Gemini (latest versions) provides the most consistent results. OpenAI models often reject facial data. Claude sometimes misses facial differences or fails with major appearance changes.
4. Can it detect fake photos or printouts?
It can, but there could be inaccuracies at times. These models aren’t designed for spoof detection, so accuracy may vary. It’s best to encourage users to upload a live, front-facing selfie in natural lighting.
5. Does this work offline?
No. The AI Block requires a live internet connection to process inputs through cloud-based LLMs.
6. Is the data secure?
Yes. Photos are stored in your app’s database and not accessed by Clappia. Image comparison happens via secure API calls to AI providers. Clappia does not retain any data from the AI output.
7. What if the AI block says that there is a mismatch in facial recognition?
You have several fallback options you can include in your app:
8. Can I include GPS or ID checks too?
Yes. You can combine facial recognition with GPS & geofencing, Live tracking, Manual ID inputs, approvals, etc. These are all standard Clappia blocks and can be added easily to the app.
L374, 1st Floor, 5th Main Rd, Sector 6, HSR Layout, Bengaluru, Karnataka 560102, India
3500 S DuPont Hwy, Dover,
Kent 19901, Delaware, USA


3500 S DuPont Hwy, Dover,
Kent 19901, Delaware, USA
L374, 1st Floor, 5th Main Rd, Sector 6, HSR Layout, Bengaluru, Karnataka 560102, India
.svg)


